

Every gateway ships with a set of built-in policies. Authentication. Rate limiting. Request routing. Prompt guards. These cover most use cases. But what about the ones they don’t cover?
What if you need to add a custom header based on a database lookup? What if you need to transform a request body in a way no existing filter supports? What if your business has unique logic that no off-the-shelf gateway can anticipate?
You build your own extension.
kgateway already includes a built-in rustformation filter that supports Jinja templating. This lab extends that pattern by replacing the default module with a custom one – useful when the built-in templating isn’t sufficient for your specific use case.
This article walks through exactly how to do that using agentgateway, Envoy, and Rust. In this tutorial, you’ll learn how to:
- Build a custom Envoy dynamic module in Rust
- Package it into a production-ready Docker image
- Deploy it to Kubernetes with kgateway and agentgateway
- Test the entire stack with a mock LLM endpoint
- Add a visible custom header to prove the module is working
What you’ll need: Basic familiarity with Kubernetes, Docker, and command-line tools. No prior Rust experience required — I’ll explain the key parts as we go.
Time to complete: About 30-45 minutes.
Cost: Zero. Everything runs locally.
Note on kgateway v2.3: This lab was built and tested with kgateway v2.3.0-rc.1. kgateway v2.3 introduces breaking changes to the Rust dynamic module system. If you’re using an older version, refer to the migration guide in the kgateway repository. The custom header logic (X-Custom-Transformed: true) remains valid and has been ported to the new structure.
Architecture overview
Before diving into code, let’s understand what we’re building.
The lab routes a request through four layers:
- A curl client sends a POST request
agentgateway-proxy(Envoy) receives it- A custom Rust module transforms the request
httpbun(a mock LLM) returns a fake response
text
curl → kgateway-proxy (Envoy) → Rust Module (.so) → httpbun (mock LLM) → response
Here’s the complete architecture:
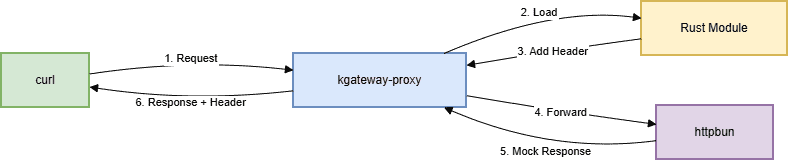
Figure 1: AI Gateway request flow with custom Rust transformation. A curl client sends a request to the kgateway-proxy. A TrafficPolicy with transformation adds X-Custom-Transformed: true and X-Smart-Header to the response. The request forwards to httpbun’s mock LLM, and the response returns through the proxy with the custom headers.
Everything runs locally on your laptop using kind (Kubernetes in Docker). No cloud costs. No API keys. The Rust module can be replaced with any transformation logic you need — the lab just shows the mechanism.
The stack
Here’s what each tool does:
| Tool | Purpose |
| kind | Creates a local Kubernetes cluster on your laptop |
| kgateway | Control plane that manages Envoy and handles Gateway API resources |
| Envoy | The proxy that sits between your client and backend, processing every request |
| Rust | Your custom transformation code, compiled into a shared library that Envoy loads at runtime |
| httpbun | A mock LLM that returns fake responses (no API key required) |
Everything is open source. Everything runs locally. You don’t need to spend a dime to follow along.
Before you start
Make sure you have these tools installed:
- Docker (latest) – Runs containers, including your Kubernetes cluster and the Envoy proxy
- kind (v0.20+) – Creates a local Kubernetes cluster
- kubectl (v1.27+) – Talks to your Kubernetes cluster
- Helm (v3.10+) – Installs kgateway and agentgateway packages
- Rust (1.85+) – Builds the Rust module (optional; you can build inside Docker)
Important: The Rust module requires Rust 1.88 or later. If you encounter build errors with older versions, update your Dockerfile to use rust:1.88.
Create your cluster:
bash
kind create cluster --name ai-gateway-lab
This command spins up a local Kubernetes cluster. All your gateway components will run inside it, isolated from your main system.
Part 1: Install kgateway
- Install Gateway API CRDs
kubectl apply -f https://github.com/kubernetes-sigs/gateway-api/releases/download/v1.4.0/standard-install.yaml2. Install kgateway Control Plane
bash
helm upgrade -i kgateway-crds oci://cr.kgateway.dev/kgateway-dev/charts/kgateway-crds \
  --create-namespace --namespace kgateway-system \
  --version v2.3.0-rc.1

helm upgrade -i kgateway oci://cr.kgateway.dev/kgateway-dev/charts/kgateway \
  --namespace kgateway-system \
  --version v2.3.0-rc.1
What this does: Installs kgateway, the control plane, into your cluster. It runs in the kgateway-system namespace and manages Envoy instances.
Part 2: Deploy httpbun (the Mock LLM)
bash
kubectl apply -f - <<EOF
apiVersion: apps/v1
kind: Deployment
metadata:
  name: httpbun
  namespace: default
spec:
  replicas: 1
  selector:
    matchLabels:
      app: httpbun
  template:
    metadata:
      labels:
        app: httpbun
    spec:
      containers:
      - name: httpbun
        image: sharat87/httpbun
        env:
        - name: HTTPBUN_BIND
          value: "0.0.0.0:3090"
        ports:
        - containerPort: 3090
---
apiVersion: v1
kind: Service
metadata:
  name: httpbun
  namespace: default
spec:
  selector:
    app: httpbun
  ports:
    - protocol: TCP
      port: 3090
      targetPort: 3090
EOF
What this does: Deploys httpbun – a fake OpenAI-compatible LLM. It listens on port 3090 and returns mock responses. No API key needed.
Part 3: Configure kgateway Resources
- Create the backend
bash
kubectl apply -f - <<EOF
apiVersion: gateway.kgateway.dev/v1alpha1
kind: Backend
metadata:
  name: httpbun-backend
  namespace: kgateway-system
spec:
  type: Static
  static:
    hosts:
      - host: httpbun.default.svc.cluster.local
        port: 3090
EOF
2. Create the gateway
bash
kubectl apply -f - <<EOF
apiVersion: gateway.networking.k8s.io/v1
kind: Gateway
metadata:
  name: ai-gateway
  namespace: kgateway-system
spec:
  gatewayClassName: kgateway
  listeners:
    - name: http
      protocol: HTTP
      port: 8080
      allowedRoutes:
        namespaces:
          from: All
EOF
3. Create the HTTPRoute with URL Rewrite
bash
kubectl apply -f - <<EOF
apiVersion: gateway.networking.k8s.io/v1
kind: HTTPRoute
metadata:
  name: httpbun-route
  namespace: kgateway-system
spec:
  parentRefs:
    - name: ai-gateway
      namespace: kgateway-system
  rules:
    - matches:
        - path:
            type: PathPrefix
            value: /v1/chat/completions
      filters:
        - type: URLRewrite
          urlRewrite:
            path:
              type: ReplaceFullPath
              replaceFullPath: /llm/chat/completions
      backendRefs:
        - name: httpbun-backend
          namespace: kgateway-system
          group: gateway.kgateway.dev
          kind: Backend
EOF
Why URLRewrite?: httpbun expects the path /llm/chat/completions, but the OpenAI API standard uses /v1/chat/completions. The URLRewrite filter transparently transforms the path so clients can use the standard endpoint.
Why ExtensionRef?: This links the HTTPRoute to a TrafficPolicy that applies custom header transformations.
Part 4: The Rust module
The Rust code is split into two crates:
- rustformations – The main Envoy filter that contains your transformation logic
- transformations – A helper library that provides Jinja templating and shared transformation traits
Project Structure
├text
rust/
├── rustformations/
│ ├── Cargo.toml
│ └── src/
│ ├── lib.rs # Registers the filter with Envoy
│ └── http_simple_mutations.rs # Your actual transformation logic
└── transformations/
├── Cargo.toml
└── src/
├── lib.rs # Defines transformation traits
└── jinja.rs # Jinja templating for dynamic transformations
The Transformation Logic
The key addition that demonstrates the module is working:
rust
// In your custom Rust filter (registered as "my-smart-header")
// File: internal/envoyinit/rustformations/src/http_simple_mutations.rs
fn on_response_headers(
    &mut self,
    envoy_filter: &mut EHF,
    end_of_stream: bool,
) -> abi::envoy_dynamic_module_type_on_http_filter_response_headers_status {
    // ... existing code ...
    envoy_log_trace!("on_response_headers");
    // ADD THIS: Custom header to prove the Rust module is working
    self.set_response_header("X-Custom-Transformed", b"true");
    // ... rest of the function
}
This single line adds X-Custom-Transformed: true to every response, providing visible proof that your custom module is loaded and executing.
Building the Module
bash
cd rust/rustformations
cargo build --release
The module compiles to librust_module.so, which envoy loads at runtime.
Part 5: The Docker Image
We need to package Envoy with our Rust module into a single Docker image. This Dockerfile uses a multi-stage build to keep the final image small.
dockerfile
# Stage 1: Build the Rust module
FROM rust:1.88 AS builder
WORKDIR /build

RUN apt-get update && apt-get install -y clang

COPY rust/ ./rust/
WORKDIR /build/rust/rustformations
RUN cargo build --release

# Stage 2: Final Envoy image
FROM envoyproxy/envoy:v1.36.4

COPY --from=builder /build/rust/rustformations/target/release/librust_module.so /usr/local/lib/
ENV ENVOY_DYNAMIC_MODULES_SEARCH_PATH=/usr/local/lib
COPY envoy.yaml /etc/envoy/envoy.yaml

CMD ["envoy", "-c", "/etc/envoy/envoy.yaml"]
Build the image
bash
docker build -t envoy-wrapper:latest -f Dockerfile .
Loading the Image into Kind
bash
kind load docker-image envoy-wrapper:latest --name ai-gateway-lab
Part 6: Deploying the Custom Envoy Image
To deploy your custom image without kgateway’s controller reverting changes, use GatewayParameters:
yaml
apiVersion: gateway.kgateway.dev/v1alpha1
kind: GatewayParameters
metadata:
  name: custom-envoy
  namespace: kgateway-system
spec:
  kube:
    envoyContainer:
      image:
        registry: ""          # Empty = use local images
        repository: envoy-wrapper
        tag: latest
        pullPolicy: IfNotPresent
Apply and link to your Gateway:
bash
kubectl apply -f gatewayparams.yaml
kubectl patch gateway ai-gateway -n kgateway-system --type='json' -p='[{"op": "add", "path": "/spec/infrastructure", "value": {"parametersRef": {"name": "custom-envoy", "group": "gateway.kgateway.dev", "kind": "GatewayParameters"}}}]'
Part 7: Create the TrafficPolicy for Custom Headers
Create a TrafficPolicy that adds custom headers to the response:
bash
kubectl apply -f - <<EOF
apiVersion: gateway.kgateway.dev/v1alpha1
kind: TrafficPolicy
metadata:
  name: my-smart-header-filter
  namespace: kgateway-system
spec:
  targetRefs:
    - group: gateway.networking.k8s.io
      kind: HTTPRoute
      name: httpbun-route
  transformation:
    response:
      set:
        - name: X-Custom-Transformed
          value: "true"
        - name: X-Smart-Header
          value: "method=%REQ(:METHOD)%&path=%REQ(:PATH)%"
EOF
This TrafficPolicy:
- Adds X-Custom-Transformed: true (static proof)
- Adds X-Smart-Header with dynamic request method and path
Part 8: Testing the Complete Stack
- Port-forward the gateway
bash
kubectl port-forward -n kgateway-system svc/ai-gateway 8082:8080
What this does: Forwards traffic from your laptop’s port 8082 to the gateway pod running in Kubernetes. This lets you test locally as if you were outside the cluster.
2. Send a Test Request with Verbose Output
bash
curl.exe -v -X POST http://localhost:8082/v1/chat/completions \
  -H "Content-Type: application/json" \
  -d '{\"model\":\"gpt-4\",\"messages\":[{\"role\":\"user\",\"content\":\"Hello\"}]}
3. Expected response
http
< HTTP/1.1 200 OK
< content-type: application/json
< x-custom-transformed: true
< x-smart-header: method=POST&path=/v1/chat/completions
< server: envoy
<
{
  "choices": [
    {
      "finish_reason": "stop",
      "index": 0,
      "message": {
        "content": "This is a mock chat response from httpbun. I received your messages and I'm responding with this placeholder text.",
        "role": "assistant"
      }
    }
  ],
  "created": 1777815746,
  "id": "chatcmpl-b4c10e5dd83335c4b59656d3",
  "model": "gpt-4",
  "object": "chat.completion",
  "usage": {
    "completion_tokens": 29,
    "prompt_tokens": 3,
    "total_tokens": 32
  }
}
Look for X-Custom-Transformed: true – this proves your Rust module is working!
The X-Smart-Header shows dynamic data extraction from the request.
Troubleshooting Common Issues
| Issue | Solution |
| ImagePullBackOff on custom image | Load image with kind load docker-image and set pullPolicy: IfNotPresent and registry: “” in GatewayParameters |
| Rust version mismatch | Update Dockerfile to use rust:1.88 instead of rust:1.85 |
| Gateway controller reverts image changes | Use GatewayParameters instead of direct deployment edit |
| 404 page not found | Add URLRewrite filter to transform /v1/chat/completions → /llm/chat/completions |
| BackendRef port error | Remove port from backendRefs when using kind: Backend |
| kgateway.exe causing large git pushes | Add to .gitignore and use git rm –cached |
Next steps: Production and real LLMs
This lab uses httpbun as a mock. To use a real LLM:
- Get an API key from OpenAI, Anthropic, or Gemini
- Create a Kubernetes secret with your key
- Update the AgentgatewayBackend to use the real host and authentication
yaml
apiVersion: gateway.kgateway.dev/v1alpha1
kind: Backend
metadata:
  name: openai
  namespace: kgateway-system
spec:
  type: AI
  ai:
    llm:
      provider:
        openai:
          model: gpt-4
      hostOverride:
        host: api.openai.com
        port: 443
  policies:
    auth:
      secretRef:
        name: openai-secret
For production, also add:
- Authentication (API keys, JWT, or mTLS)
- Rate limiting to control costs
- Observability (metrics, logs, tracing)
- Deploy to a real Kubernetes cluster (EKS, GKE, or AKS)
agentgateway supports all of these through its policy CRDs.
Complete code
Everything is on GitHub: Lab link
The repo includes:
- All Kubernetes manifests
- Complete Rust source code
- Multi-stage Dockerfile
- Quick start README
You can clone it and run the entire lab in about 10 minutes.
Final thoughts
Building this lab taught me three things:
- Extending kgateway with Rust is powerful – The Rust module can do anything envoy’s APIs allow. The SDK must match Envoy exactly. The Rust version must support your dependencies. One version mismatch and everything breaks.
- The filter_config format is not obvious. The protobuf wrapper is documented, but easy to miss. I spent hours on this error before finding the solution in the docs.
- Starting with a mock LLM saves time and money. httpbun let me focus on the gateway, not the AI provider. I could test everything locally without worrying about API keys or costs.
If you’re building on agentgateway and need a capability that doesn’t exist yet, you now know how to build it yourself.
Questions? Find me on GitHub.
Special thanks to Art Berger, Andy Fong, and the kgateway community for their guidance and encouragement.