


In the previous post , we introduced KubeVirtBMC and showed how it provides virtual BMC endpoints for KubeVirt VMs. We tested it with raw IPMI and Redfish commands. That was fun, but the real power of KubeVirtBMC shines when you pair it with actual bare-metal provisioning tools.
In this post, we’ll walk through a complete end-to-end demo: using Metal3 to manage and provision KubeVirt VMs through KubeVirtBMC, just as if they were physical servers. You’ll be able to follow along and replicate every step.
Why Metal3?
Metal3 (Metal Kubed) is a CNCF Incubating project that brings bare-metal host management into the Kubernetes ecosystem. Under the hood, it uses OpenStack Ironic to handle the heavy lifting, inspecting hardware, setting boot devices, and writing OS images to disks.
The core abstraction is the BareMetalHost custom resource. You declare what you want (BMC address, credentials, desired image), and Metal3 takes care of the rest. The typical BareMetalHost lifecycle goes like this:
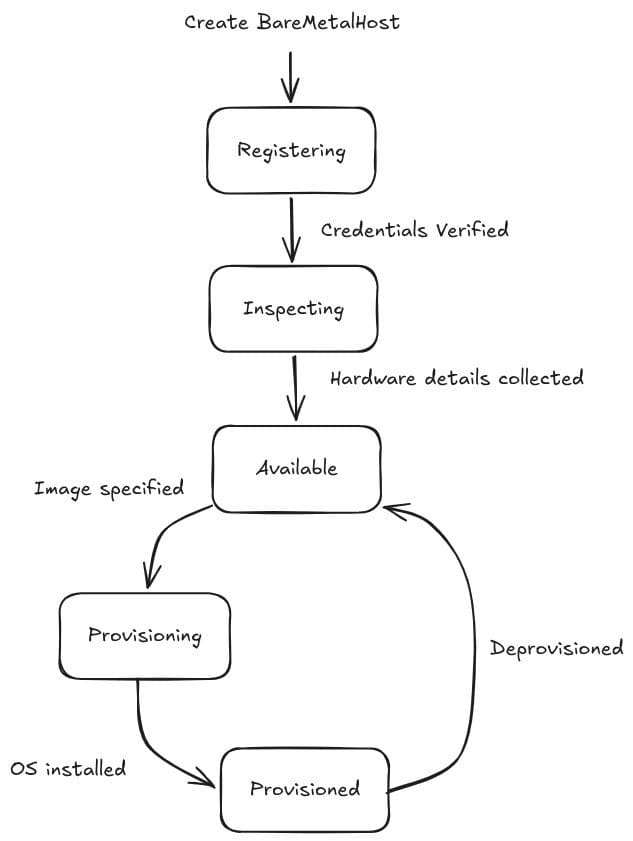
Metal3 expects to talk to a BMC via IPMI or Redfish. Physical servers have these built in. KubeVirt VMs don’t—unless you give them one with KubeVirtBMC.
What We’re Building
Here’s a high-level overview of the demo environment:
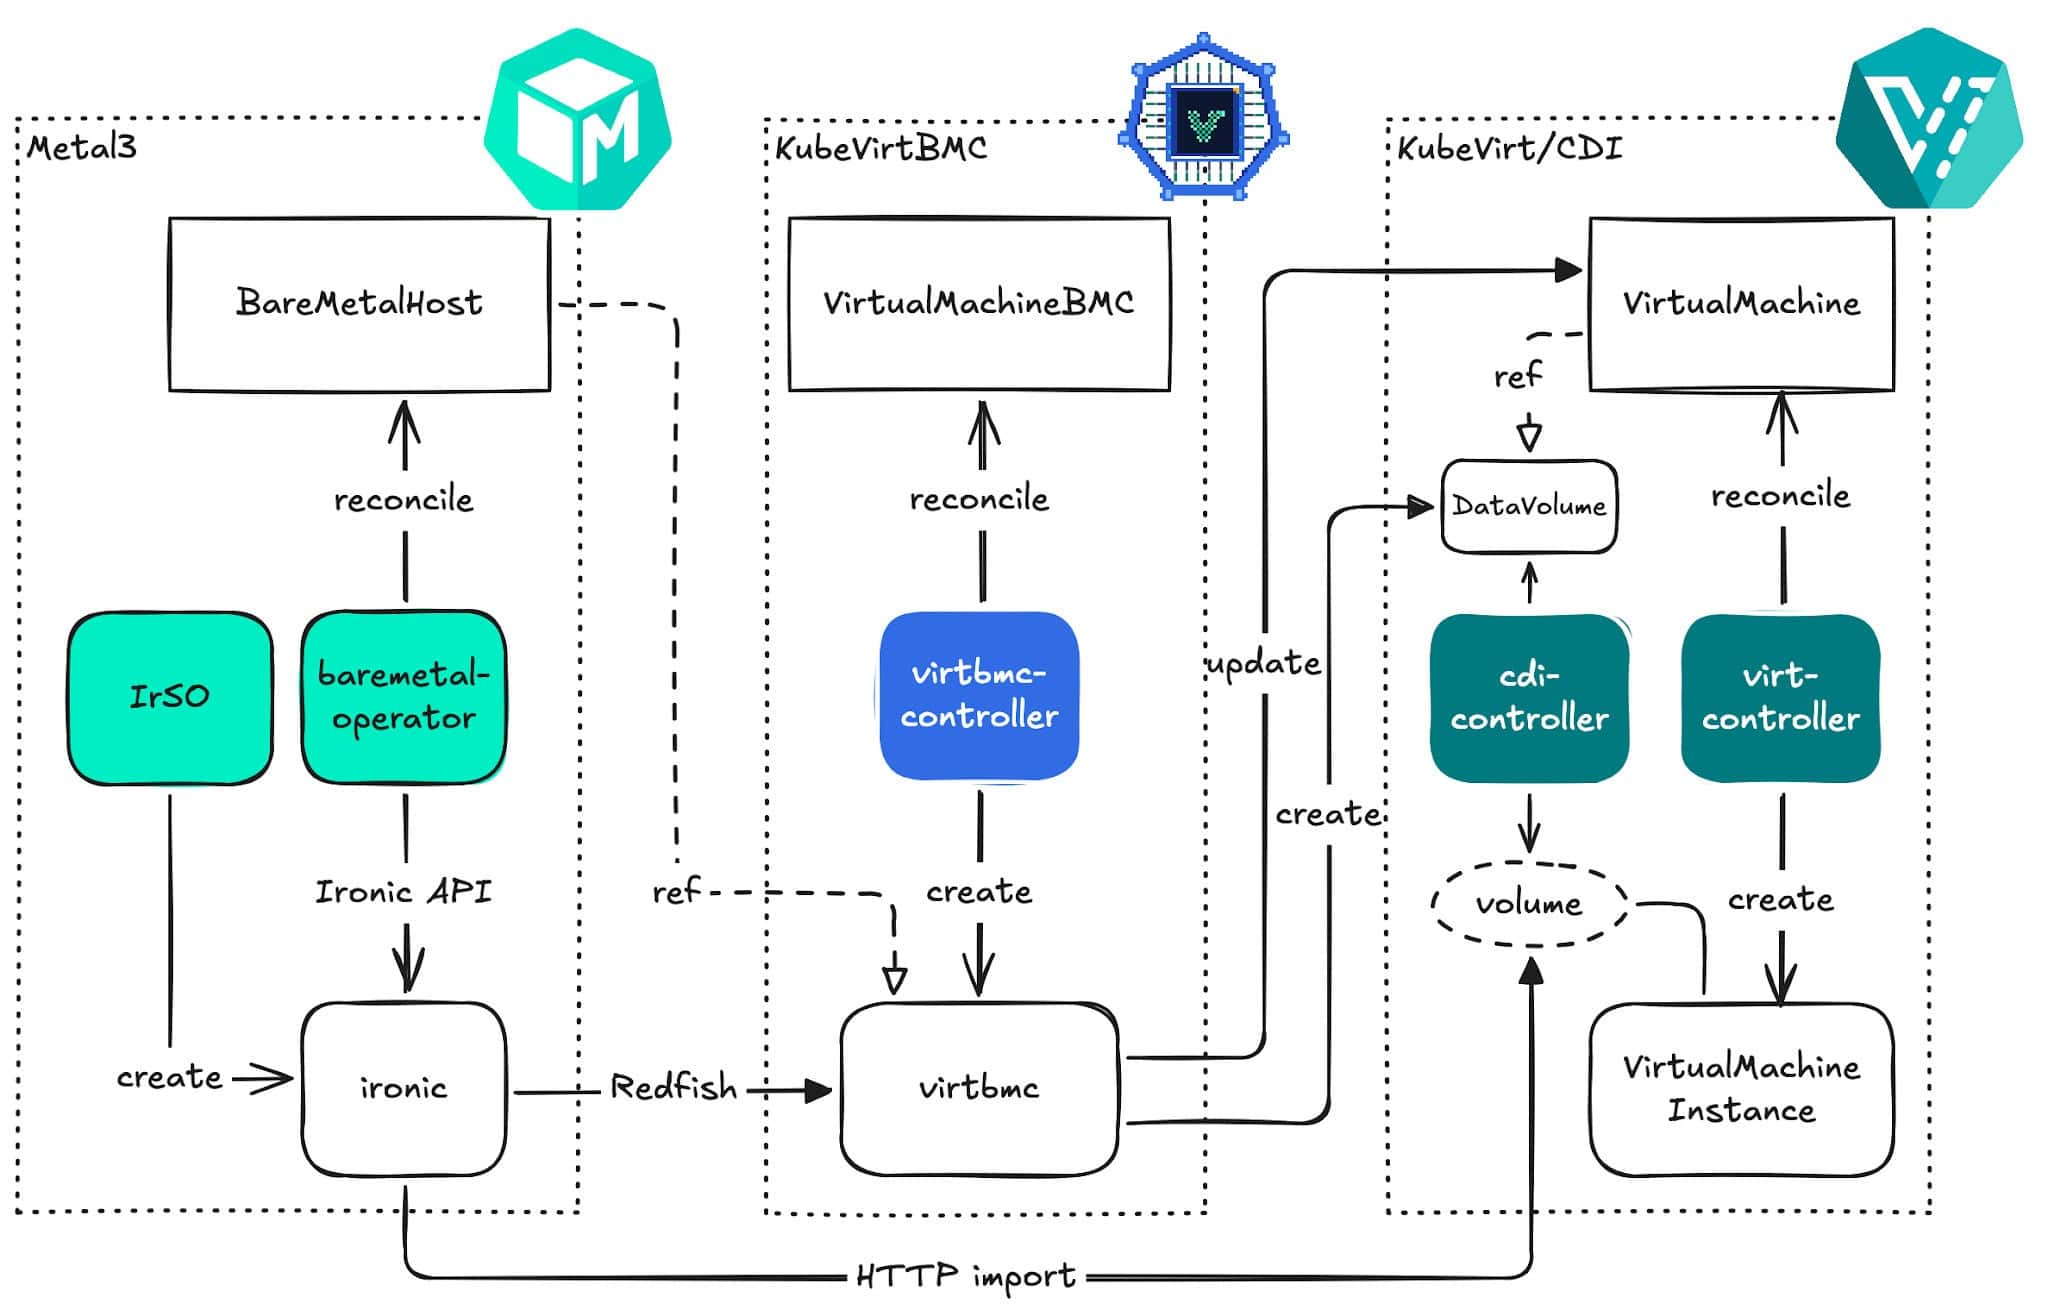
Everything runs in a single Kubernetes cluster. Metal3 manages BareMetalHost resources that point to the virtual BMC endpoints created by KubeVirtBMC. When Metal3 tells Ironic to power on a host or attach a boot image, Ironic sends Redfish requests to the BMC pod. The BMC pod translates these into Kubernetes API calls to control the KubeVirt VM. Metal3 doesn’t know (or care) that it’s talking to a VM.
Prerequisites
Before we start, make sure you have:
- A Kubernetes cluster with virtualization support (nested virtualization or bare metal)
- KubeVirt installed and functional
- A storage provider (for VM disks)
- kubectl, helm, and kustomize installed locally
If you don’t have a cluster ready, refer to the previous post for instructions on setting one up with KubeVirt CI, or simply using Harvester.
Step 1: Install cert-manager
Both KubeVirtBMC and Metal3 components require cert-manager for webhook certificates.
helm upgrade --install cert-manager oci://quay.io/jetstack/charts/cert-manager \
    --namespace=cert-manager \
    --create-namespace \
    --set=crds.enabled=true
Step 2: Install KubeVirtBMC
helm upgrade --install kubevirtbmc kubevirtbmc \
    --repo=https://charts.kubevirtbmc.io \
    --namespace=kubevirtbmc-system \
    --create-namespace
Verify:
$ kubectl get pods -n kubevirtbmc-system
NAME                                      READY   STATUS    RESTARTS   AGE
kubevirtbmc-controller-manager-xxxxx      1/1     Running   0          30s
Step 3: Create a KubeVirt VM with BMC
We’ll create a VM that simulates a bare-metal server. It needs a disk, a network interface, and it should start in a powered-off state so that Metal3 can manage its lifecycle from scratch.
Create a PVC for the VM’s root disk:
cat <<EOF | kubectl apply -f -
apiVersion: v1
kind: PersistentVolumeClaim
metadata:
  name: metal3-demo-vm-disk
  namespace: default
spec:
  accessModes:
  - ReadWriteOnce
  resources:
    requests:
      storage: 20Gi
EOF
Create the VirtualMachine with runStrategy: Halted so it stays powered off:
cat <<EOF | kubectl apply -f -
apiVersion: kubevirt.io/v1
kind: VirtualMachine
metadata:
  name: metal3-demo-vm
  namespace: default
spec:
  runStrategy: Halted
  template:
    spec:
      domain:
        cpu:
          cores: 4
        memory:
          guest: 8Gi
        devices:
          disks:
          - name: rootdisk
            disk:
              bus: virtio
          - name: cdrom
            cdrom:
              bus: sata
          interfaces:
          - name: default
            macAddress: "02:00:00:00:00:01"
            bridge: {}
        firmware:
          bootloader:
            efi:
              secureBoot: false
      networks:
      - name: default
        pod: {}
      volumes:
      - name: rootdisk
        persistentVolumeClaim:
          claimName: metal3-demo-vm-disk
EOF
A few things worth noting:
- runStrategy: Halted keeps the VM off. Metal3 will power it on when it’s ready.
- We include a cdrom device so that KubeVirtBMC can attach virtual media (ISO images) via Redfish later.
- We explicitly set macAddress: “02:00:00:00:00:01” on the interface. This is important because Metal3 requires a bootMACAddress for each BareMetalHost, and it must match an actual NIC on the machine. By pinning the MAC address here, we avoid the hassle of discovering a randomly generated one.
- We use BIOS firmware for simplicity. You can switch to UEFI if your provisioning image requires it.
Now create the VirtualMachineBMC and its credential Secret:
cat <<EOF | kubectl apply -f -
apiVersion: v1
kind: Secret
metadata:
  name: demo-bmc-secret
  namespace: default
stringData:
  username: admin
  password: password
---
apiVersion: bmc.kubevirt.io/v1beta1
kind: VirtualMachineBMC
metadata:
  name: demo-bmc
  namespace: default
spec:
  virtualMachineRef:
    name: metal3-demo-vm
  authSecretRef:
    name: demo-bmc-secret
EOF
Wait for the BMC to be ready and grab its ClusterIP:
kubectl wait --for=condition=Ready virtualmachinebmcs demo-bmc
--timeout=60s
$ kubectl get virtualmachinebmcs demo-bmc
NAME VIRTUALMACHINE SECRET CLUSTERIP READY
demo-bmc metal3-demo-vm demo-bmc-secret 10.96.xxx.xxx TrueTake note of the Service name:
$ kubectl get services -l kubevirt.io/virtualmachinebmc-name=demo-bmc
NAME                     TYPE        CLUSTER-IP      EXTERNAL-IP   PORT(S)          AGE
metal3-demo-vm-virtbmc   ClusterIP   10.96.xxx.xxx   <none>        80/TCP,623/UDP   58s
The BMC service is accessible at metal3-demo-vm-virtbmc.default.svc.cluster.local within the cluster.
Step 4: Install the Metal3 Stack
Metal3 consists of two main components: the Bare Metal Operator (BMO) and Ironic. We’ll use the Ironic Standalone Operator (IrSO) to deploy Ironic, which is the recommended approach for new installations.
Install the Ironic Standalone Operator
Install IrSO from the bleeding-edge build, as the ironic.spec.networking.disableHostNetwork field had only recently been introduced at the time of writing and was not yet included in a release.
git clone https://github.com/metal3-io/ironic-standalone-operator.git
cd ironic-standalone-operator
make install deploy

kubectl -n ironic-standalone-operator-system wait --for=condition=Available \
    deploy/ironic-standalone-operator-controller-manager \
    --timeout=120s
Deploy Ironic
We’ll follow the Metal3 quickstart pattern and use a kustomization to deploy both Ironic and BMO together. First, create the namespace and the required TLS certificates:
kubectl create ns baremetal-operator-systemWe need a TLS certificate for Ironic. Create self-signed certificates using cert-manager:
Apply the cert-manager resources
cat <<EOF | kubectl apply -f -
apiVersion: cert-manager.io/v1
kind: Issuer
metadata:
  name: selfsigned-issuer
  namespace: baremetal-operator-system
spec:
  selfSigned: {}
---
apiVersion: cert-manager.io/v1
kind: Certificate
metadata:
  name: ironic-cacert
  namespace: baremetal-operator-system
spec:
  commonName: ironic-ca
  isCA: true
  issuerRef:
    kind: Issuer
    name: selfsigned-issuer
  secretName: ironic-cacert
---
apiVersion: cert-manager.io/v1
kind: Issuer
metadata:
  name: ca-issuer
  namespace: baremetal-operator-system
spec:
  ca:
    secretName: ironic-cacert
---
apiVersion: cert-manager.io/v1
kind: Certificate
metadata:
  name: ironic-cert
  namespace: baremetal-operator-system
spec:
  secretTemplate:
    labels:
      environment.metal3.io/ironic-standalone-operator: "true"
  dnsNames:
  - ironic.baremetal-operator-system.svc
  - ironic.baremetal-operator-system.svc.cluster.local
  issuerRef:
    kind: Issuer
    name: ca-issuer
  secretName: ironic-cert
EOF
In addition to TLS certificates, a set of credentials should be created to protect the API endpoints. Otherwise, random credentials will be generated automatically when the Ironic custom resource is created. For simplicity, we will create them explicitly here:
Apply the credentials Secret
cat <<EOF | kubectl apply -f -
apiVersion: v1
kind: Secret
metadata:
  labels:
    environment.metal3.io/ironic-standalone-operator: "true"
  name: ironic-credentials
  namespace: baremetal-operator-system
type: kubernetes.io/basic-auth
stringData:
  username: ironic
  password: supersecret
EOF
Now create the Ironic custom resource. Since we’re doing virtual media-based provisioning (no PXE/DHCP needed), the configuration is minimal:
Apply the Ironic resource
cat <<EOF | kubectl apply -f -
apiVersion: ironic.metal3.io/v1alpha1
kind: Ironic
metadata:
  name: ironic
  namespace: baremetal-operator-system
spec:
  apiCredentialsName: ironic-credentials
  networking:
    disableHostNetwork: true
  tls:
    certificateName: ironic-cert
    disableVirtualMediaTLS: true
  version: "37.0"
EOF
One thing to note is that .spec.tls.disableVirtualMediaTLS must be set to true, as we do not want dynamically generated images to be hosted on a TLS-protected HTTP server. At the time of writing, neither KubeVirtBMC nor CDI, the underlying component used by KubeVirtBMC for volume preparation, can properly handle the certificates Ironic created or skip certificate verification.
IrSO will use the API credentials you provided or auto-generate ones and create the Ironic pod. Wait for it to become ready:
kubectl -n baremetal-operator-system wait --for=condition=Ready \
    ironic/ironic \
    --timeout=300s
Note: We don’t configure DHCP or a provisioning network here. For this demo, we rely on Redfish virtual media: Ironic attaches boot images through the Redfish API rather than PXE booting, so a dedicated provisioning network is not required.
Install the Bare Metal Operator
Clone the baremetal-operator repository and deploy BMO:
git clone https://github.com/metal3-io/baremetal-operator.git
cd baremetal-operator
Create a kustomization that points BMO to the in-cluster Ironic. The recommended approach from the Metal3 quickstart uses a kustomization overlay:
Configure the BMO overlay
mkdir -p config/overlays/kubevirtbmc-demo

cat > config/overlays/kubevirtbmc-demo/kustomization.yaml <<EOF
apiVersion: kustomize.config.k8s.io/v1beta1
kind: Kustomization
namespace: baremetal-operator-system
resources:
- ../../default
components:
- ../../components/basic-auth
- ../../components/tls
EOF

# Configure the Ironic connection
cat > config/default/ironic.env <<EOF
DEPLOY_KERNEL_URL=
DEPLOY_RAMDISK_URL=
IRONIC_ENDPOINT=https://ironic.baremetal-operator-system.svc
IRONIC_CACERT_FILE=/opt/metal3/certs/ca/tls.crt
IRONIC_INSECURE=false
EOF
Deploy BMO:
kustomize build config/overlays/kubevirtbmc-demo | kubectl apply -f -

kubectl -n baremetal-operator-system wait --for=condition=Available \
    deploy/baremetal-operator-controller-manager \
    --timeout=120s
Verify that all Metal3 components are running:
$ kubectl get pods -n baremetal-operator-system
NAME                                                      READY   STATUS    RESTARTS   AGE
baremetal-operator-controller-manager-xxxxx               1/1     Running   0          60s
ironic-service-xxxxx                                      4/4     Running   0          2m
Step 5: Register the VM as a BareMetalHost
This is where the magic happens. We create a BareMetalHost resource that points to the KubeVirtBMC endpoint. Metal3 doesn’t know it’s talking to a virtual BMC, it just sees a standard Redfish interface.
cat <<EOF | kubectl apply -f -
apiVersion: v1
kind: Secret
metadata:
  name: metal3-demo-vm-bmc-secret
  namespace: default
stringData:
  username: admin
  password: password
---
apiVersion: metal3.io/v1alpha1
kind: BareMetalHost
metadata:
  name: metal3-demo-vm
  namespace: default
spec:
  online: true
  bootMACAddress: "02:00:00:00:00:01"
  bmc:
    address: redfish-virtualmedia+http://metal3-demo-vm-virtbmc.default.svc.cluster.local:80/redfish/v1/Systems/1
    credentialsName: metal3-demo-vm-bmc-secret
    disableCertificateVerification: true
  rootDeviceHints:
    deviceName: /dev/vda
EOF
A few important details on the bmc.address field:
redfish-virtualmediatells Ironic to use the Redfish driver with virtual media support (ISO boot instead of PXE). See the supported hardware page for all available driver types.+httpexplicitly selects plain HTTP because the BMC pod does not serve HTTPS by default. HTTPS can be enabled through an Ingress resource, but HTTP is used here for simplicity. Without the+httpsuffix, Ironic defaults to HTTPS, causing the connection to fail.- The host portion
metal3-demo-vm-virtbmc.default.svc.cluster.local:80is the in-cluster Service created by KubeVirtBMC. /redfish/v1/Systems/1is the Redfish system path that KubeVirtBMC exposes.
Note that bootMACAddress matches the MAC address 02:00:00:00:00:01 we pinned on the VirtualMachine interface in Step 3.
Watch the BareMetalHost go through its lifecycle:
$ kubectl get bmh metal3-demo-vm -w
NAME             STATE          CONSUMER   ONLINE   ERROR   AGE
metal3-demo-vm   registering                true             5s
metal3-demo-vm   inspecting                 true             30s
metal3-demo-vm   preparing                  true             9m30s
metal3-demo-vm   available                  true             9m31s
During registering, Ironic verifies the BMC credentials by sending a Redfish request to the KubeVirtBMC endpoint. During inspecting, Ironic boots the IPA (Ironic Python Agent) ramdisk on the VM via virtual media to gather hardware details like CPU, RAM, disk, and NIC information. Once inspection completes, the host becomes available and ready for provisioning.
You can inspect the discovered hardware inventory:
kubectl get bmh metal3-demo-vm -o
jsonpath='{.status.hardware}'
Step 6: Provision the Host with an OS Image
Now let’s provision the VM with an actual OS image. We’ll use the live-iso approach, which tells Ironic to boot the host from an ISO image via virtual media. This mode is designed for integrating with site-specific installers—Metal3 simply boots the ISO and leaves the installation to whatever process runs inside it.
kubectl patch bmh metal3-demo-vm --type=merge -p '
{
  "spec": {
    "image": {
      "url": "https://releases.ubuntu.com/resolute/ubuntu-26.04-live-server-amd64.iso",
      "format": "live-iso"
    }
  }
}'
Note: The live-iso format does not require a checksum, Metal3 does not enforce checksums for live-iso images.
If you prefer to write a disk image directly (the typical Metal3 workflow), use a qcow2 or raw image with a checksum instead:
kubectl patch bmh metal3-demo-vm --type=merge -p '
{
 "spec": {
   "image": {
     "url": "https://cloud-images.ubuntu.com/resolute/current/resolute-server-cloudimg-amd64.img",
     "checksum": "https://cloud-images.ubuntu.com/resolute/current/SHA256SUMS",
     "checksumType": "auto",
     "format": "qcow2"
   }
 }
}'
Watch the provisioning progress:
$ kubectl get bmh metal3-demo-vm -w
NAME             STATE          CONSUMER   ONLINE   ERROR   AGE
metal3-demo-vm   provisioning              true             5m
metal3-demo-vm   provisioned               true             12m
Behind the scenes, here’s what happens:
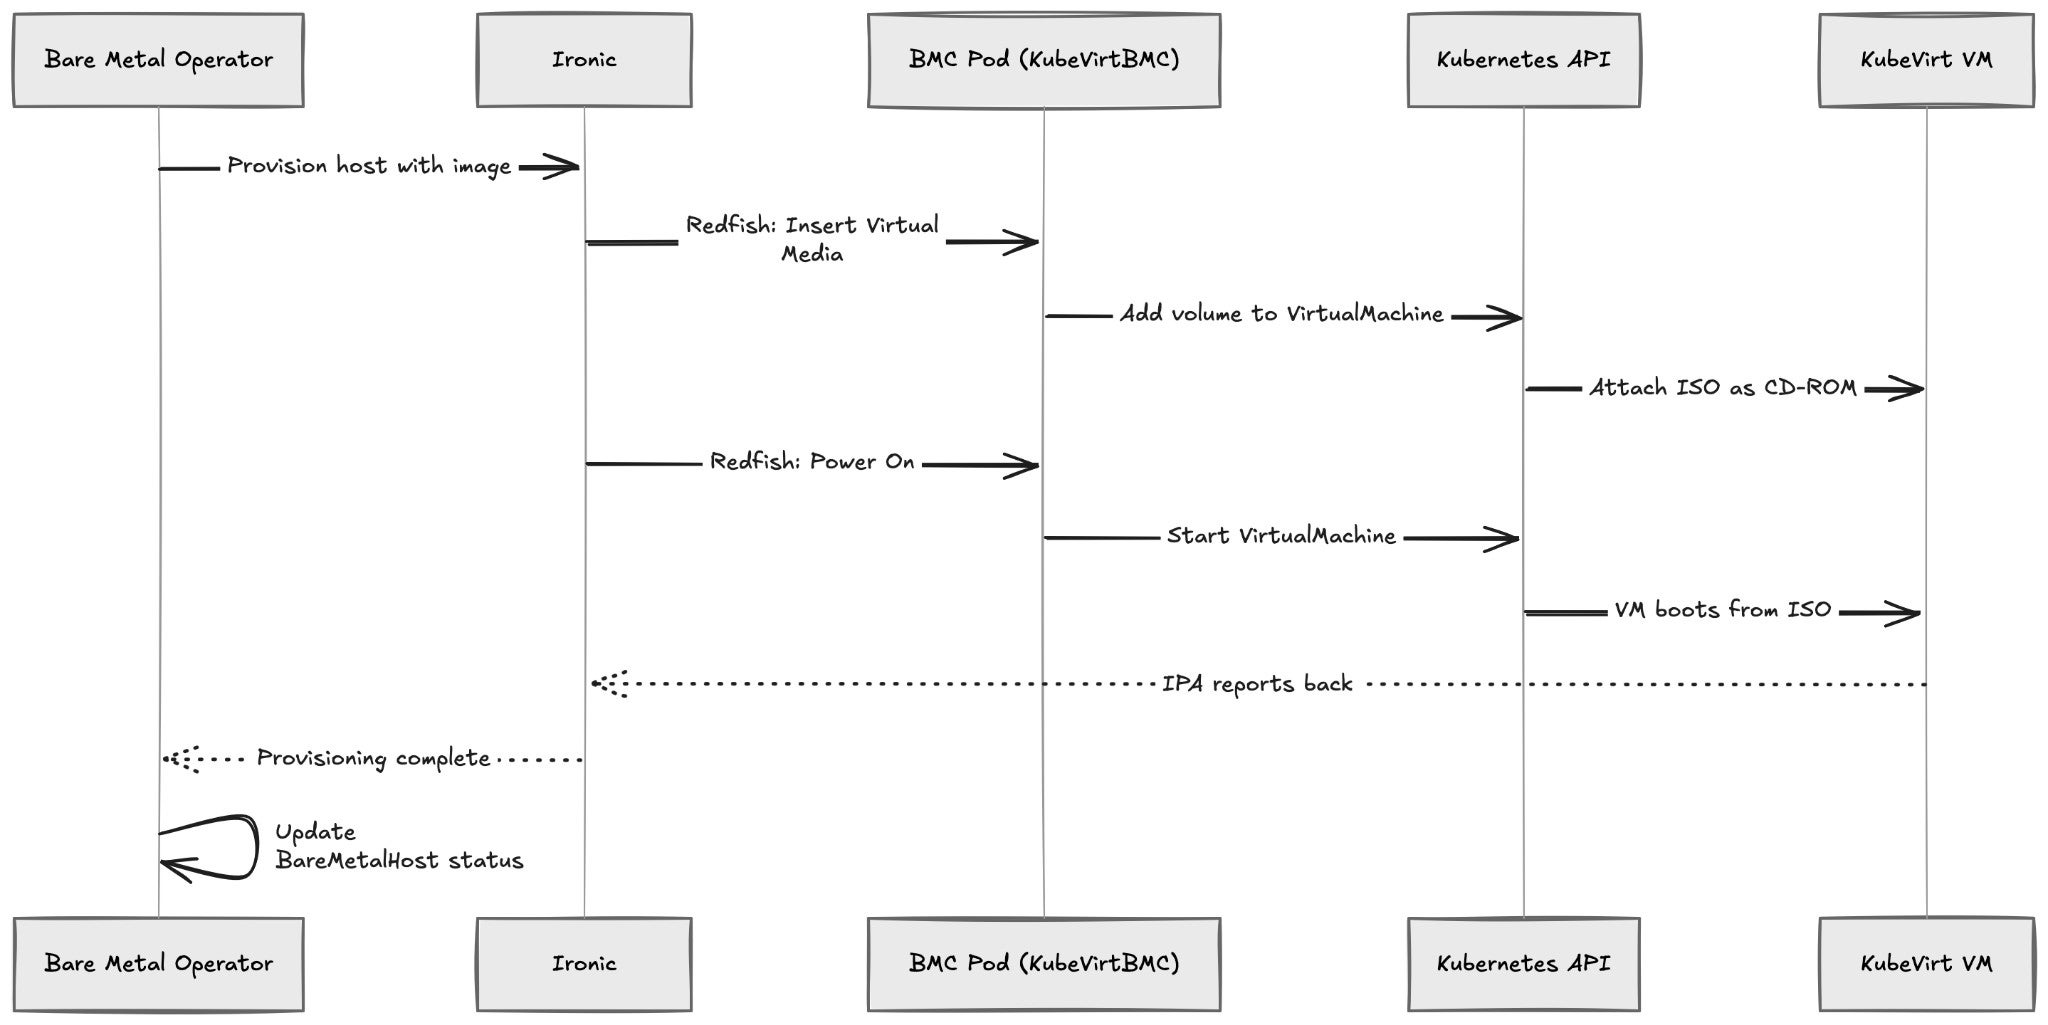
The entire flow is transparent. Metal3 and Ironic use standard Redfish calls. KubeVirtBMC translates them into Kubernetes API operations on the VirtualMachine resource. KubeVirt handles the actual VM lifecycle.
Step 7: Verify and Clean Up
Check the final state:
$ kubectl get bmh
NAME             STATE         CONSUMER   ONLINE   ERROR   AGE
metal3-demo-vm   provisioned              true             15m

$ kubectl get vm
NAME             AGE   STATUS    READY
metal3-demo-vm   20m   Running   True
To deprovision (wipe the host and return it to the available pool):
kubectl patch bmh metal3-demo-vm --type=json \
   -p '[{"op": "remove", "path": "/spec/image"}]'
To clean up everything:
kubectl delete bmh metal3-demo-vm
kubectl delete virtualmachinebmc demo-bmc
kubectl delete secret demo-bmc-secret metal3-demo-vm-bmc-secret
kubectl delete vm metal3-demo-vm
kubectl delete pvc metal3-demo-vm-disk
Gotchas and Tips
There are a few things that might trip you up when working with this setup:
- MAC address mismatch. The
bootMACAddressin BareMetalHost must match an actual interface on the VM. That’s why we pinned it to02:00:00:00:00:01in the VirtualMachine spec. If you forget this, KubeVirt generates a random MAC and Ironic won’t be able to match the host during inspection. - HTTP vs HTTPS. KubeVirtBMC serves Redfish over plain HTTP by default. Make sure to use
redfish-virtualmedia+http://in the BMC address. Without the+httpsuffix, Ironic defaults to HTTPS and the connection will fail during registration. - Virtual media vs network boot. The
redfish-virtualmediadriver boots the IPA ramdisk and provisioning images via virtual media (ISO attachment), which means no PXE, no DHCP, and no provisioning network is required. If you use theredfishdriver (withoutvirtualmedia), you’ll need to set up DHCP and configure Ironic’s networking section accordingly (we’ll talk about that part in a future post). - Ironic host networking. By default, IrSO deploys Ironic with host networking enabled. The Ironic pod must be reachable from the IPA ramdisk running inside the VMs. If everything is running in a single cluster, this should work out of the box. In this article, we disable host networking solely for demonstration purposes, allowing us to rely on in-cluster DNS to resolve the Ironic service and route traffic to the underlying Ironic pod. In more complex network topologies, you may need to adjust the Ironic networking configuration.
- Cross-cluster scenarios. If Metal3 runs in a different cluster than KubeVirt, you can expose the KubeVirtBMC Services externally using Ingress or NodePort. Just update the BMC address in the BareMetalHost accordingly.
Why This Matters
This integration proves that KubeVirtBMC is not just a toy for manually sending IPMI commands. It plugs directly into real-world, production-grade bare-metal provisioning workflows:
- CI/CD for bare-metal tools. Metal3, Ironic, and similar projects can use KubeVirtBMC to run their integration tests on KubeVirt VMs instead of maintaining a fleet of physical servers.
- Developer inner loop. If you’re developing bare-metal provisioning features, you can iterate much faster with VMs that spin up in seconds.
- Training and demos. Showcasing Metal3 no longer requires a rack of servers. A single Kubernetes cluster with KubeVirt is enough.
What’s Next
The KubeVirtBMC project is actively evolving. There is more work underway to improve Redfish compatibility and extend the BMC feature set. If you want to follow the progress or contribute, head over to the GitHub repository.
If you’ve found this useful—or hit a snag while trying it out—please open an issue or drop a comment. Feedback is what keeps open-source projects going.
Happy provisioning!