


Dragonfly speeds up file and container image distribution using peer-to-peer (P2P) technology, but a standard installation deploys several components and dependencies. Beyond the Scheduler, Seed Client, and Client that move data, a traditional setup requires a Manager for dynamic configuration, backed by MySQL and Redis. While that architecture fits platform teams running Dragonfly across large multi-cluster fleets, it can be heavy for a single cluster focused primarily on resolving registry overload during image pulls.
Dragonfly supports a lightweight deployment model that removes the Manager, MySQL, and Redis. The Scheduler serves as the sole coordination component, allowing you to install the entire setup with a single Helm command. This post explains how the lightweight architecture operates and demonstrates how to run it in a local kind cluster.
What the Manager Does in Fleet Deployments
The Manager acts as Dragonfly’s control plane. It hosts the web console, exposes open APIs for integrations (such as registry-triggered preheating), manages relationships across multiple P2P clusters, and distributes dynamic configurations to Schedulers and Clients. It persists state in MySQL and uses Redis for caching and asynchronous job distribution.
These resources are essential at fleet scale. However, for a single cluster focused strictly on P2P distribution, the primary feature required is dynamic configuration. In practice, single-cluster dynamic configuration consists of YAML settings defining scheduling limits, blocklists, and endpoint details for Clients to discover Schedulers.
Decoupling the Scheduler and Client from the Manager allows them to run autonomously without requiring a database backend when no Manager address is configured.
How the Lightweight Model Works
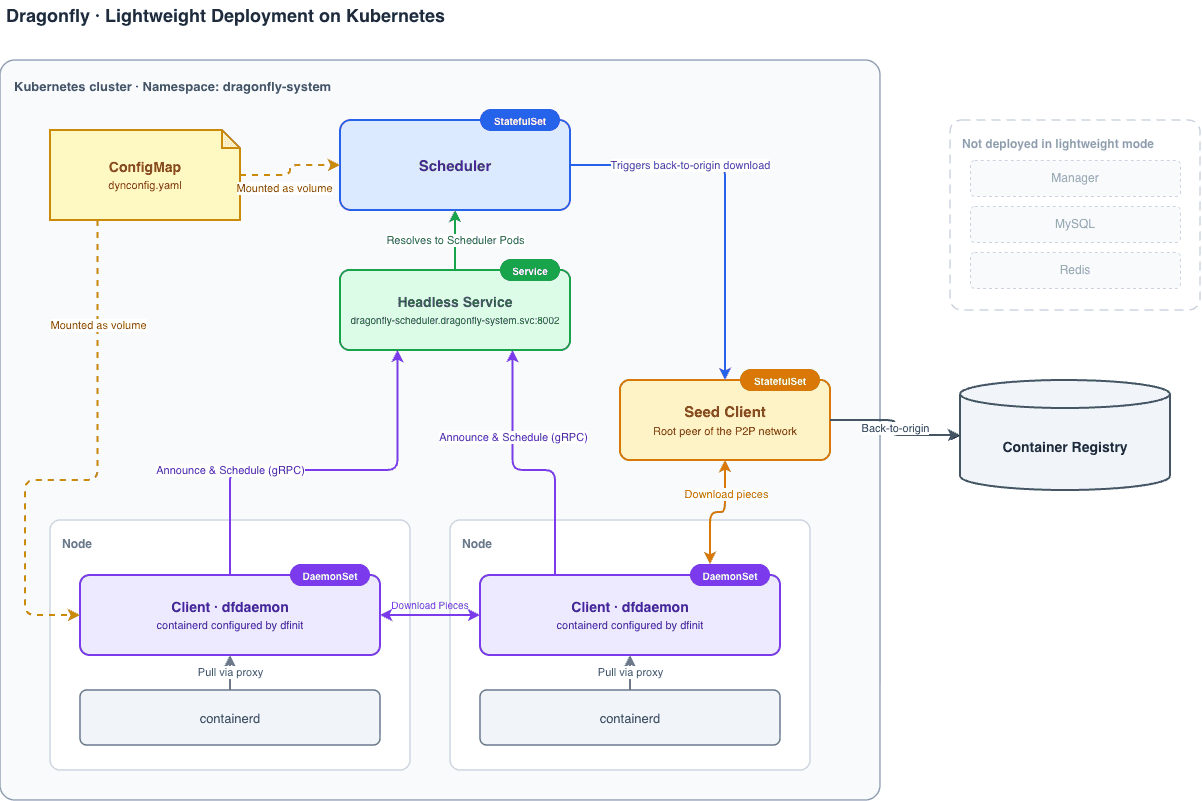
The lightweight deployment replaces the Manager control plane with two native Kubernetes primitives: a ConfigMap and a headless Service.
Dynamic Configuration via ConfigMap
When manager.addr is unset, the Scheduler and Client load dynamic configurations from a local /etc/dragonfly/dynconfig.yaml file, which the Helm chart mounts via a ConfigMap. If the file is not present, default values are generated on startup.
The Scheduler’s dynconfig.yaml defines cluster-level scheduling parameters:
# seedPeerClusterConfig is the seed peer cluster configuration.
seedPeerClusterConfig:
  # loadLimit is the seed peer concurrent upload limit.
  loadLimit: 2000

# schedulerClusterConfig is the scheduler cluster configuration.
schedulerClusterConfig:
  # candidateParentLimit is the candidate parent limit for scheduling.
  candidateParentLimit: 3
  # filterParentLimit is the filter parent limit for scheduling.
  filterParentLimit: 15

# schedulerClusterClientConfig is the client configuration.
schedulerClusterClientConfig:
  # loadLimit is the peer concurrent upload limit.
  loadLimit: 200
The Scheduler and Client reload this configuration periodically (controlled by refreshInterval, which defaults to one minute). Updates to the ConfigMap reach running Pods within a refresh interval without requiring Pod restarts. These parameters are also exposed as Helm values (scheduler.dynconfig, seedClient.dynconfig, and client.dynconfig), maintaining declarative, GitOps-aligned configuration.
Scheduler Discovery via Headless Service
In a Manager-based deployment, Clients query the Manager to locate available Schedulers. In a lightweight deployment, the Client’s dynconfig.yaml points directly to the Scheduler’s headless Service:
scheduler:
  # addr is the address of the scheduler headless service with port,
  # resolved via DNS to discover all scheduler addresses.
  addr: dragonfly-scheduler.dragonfly-system.svc.cluster.local:8002
The Client process (dfdaemon) resolves the hostname via DNS to discover all Scheduler Pod IPs, health-checks each endpoint, and filters out unhealthy instances. If you scale the Scheduler StatefulSet up or down, Clients automatically discover the updated endpoints via DNS.
If Schedulers run at static IP addresses (for example, outside the Kubernetes cluster), you can define them explicitly using scheduler.addrs. A non-empty list overrides DNS resolution:
scheduler:
  # addrs is a static list of scheduler addresses with port. When non-empty,
  # it takes precedence over addr.
  addrs:
    - 192.168.1.10:8002
    - 192.168.1.11:8002
In-Cluster Footprint
Three primary workload components deploy to the cluster:
- Scheduler (StatefulSet): Coordinates task scheduling and piece distribution across peers.
- Seed Client (StatefulSet): Acts as the root peer in the P2P network, downloading content directly from the origin repository.
- Client (DaemonSet): Runs on every node, where
dfinitconfigurescontainerdto route image pulls through the local peer client.
This footprint requires no database backups or migration scripts during upgrades. The system maintains state in local disk caches, which can be rebuilt on demand from the origin source.
Deployment Model Comparison
Dragonfly offers three deployment options based on operational needs. Because the Helm chart disables the Manager, MySQL, and Redis by default, the lightweight setup serves as the primary baseline:
- Lightweight Deployment: Deploys only the Scheduler, Seed Client, and Client. Ideal for single clusters, edge locations, or CI/CD pipelines focused on P2P distribution, task execution, and CLI preheating via
dfctl. - Lightweight Deployment with Redis: Adds Redis to the lightweight architecture (
scheduler.database.redis.addrs). Enables persistent tasks and persistent cache metadata retention. - Deployment with Manager: Deploys the Manager alongside MySQL and Redis. Provides full control plane capabilities, including the web console, OpenAPI endpoints, multi-cluster management, and API-triggered preheat jobs.
| Feature / Capability | Lightweight | Lightweight + Redis | With Manager |
|---|---|---|---|
| Blocklist Support | Yes | Yes | Yes |
| Task Distribution | Yes | Yes | Yes |
| Persistent Task | No | Yes | Yes |
| Persistent Cache Task | No | Yes | Yes |
Preheat via dfctl | Yes | Yes | Yes |
| Preheat via OpenAPI | No | No | Yes |
| Preheat via Web Console | No | No | Yes |
| Web Console | No | No | Yes |
| OpenAPI Integration | No | No | Yes |
| Personal Access Tokens | No | No | Yes |
Step-by-Step Setup on a kind Cluster
1. Create a Multi-Node Cluster
Save the following configuration as kind-config.yaml:
kind: Cluster
apiVersion: kind.x-k8s.io/v1alpha4
nodes:
  - role: control-plane
  - role: worker
  - role: worker
Provision the cluster:
kind create cluster --config kind-config.yaml2. Pre-load Dragonfly Container Images
Pull the required container images and load them into the kind nodes:
docker pull dragonflyoss/scheduler:latest
docker pull dragonflyoss/client:latest
docker pull dragonflyoss/dfinit:latest

kind load docker-image dragonflyoss/scheduler:latest
kind load docker-image dragonflyoss/client:latest
kind load docker-image dragonflyoss/dfinit:latest
3. Configure Helm Values
Create charts-config.yaml. The manager, mysql, and redis blocks are omitted since they are disabled by default:
scheduler:
  image:
    repository: dragonflyoss/scheduler
    tag: latest
  metrics:
    enable: true

seedClient:
  image:
    repository: dragonflyoss/client
    tag: latest
  metrics:
    enable: true

client:
  image:
    repository: dragonflyoss/client
    tag: latest
  metrics:
    enable: true
  dfinit:
    enable: true
    image:
      repository: dragonflyoss/dfinit
      tag: latest
    config:
      containerRuntime:
        containerd:
          configPath: /etc/containerd/config.toml
          proxyAllRegistries: true
4. Deploy Dragonfly via Helm
Install the chart using Helm:
helm repo add dragonfly https://dragonflyoss.github.io/helm-charts/
helm install --wait --create-namespace --namespace dragonfly-system dragonfly dragonfly/dragonfly -f charts-config.yaml
Verify that four Pods start successfully (one Client per worker node, one Scheduler, and one Seed Client):
kubectl get po -n dragonfly-systemNAME READY STATUS RESTARTS AGE
dragonfly-client-dhqfc 1/1 Running 0 3m
dragonfly-client-h58x6 1/1 Running 0 3m
dragonfly-scheduler-0 1/1 Running 0 3m
dragonfly-seed-client-0 1/1 Running 0 3m
5. Verify P2P Routing
Pull an image inside a worker node using crictl:
docker exec -i kind-worker /usr/local/bin/crictl pull alpine:3.19
Inspect the local Client logs to confirm the transfer routed through Dragonfly:
# Locate the client pod running on kind-worker
export POD_NAME=$(kubectl get pods --namespace dragonfly-system -l "app=dragonfly,release=dragonfly,component=client" -o=jsonpath='{.items[?(@.spec.nodeName=="kind-worker")].metadata.name}' | head -n 1)

# Retrieve the task ID for the alpine image
export TASK_ID=$(kubectl -n dragonfly-system exec ${POD_NAME} -- sh -c "grep -hoP 'library/alpine.*task_id=\"\K[^\"]+' /var/log/dragonfly/dfdaemon/* | head -n 1")

# Verify successful download execution
kubectl -n dragonfly-system exec -it ${POD_NAME} -- sh -c "grep ${TASK_ID} /var/log/dragonfly/dfdaemon/* | grep 'download task succeeded'"
Image and File Preheating
Preheating warms the P2P cache prior to image rollouts. This operational task functions without the Manager. The dfctl CLI interacts directly with the Scheduler’s gRPC endpoint to trigger downloads on Seed Clients or node Clients:
dfctl task preheat oci://docker.io/library/alpine:3.19 \
  --scheduler-endpoint http://dragonfly-scheduler.dragonfly-system.svc.cluster.local:8002 \
  --scope all_seed_peers
dfctl supports both OCI container images (oci://) with registry authentication and standard HTTP/HTTPS file downloads (https://). The --scope flag designates whether preheating applies to a single Seed Client, all Seed Clients, or every Client across the cluster. Because dfctl is bundled within the Client image, preheat tasks can be run directly inside Kubernetes using kubectl exec.
Application Pod Artifact Injection
While container runtime mirroring handles container image pulls, applications frequently download secondary assets like machine learning models, dataset files, or build artifacts.
Dragonfly provides dragonfly-injector, a Kubernetes mutating admission webhook that injects Dragonfly CLI tools (dfget, dfcache, dfstore, dfdaemon) and the local dfdaemon Unix socket mount into application Pods. This allows workloads to run direct P2P downloads without modifying base images.
The injector uses cert-manager to issue TLS certificates for the webhook server. To enable the injector, update your values file:
injector:
  enable: true
  replicas: 2
  image:
    registry: docker.io
    repository: dragonflyoss/injector
    tag: latest
  initContainerImage:
    registry: docker.io
    repository: dragonflyoss/client
    tag: latest
  certManager:
    enable: true
Annotate application Pods to enable tool injection:
apiVersion: v1
kind: Pod
metadata:
  name: test-pod
  annotations:
    dragonfly.io/inject: 'true'
    dragonfly.io/init-container-image: 'dragonflyoss/client:latest'
spec:
  containers:
    - name: app
      image: debian:stable-slim
      command: ['/bin/sh', '-c', 'sleep 3600']
Upon pod creation, the admission webhook adds an init container that copies binaries into a shared volume and mounts the node’s dfdaemon socket, allowing applications to execute dfget commands natively.
When to Use the Manager Architecture
The Manager architecture remains the optimal choice when operating Dragonfly as a centralized platform service across multi-cluster environments, or when teams require a web UI and automated preheating via OpenAPI integrations.
To enable the full control plane, set manager.enable, mysql.enable, and redis.enable to true in your Helm configuration. Teams can start with a lightweight deployment and scale up to include the Manager as operational requirements evolve.
Resources
Community: #dragonfly channel on the CNCF Slack
Documentation & Web: Dragonfly Website | Lightweight Deployment Guide
GitHub Repositories: Dragonfly Core | Client | Injector | Helm Charts