


A hands-on guide to deploying Kyverno with Argo CD and enforcing custom policies
As Kubernetes environments develop, GitOps with Argo CD has become the standard for declarative, self-healing infrastructure. Yet without guardrails for your deployments, misconfigured, insecure, or non-compliant resources can easily make it to production.
This blog explores how to deploy Kyverno alongside Argo CD, using baseline policies from the official Kyverno Policies Helm chart and demonstrating how to add your own custom policies on top.
What is Kyverno?
Kyverno is a CNCF graduated project that acts as a policy engine for Kubernetes. It lets you define rules for what is and isn’t allowed in your cluster, all written as standard Kubernetes YAML. Kyverno operates at the admission controller level, meaning it intercepts resource requests before they hit the cluster and acts on them based on your policies.
You can think of Kyverno like a checkpoint before manifests are created. They need to comply based on a set of policies you want to have set in your cluster.
There are four types of policies it supports:
- Validate: block or audit resources that don’t meet your rules
- Block: If resource does not comply it will not be created
- Audit: If resource does not comply It will still be created but Log that the resource does not comply due to policy
- Mutate: Instead of rejecting a resource, Kyverno changes it automatically to meet your rules before it’s created.
- Generate: create defined resources in policy automatically
- Cleanup/deleting: remove stale or unwanted resources on a schedule
It covers the full lifecycle of a resource in your cluster.
Why Kyverno with Argo CD?
If you’re running Argo CD, you already have your cluster state living in Git. Kyverno extends that same structure to policy enforcement as well. Together, they enable a fully GitOps-driven approach to security and governance.
Here’s why the two work so well together:
Policy as code:
Kyverno policies are defined using standard Kubernetes YAML, following the same structure as Kubernetes manifests (`apiVersion`, `kind`, and `spec`). This allows policies to be versioned, reviewed, and promoted through environments using familiar Git workflows.
Consistent enforcement:
Once policies are committed to Git, Argo CD automatically syncs them to the cluster. Kyverno enforces these policies at admission time, ensuring that all resources comply with your rules regardless of how they are created.
Safe rollouts with audit and enforce modes:
Kyverno policies can run in Audit mode to report violations without blocking anything, or Enforce mode to block resources that don’t meet the policy. With Argo CD, moving a policy from audit to enforce is just a Git change.
Configuration and setup: Kyverno with Argo CD
The setup shown in this tutorial is based on the structure used in the ITGix ADP (Application Development Platform), created by our team at ITGix (https://www.itgix.com). It provides a ready-made App-of-Apps pattern for managing cluster infrastructure with Argo CD. On the ADP, enabling Kyverno is as simple as setting enabled: true in your platform’s environment-specific configuration, the platform handles the rest.
That said, you don’t need the ADP to follow along. The setup uses a standard App-of-Apps pattern that works with any Argo CD installation. The idea is simple: one root Argo CD application points at a directory in your Git repo that contains individual Application manifests for each service. When the root app syncs, it creates all the child apps, and each child app manages its own Helm chart. Everything is driven from Git with no manual kubectl apply needed after the initial bootstrap.
At the end the repo structure will looks like this:
global-infra/
  infra-services/  #contains Application manifests for Kyverno + policies
    kyverno.yaml
    kyverno-policies.yaml
  kyverno/              # kyverno child app points here
    Chart.yaml
    values.yaml
  kyverno-policies/     # kyverno-policies child app points here
    Chart.yaml
    values.yaml
    templates/          # your custom policy YAMLs live here
From here we assume you already have Argo CD installed, with a root app watching your infra-services/ directory. All you need to do is drop the following Application manifests into that directory and Argo CD handles the rest.
Step 1: Add Kyverno as an Argo CD application
This will install the full Kyverno package into your cluster (the brains of Kyverno), including:
– All Kyverno controllers (policy engine, mutate, generate, cleanup, etc.)
– Custom Resource Definitions (CRDs) required by Kyverno
– Default configurations from the Helm chart
Inside infra-services/, create kyverno.yaml. This defines the Argo CD Application that deploys Kyverno into your cluster. It uses a local Helm chart wrapper that pulls in the official Kyverno chart as a dependency. The sync-wave annotation ensures Kyverno is always installed before any policies are applied.
infra-services/kyverno.yaml
apiVersion: argoproj.io/v1alpha1
kind: Application
metadata:
  name: kyverno
  namespace: argocd
  annotations:
    argocd.argoproj.io/sync-wave: "1"
    argocd.argoproj.io/compare-options: ServerSideDiff=true,IncludeMutationWebhook=true
spec:
  project: default
  source:
    repoURL: https://github.com/demo-infra.git
    targetRevision: main
    path: kyverno
    helm:
      valueFiles:
        - values.yaml
  destination:
    server: https://kubernetes.default.svc
    namespace: kyverno
  syncPolicy:
    automated:
      prune: true
      selfHeal: true
    syncOptions:
      - CreateNamespace=true
      - ServerSideApply=true
A couple of things worth noting here:
– ServerSideApply=true
This is needed for Kyverno because its CRDs are large and can exceed the annotation size limit used by client-side apply.
– IncludeMutationWebhook=true
This compare option tells Argo CD to factor in Kyverno’s mutating webhooks when calculating diffs, preventing constant out-of-sync warnings on resources that Kyverno mutates.
– ServerSideDiff=true
This tells Argo CD to calculate diffs using the server-side representation of resources instead of the local manifest. This works better with tools like Kyverno that mutate resources at admission time and helps avoid noisy or incorrect diffs.
Step 2: Wrap the official Kyverno Helm chart
Helm repository at https://kyverno.github.io/kyverno/
Chart: kyverno
kyverno/Chart.yaml
The `kyverno/Chart.yaml` wraps the official chart as a dependency, pulled from the Kyverno
apiVersion: v2
name: kyverno
description: Helm Chart for Kyverno
type: application
version: 1.0.0
dependencies:
 - name: kyverno
   version: "3.7.1"
   repository: https://kyverno.github.io/kyverno/
kyverno/values.yaml
Note: To use the Deleting/Cleanup Controller to automatically clean up resources, add the following to your kyverno/values.yaml file. If you don’t plan on using any policies for cleanup/deleting, the default settings from the official chart will work just fine.
kyverno:
 cleanupController:
   rbac:
     clusterRole:
       extraResources:
         - apiGroups:
             - ""
           resources:
             - pods
           verbs:
             - get
             - list
             - watch
             - delete
Step 3: In ArgoCD UI Confirm Argo application Kyverno is created
After pushing those changes, Argo CD will deploy kyverno to the cluster:
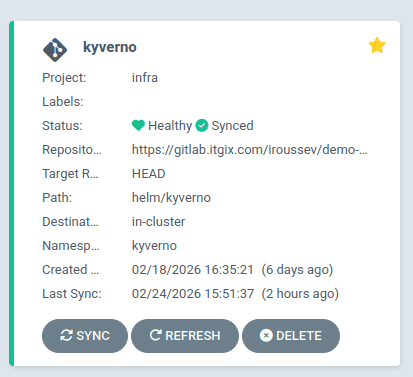
Note: If kyverno is stuck on unsynced make sure you added the annotations in the Application:
argocd.argoproj.io/compare-options: ServerSideDiff=true,IncludeMutationWebhook=true
Step 4: Add Kyverno Policies as an Argo CD Application
This step installs the actual policies you want Kyverno to enforce.
It will give you a set of starting policies for your cluster, which you can customize later using your values.yaml or creating your own in templates/.
With Kyverno running, create kyverno-policies.yaml in infra-services/ to deploy your policies. It follows the same pattern, pointing at the kyverno-policies/ directory and running at sync-wave `”2″` so it always comes after Kyverno itself is ready:
infra-services/kyverno-policies.yaml
apiVersion: argoproj.io/v1alpha1
kind: Application
metadata:
 name: kyverno-policies
 namespace: argocd
 annotations:
   argocd.argoproj.io/sync-wave: "2"
spec:
 project: default
 source:
   repoURL: https://github.com/demo-infra.git
   targetRevision: main
   path: kyverno-policies
   helm:
     valueFiles:
       - values.yaml
 destination:
   server: https://kubernetes.default.svc
   namespace: kyverno
 syncPolicy:
   automated:
     prune: true
     selfHeal: true
   syncOptions:
     - CreateNamespace=true
Step 5: Wrap and configure the Kyverno policies Helm chart
In this step, we define a Helm wrapper for Kyverno’s official policies chart. This allows us to:
- Install baseline, production-ready policies maintained by the Kyverno project
- Configure policy behavior (Audit vs Enforce, severity, PSS level) using values.yaml
- Add our own custom policies alongside the official ones in a single GitOps workflow
The kyverno-policies child application created in the previous step points to this directory.
Helm repository at https://kyverno.github.io/kyverno/Chart: kyverno-policies
kyverno-policies/Chart.yaml
The kyverno-policies/Chart.yaml file wraps the official kyverno-policies Helm chart as a dependency. The chart is pulled directly from the Kyverno Helm repository.
apiVersion: v2
name: kyverno-policies
description: Helm Chart for Kyverno Policies
type: application
version: 1.0.0
dependencies:
 - name: kyverno-policies
   version: "3.7.1"
   repository: https://kyverno.github.io/kyverno/
kyverno-policies/values.yaml
And kyverno-policies/values.yaml sets the pod security standard and the default validation mode for those library policies:
kyverno-policies:
 policyType: ValidatingPolicy
 podSecurityStandard: baseline
 validationFailureAction: Audit
 podSecuritySeverity: Medium
– policyType: ValidatingPolicy: Tells the chart to generate validation policies (policies that check resources against rules) rather than mutating ones. These policies will either block or report resources that don’t meet the defined standards.
– podSecurityStandard: baseline: Selects which set of Pod Security Standard policies to install. Kubernetes defines three levels: privileged (unrestricted), baseline (prevents known privilege escalations), and restricted (heavily locked down). baseline is a good starting point since it blocks things like privileged containers and host networking without being so strict that it breaks common workloads.
– validationFailureAction: Audit: Controls what happens when a resource violates a policy. Audit means violations are logged and visible in policy reports, but the resource is still allowed to be created. Setting this to Enforce would block non-compliant resources from being created entirely. Starting with Audit lets you see what would break before you start blocking anything.
– podSecuritySeverity: Medium: Sets the severity level reported when a violation is detected. This shows up in Kyverno’s policy reports and can be used for filtering and prioritization. Options are Low, Medium, High, and Critical.
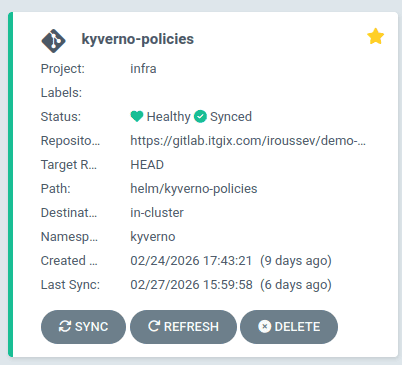
After pushing those changes, Argo CD will deploy kyverno-policies to the cluster:
Step 6: Add support for custom Kyverno policies (optional)
So far, we’ve installed:
- Kyverno itself
- A baseline set of official Kyverno policies managed via Helm
In many real-world scenarios, you’ll also want to enforce organization-specific rules that aren’t covered by the default policy library. To support this, we add a directory for custom policy manifests.
Create the following directory in your repository:
kyverno-policies/templates/
Any Kyverno policy YAML placed in this directory will be automatically included when the Helm chart is rendered. Once committed to Git, Argo CD detects the change and Kyverno enforces the policy, no manual steps required.
This keeps the built-in policy library and custom policies cleanly separated while still following the same GitOps workflow.
Step 7: Using custom policies
Good example of all types of Policies can be found at Official Kyverno website: https://kyverno.io/policies/
As an example for the blog here is a policy I found from the official Kyverno site, you can add to the kyverno-policies/templates/ directory.
Validating policy: Restrict usage of external IPs
Type: Validate | Mode: Audit | Severity: Medium
Description: Setting externalIPs on a Service is a known vector for a man-in-the-middle attack (CVE-2020-8554). It allows traffic destined for an arbitrary IP to be intercepted and redirected, which is a serious risk in any multi-tenant cluster. This policy validates that no Service has the externalIPs field set, blocking that attack surface entirely.
kyverno-policies/templates/clusterpolicy-restrict-external-ips.yaml
apiVersion: kyverno.io/v1
kind: ClusterPolicy
metadata:
 name: restrict-external-ips
 annotations:
   policies.kyverno.io/title: Restrict External IPs
   policies.kyverno.io/category: Best Practices
   policies.kyverno.io/minversion: 1.6.0
   policies.kyverno.io/severity: medium
   policies.kyverno.io/subject: Service
   policies.kyverno.io/description: "Service externalIPs can be used for a MITM attack (CVE-2020-8554). Restrict externalIPs or limit to a known set of addresses. See: https://github.com/kyverno/kyverno/issues/1367. This policy validates that the `externalIPs` field is not set on a Service."
spec:
 validationFailureAction: Audit
 background: true
 rules:
 - name: check-ips
     match:
       any:
         - resources:
             kinds:
               - Service
     validate:
       message: externalIPs are not allowed.
       pattern:
         spec:
           X(externalIPs): "null"
Viewing policy violations
Once Kyverno policies are running in your cluster, it becomes easy to see when a resource does not comply with them. The exact behavior depends on the validationFailureAction configured in your policies. As discussed earlier, policies can run in Audit mode (report violations) or Enforce mode (block resources entirely).
Argo CD UI
If a manifest violates a policy running in Enforce mode, Argo CD will fail to sync the resource. In the Argo CD UI, the affected application will appear OutOfSync or Degraded, and the sync error will include the Kyverno validation message defined in the policy.

This makes it immediately visible during a GitOps workflow when a change introduced in Git violates cluster policy.
Kyverno policy reports
When policies run in Audit mode, the resource will still be created, but the violation is recorded in a Kyverno PolicyReport or ClusterPolicyReport resource.
You can view these with:
- kubectl get policyreport -A
- kubectl get clusterpolicyreport
To inspect the details of a violation:
- kubectl describe clusterpolicyreport
These reports show:
- The resource that violated the policy
- The policy name
- The rule that failed
- The severity level
- The message defined in the policy
This allows teams to start with Audit mode to observe how policies affect workloads before switching them to Enforce mode to actively block non-compliant resources.