


Network policy changes are among the most frequent operations in a Kubernetes cluster. They are also among the most delicate, as even a small mistake can lead to widespread traffic disruption.
This tutorial walks through several methods to make policy management safer, especially in day-2 operations or brownfield deployments where clusters already run critical workloads. It shows how to test and validate changes before enforcing them, helping teams adopt a more reliable approach to policy rollout.
By following these steps, you can build confidence in your network policy lifecycle and reduce the likelihood of accidental outages.
How do Cilium network policy operations and enforcement modes work?
Cilium network policies build upon Kubernetes NetworkPolicy, extending it with deeper visibility and more flexible rule types.
Policies are used to allow or deny traffic based on defined rules, which can apply to ingress, egress, or both. These rules are evaluated at the datapath level, meaning enforcement can take place directly in the kernel through eBPF.
Every Cilium-managed endpoint operates under a policy enforcement mode, which defines the default network behavior before and after a policy is applied:
- Default: All traffic is allowed until an endpoint is selected by a policy. Once selected, traffic is denied unless explicitly permitted.
- Always: All traffic is denied by default. Only explicitly allowed connections are permitted.
- Never: Policies are disabled entirely for selected endpoints. Use this mode if you want a default-allow network policy.
This distinction matters when introducing or changing policies.
A newly applied policy that selects an endpoint will immediately transition that endpoint from “allow-all” to “deny-all.” Any traffic not explicitly covered by a rule will be dropped.
There are two situations where this transition can cause disruption:
- Applying the first policy — This changes the endpoint’s default mode from open to restrictive, potentially cutting off traffic you didn’t plan to block.
- Updating an existing policy — Specific flows may be unintentionally denied or allowed depending on the rule changes.
The following sections explore practical ways to handle both cases safely; observing real traffic before enforcement, auditing changes, and simulating outcomes to ensure consistent behavior.
Test environment setup
As a test application, we’ll be using a single Pod with isovalent=cilium-tutorial label, which can be deployed with this command:

To trigger network traffic we will be connecting to this pod and executing commands from its shell, e.g.

Before you proceed, take note of the values of identity, endpoint and the name of the cilium pod managing the test application. These values will be used in subsequent commands to narrow down the output.
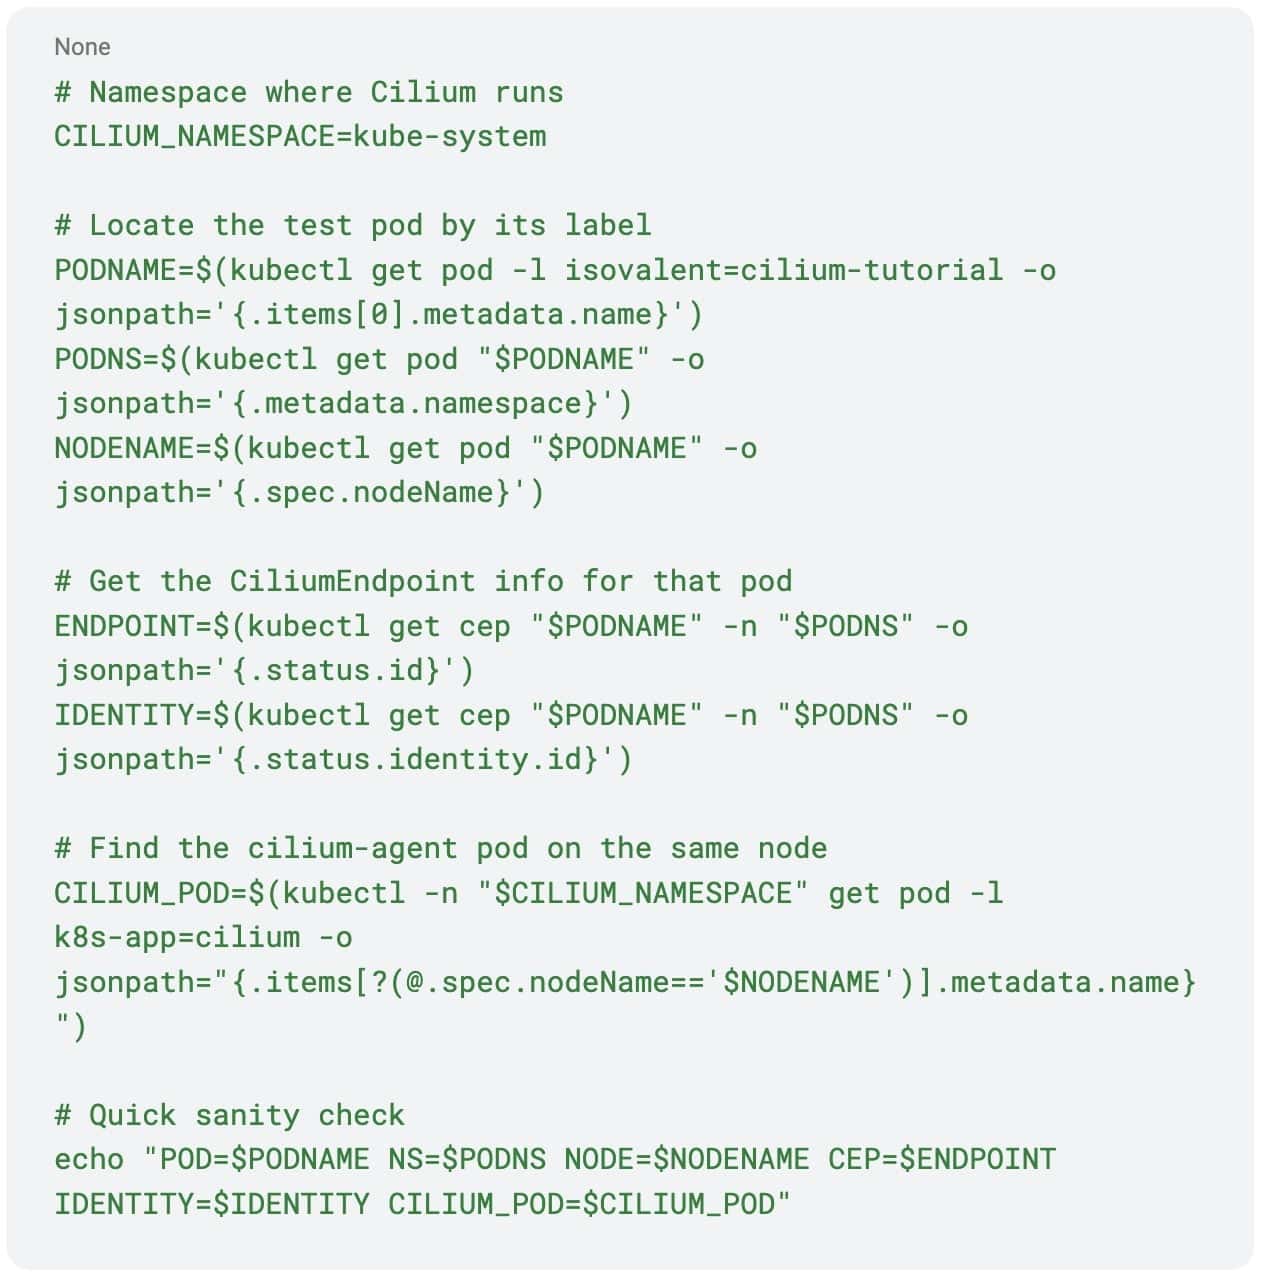
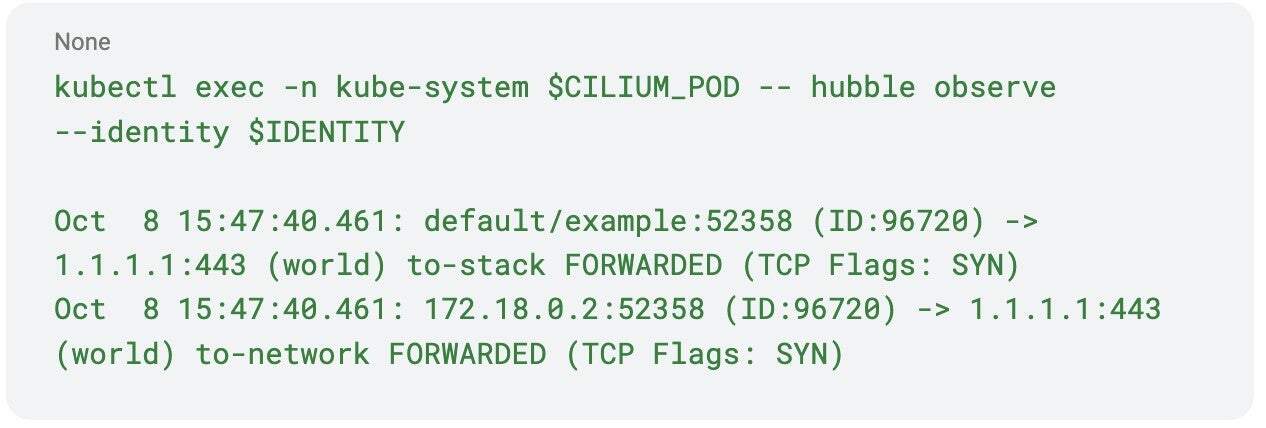
As an example, here’s the command you can use to view the Hubble flow log for the test application. Hubble is Cilium’s observability component that provides detailed visibility into network traffic and policy decisions across your cluster.
Some of the techniques described in this post work best when they can access historical network flow data.
Scenario 1: Applying the first default-deny policy
Applying the first network policy triggers the default-deny behavior, which may unintentionally block traffic not yet accounted for in your definitions.
Cilium provides two mechanisms that let you preview the impact of these changes before enforcement.
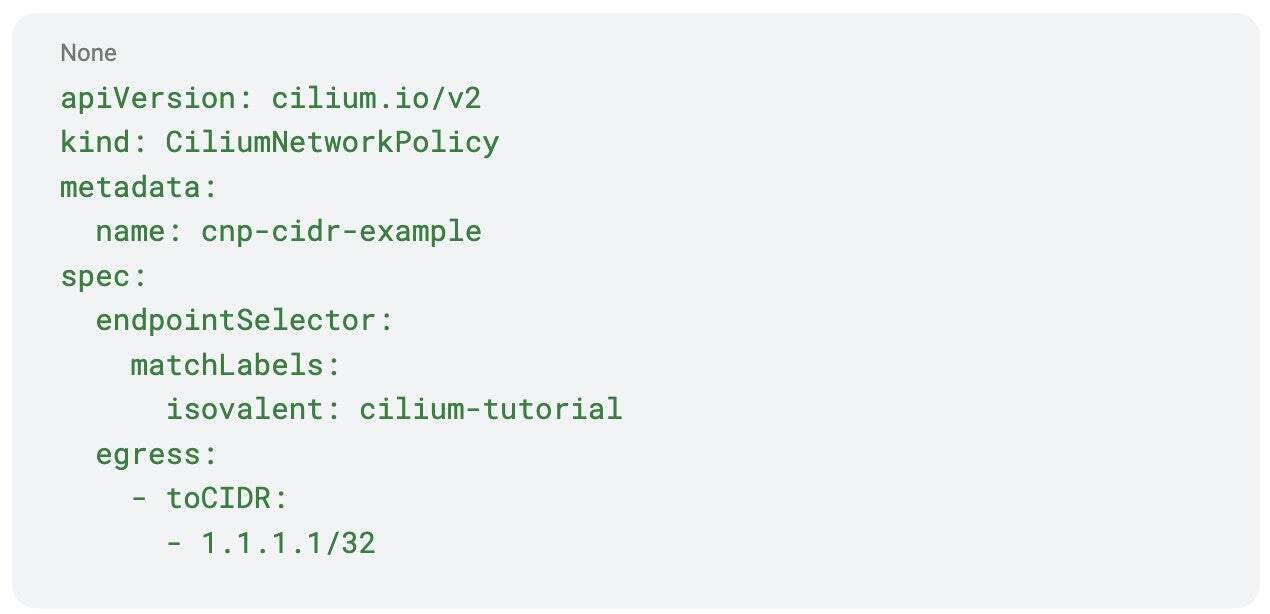
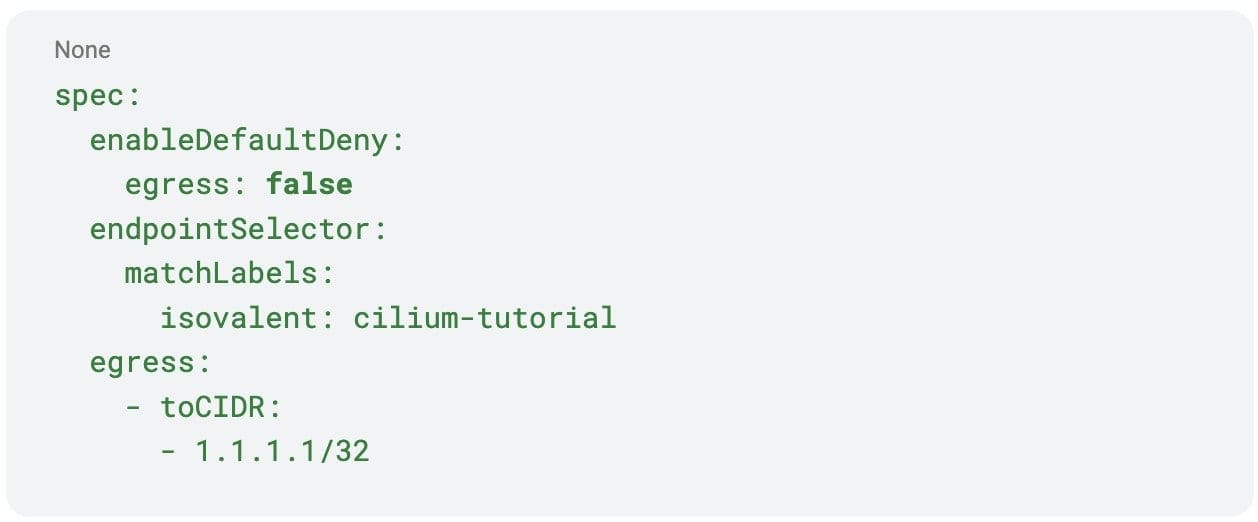
Let’s start with a simple egress-only policy that allows connections to a single destination (1.1.1.1/32):
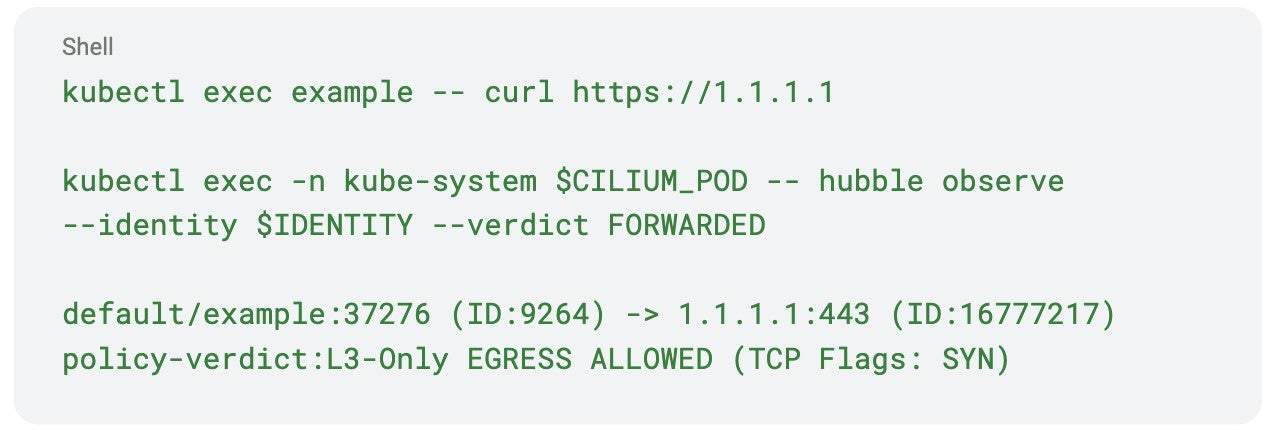
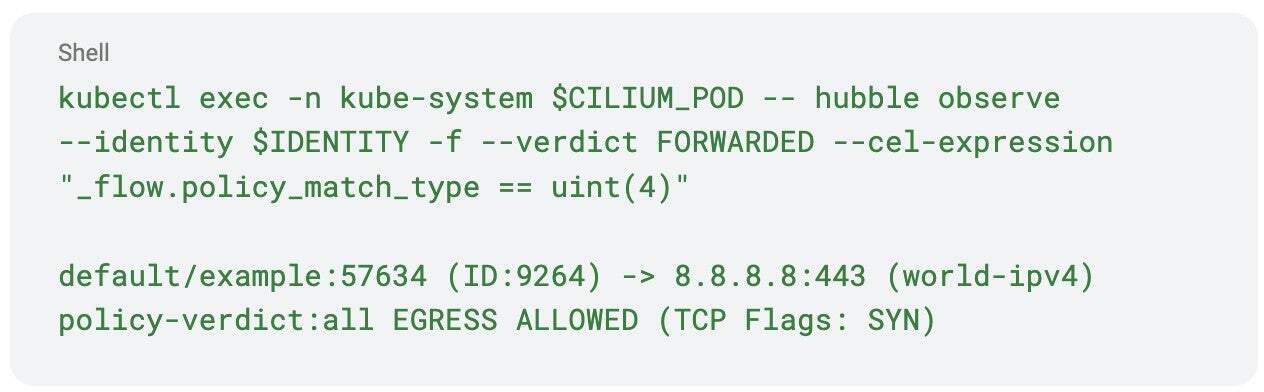
You can observe allowed traffic using Hubble. If the test pod connects to https://1.1.1.1, the output may look like this:
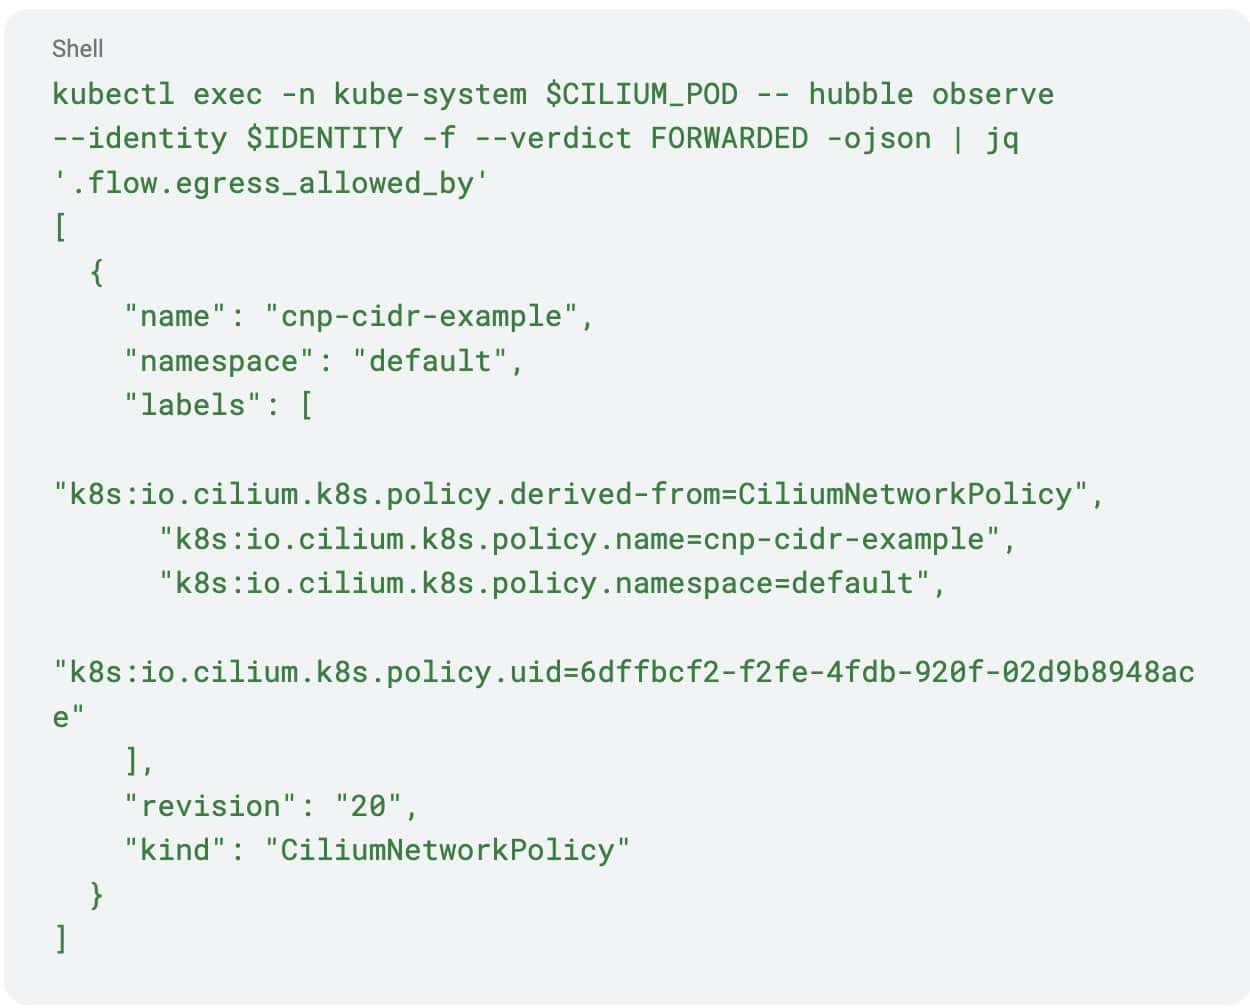
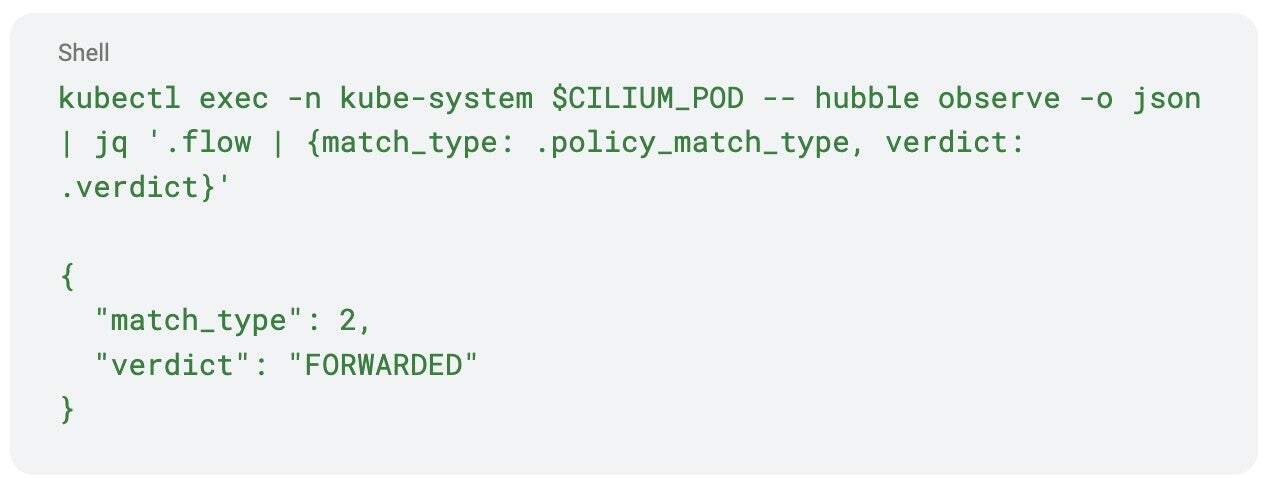
The above output displays only a subset of information contained in the actual flow log. To see the entire payload, including the reference to a policy that allowed this type of traffic, you can add the –output json flag to the above command, e.g.:
Now let’s focus on detecting dropped flows safely, without actually enforcing deny behavior.
Solution 1.a: Endpoint audit mode
Audit mode lets you apply policies to an endpoint while disabling enforcement. Verdicts appear in Hubble as AUDIT rather than DROP or FORWARDED.
Enable audit mode for a specific endpoint:
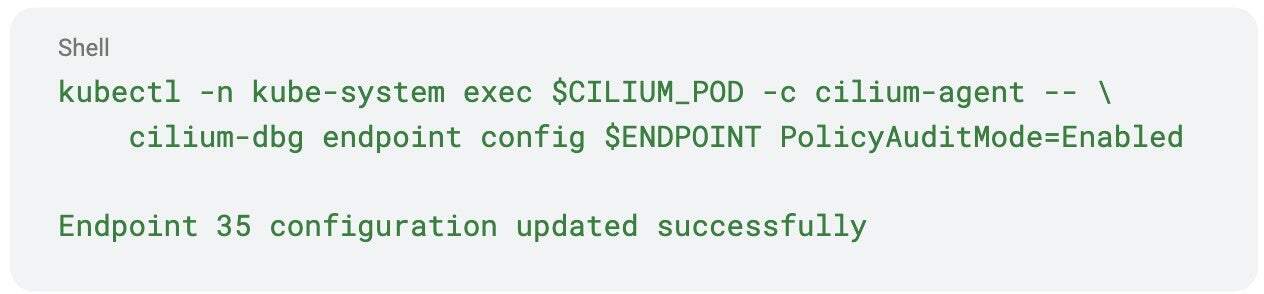
Remember that this setting is not persisted, so it will be disabled if Cilium agent restarts.
To filter the audit logs for flows that would have been denied:
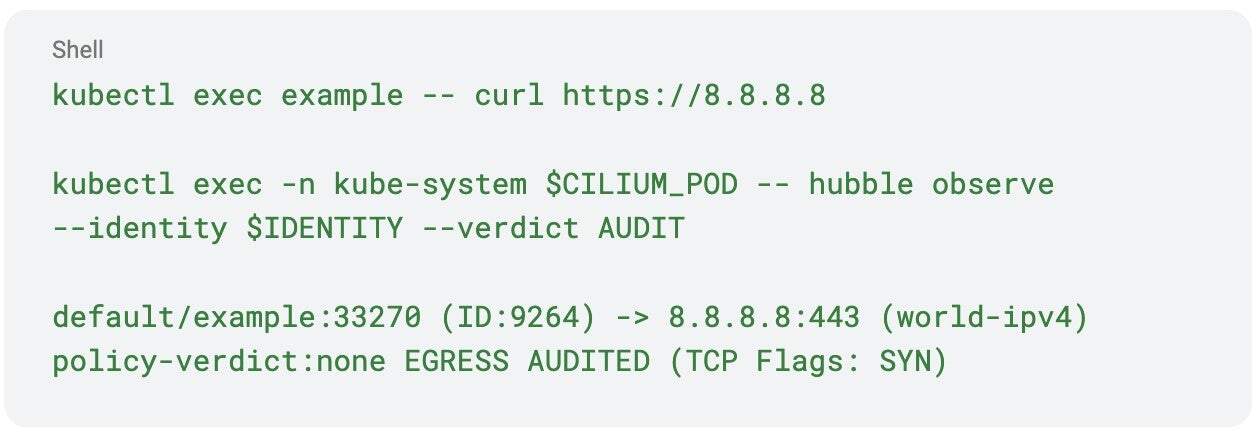
The above flow log would result from our test application trying to access a destination not explicitly permitted by the policy, e.g. https://8.8.8.8.
Once you’re happy with the observed results, you can disable the audit mode for an endpoint with the following command.
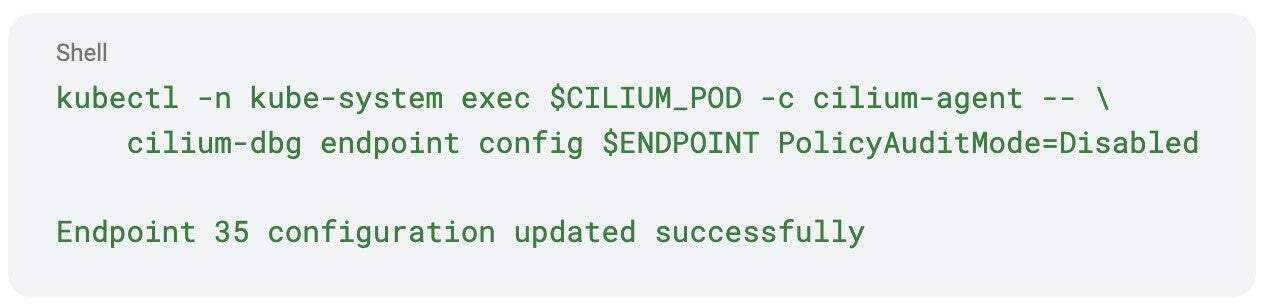
The downsides of this approach is that it works per-endpoint, meaning that policies need to be carefully constructed not to select non-audit mode endpoints, or, requires enabling audit mode on all selected endpoints.
Solution 1.b: Policy default-deny mode
You can also control the default enforcement behavior directly within a CiliumNetworkPolicy using the enableDefaultDeny field. This approach has the following advantages compared to the previous solution:
- It’s policy-centric rather than endpoint centric, which makes it easier to implement.
- It works per-direction, allowing extra flexibility to control the enforcement mode
- It’s part of the CNP/CCNP specification and doesn’t require agent-level changes
This is how you would audit your first policy using the current solution. Take the example policy defined above and disable the default-deny behavior by setting spec.enableDefaultDeny.egress to false.
In order to see and distinguish the implicitly allowed traffic, you need to filter based on the policy_match_type field of the Hubble flow log. This can be done by adding a CEL expression to the hubble observe query to filter the “allow-all” matches, which correspond to policy_match_type value of 4 (see the tip below for more information):
The above command would allow you to see all traffic that would’ve been blocked if the default-deny mode was set to enabled. You can use these flows to assess the potential impact of the applied policy and, when you’re happy with the results, flip the default-deny mode back to the default value of true.
With this solution, you have to remember that each policy will have its own EnableDefaultDeny flag, with default value being true which would always take priority over false. When combining multiple policies, ensure that each has this flag configured correctly.
In general, our recommendation is to start with a small set of well-understood policies and transition to the full “default-deny” mode early in the lifecycle of a cluster, to limit the blast radius of a potential change.
Tip:
The policy_match_type field records which part of the policy logic allowed or denied a flow.
You can use it to understand why Cilium made a particular decision. Common values include:
| Value | Meaning | Example verdict |
| 0 | None (no policy matched) | policy-verdict:none |
| 1 | L3-only rule matched | policy-verdict:none EGRESS ALLOWED |
| 2 | L3/L4 rule matched | policy-verdict:L3-L4 EGRESS ALLOWED |
| 3 | L7 rule matched (HTTP, DNS, …) | policy-verdict:L7 EGRESS ALLOWED |
| 4 | Implicit allow-all (default-deny disabled) | policy-verdict:all EGRESS ALLOWED |
| 5 | Explicit deny rule | policy-verdict:none EGRESS DENIED |
| 6 | Audit mode active (flow would have been denied) | policy-verdict:none EGRESS AUDITED |
You can confirm this mapping in raw Hubble output, the below example is after running kubectl exec example — curl https://1.1.1.1:
Scenario 2: Making changes to the existing policies
Continuing from scenario 1, where we introduced our first policy, the focus now moves to maintaining and evolving your configurations safely.
Once an endpoint has transitioned into the “default-deny” mode, making incremental changes should be a lot safer. Here is the breakdown of the potential changes along with an estimated worst case impact:
| Change type | Worst case impact |
| Adding a new allow rule | Traffic is allowed to a destination that was previously blocked |
| Adding a new deny rule | Traffic that was previously allowed is now blocked |
| Changing an existing rule | Traffic is allowed to a destination that was previously blocked |
| Adding the first L7 policy | Traffic that was previously allowed is now blocked |
Similar to the previous scenario, our goal is to ensure that we can make these changes, while minimizing the risk of an unintended drop. Let’s examine available options starting with the last change type.
Solution 2.a: L7 allow-all
This solution is designed to address the “adding the first L7 policy” change type. It works by constructing a L7 policy that matches and, thus, allows all traffic. There are two special cases, depending on the type of L7 traffic, which are covered in the following examples.
Use Case 1: Allow all DNS traffic
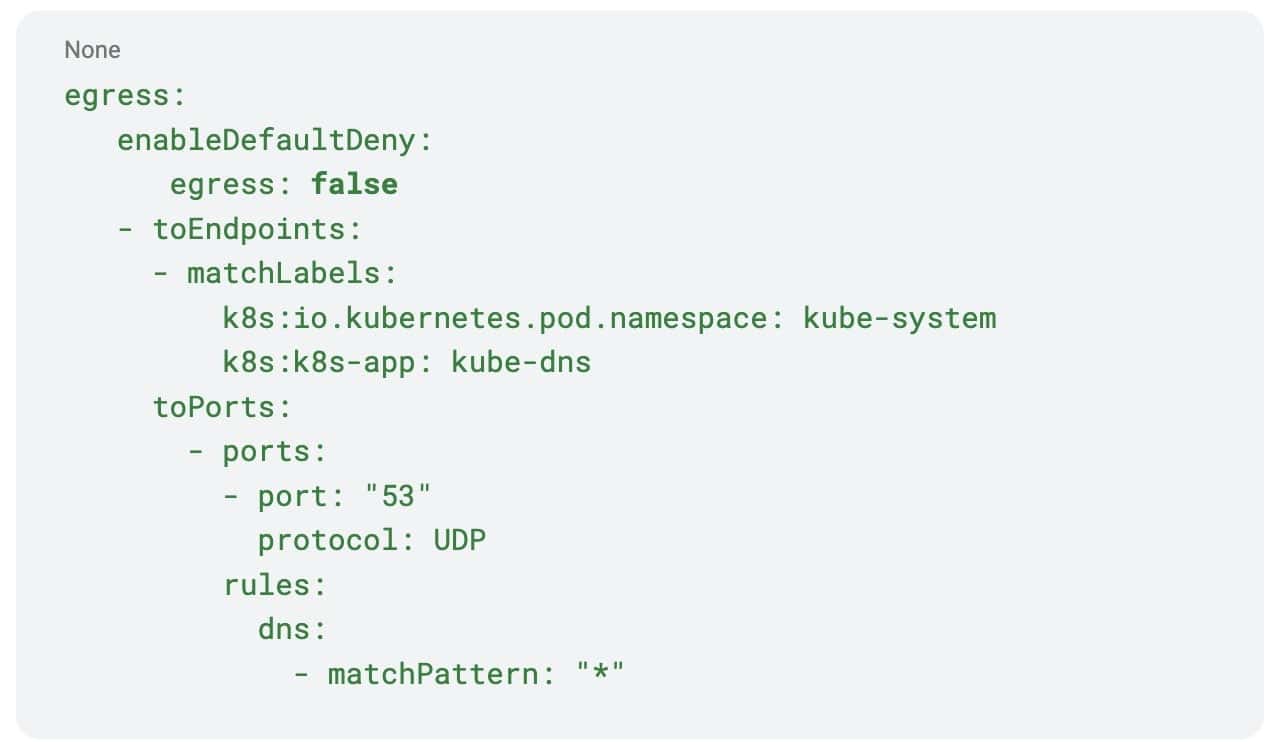
The following policy will allow all DNS traffic to kube-dns. If applied as a CiliumClusterwideNetworkPolicy, you can also use enableDefaultDeny to avoid accidentally enabling default-deny for pods with no policies applied.
Once you apply this policy to the test application, you should be able to see DNS queries in the Hubble flow log:

Use case 2: Allow all HTTP traffic
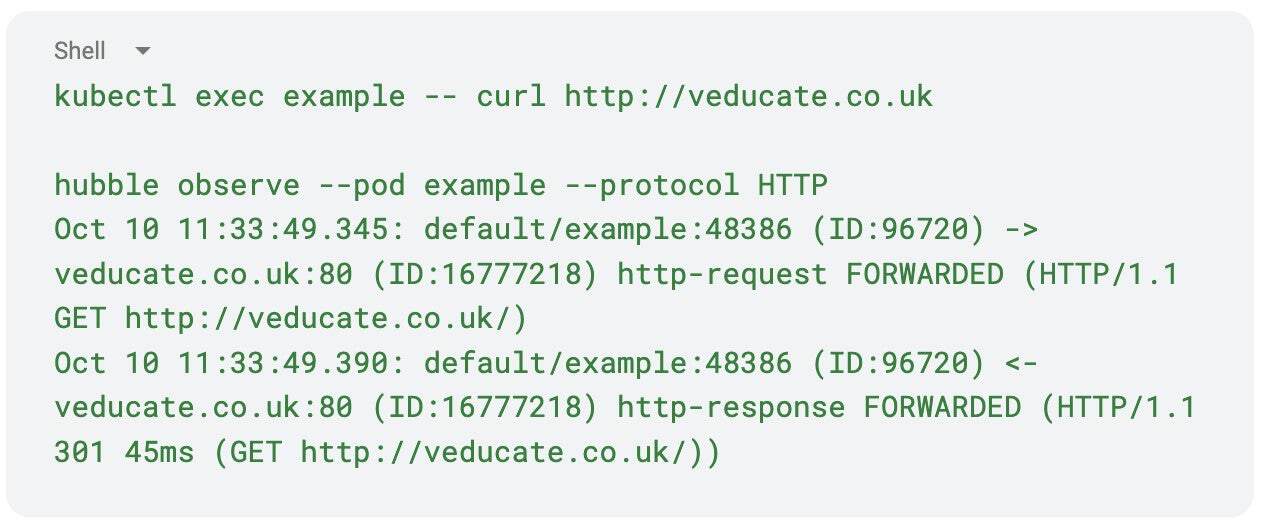
You can use a similar approach of allowing all HTTP traffic to gain L7 HTTP visibility.
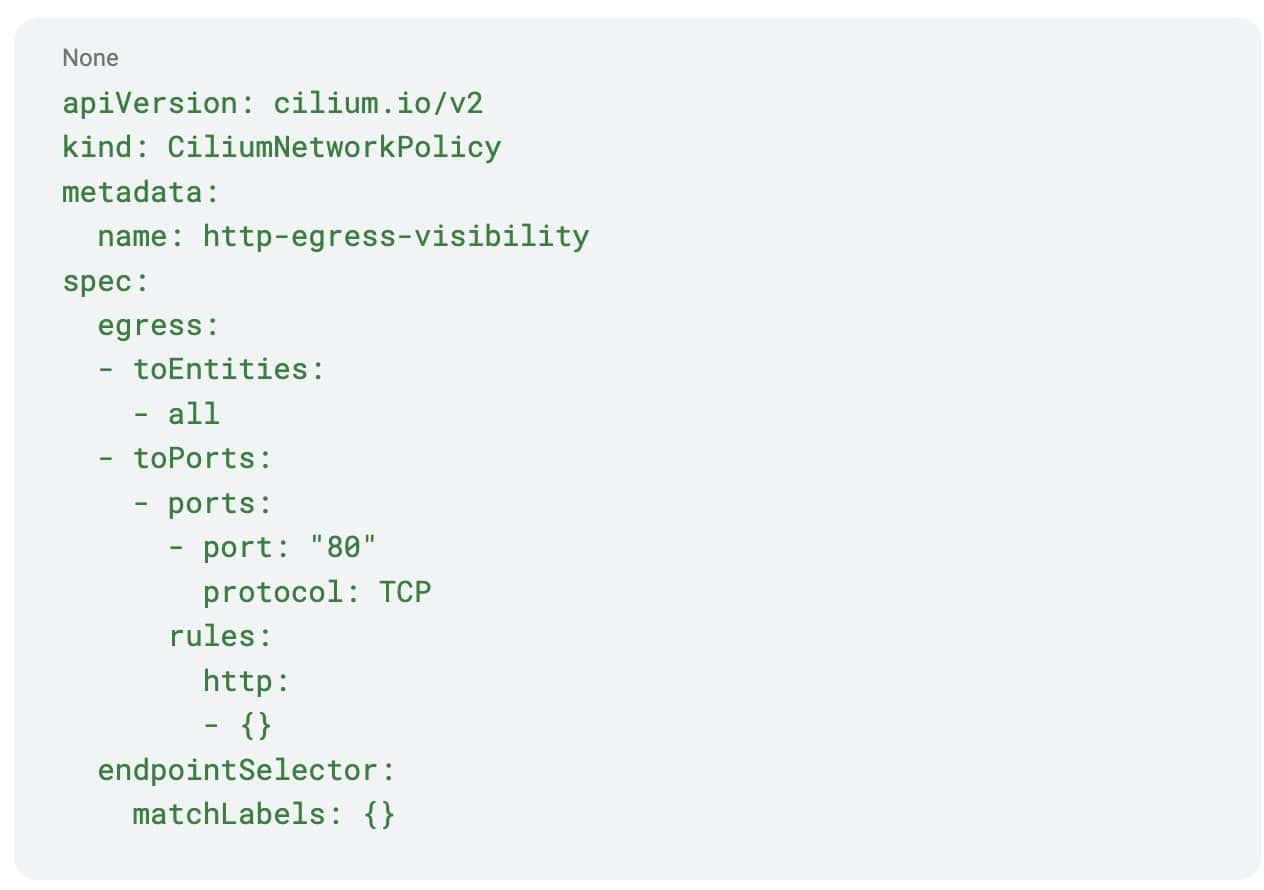
The Hubble flow log will provide Layer 7 relevant information, in the below example, this includes HTTP Request, Method, Latency and response code.
Summary & next steps
In this post you learned how to manage Cilium network policies more safely. We explored two main change scenarios; applying a first default-deny policy and editing existing policies, and introduced practical techniques such as audit mode, default-deny toggles, and L7 allow-all scaffolding. When used properly, these approaches help you validate policy changes before they hit production and reduce the risk of traffic disruptions.
If you want to explore Cilium policy design and best practices further, download our free resources:
- 📘 Cilium Network Policy Deep Dive: a practical guide to building, testing, and securing advanced Cilium policies.
- 📗 Kubernetes Network Policies Done the Right Way by Isovalent: a step-by-step ebook on network policy strategy, validation, and real-world adoption.
- 🎥 Join our live webinar: Network Policies Done the Right Way: see these concepts in action and learn how to apply effective segmentation across workloads using Cilium and Isovalent Enterprise.