

Community post by Antonio Berben, Principal Solutions Architect at Solo.io (Linkedin | GitHub)
In a Testing In Production (TIP) scenario, a critical aspect is routing traffic based on runtime contextual data. This data, often referred to as routing attributes, determines whether a request is directed to the production environment (green deployment) or a blue/green deployment containing the new features under test. The selection process relies on evaluating these attributes against pre-defined routing rules.
But, how can you pass that contextual data across multiple services?
Baggage is a way to propagate context between services. They are key-value pairs that are attached to a request and are passed along to downstream services. This allows you to pass information on.
Let’s give an example:
You have a chain of services (svc1, svc2, svc3) and you want svc3 to get some information that was received by svc1.
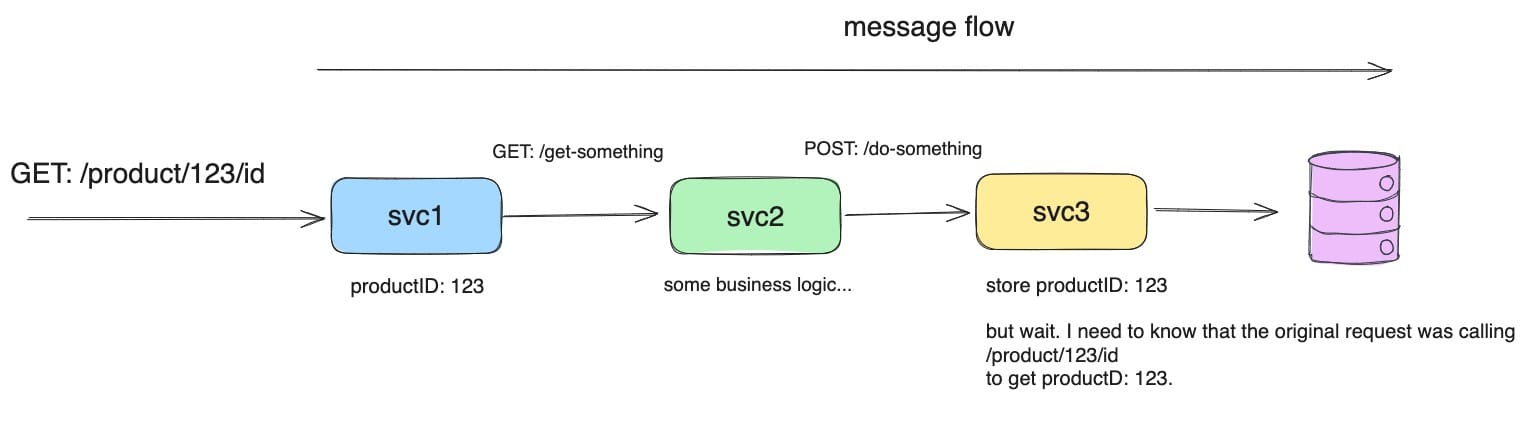
You can pass it as part of the payload. That means that svc2 is aware of that data. So it is not a good idea.
You can use a custom header and pass it along the chain. But it is not a good idea either. Because you have to modify the code of each service to pass the header.
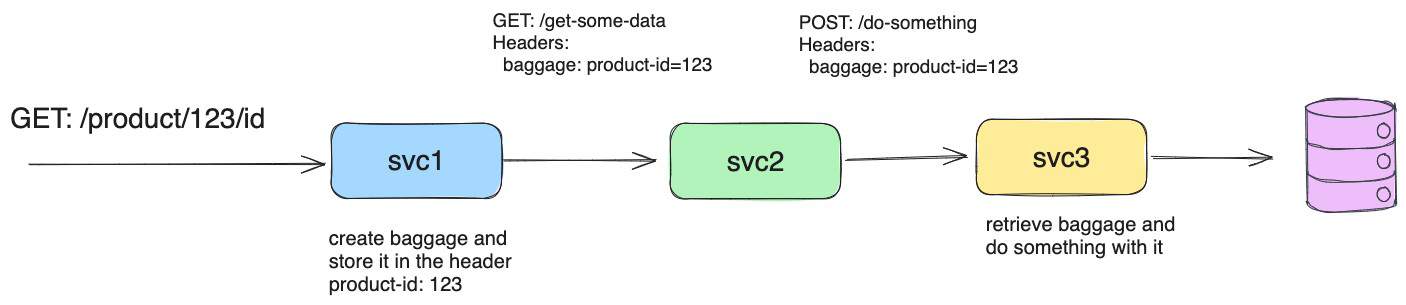
If you are already using a tracing library to propagate headers, the best way to do it is to use the baggage header. It is a header that is passed along the chain without the need to modify the code of the services.
How it works
The baggage header is defined in the W3C standard for propagating user-defined data within a distributed tracing context https://www.w3.org/TR/baggage/.
This is the reason why it is supported by many tracing systems like OpenTelemetry, Jaeger, Zipkin, and others.
Therefore, when you integrate tracing and you are forced to propagate context between services, you can use the baggage header too.
It is propagated transparently by the tracing system.
Here is an example in Python with OpenTelemetry:
import os
import logging
from flask import Flask, request
import requests
from opentelemetry.instrumentation.flask import FlaskInstrumentor
from opentelemetry.instrumentation.requests import RequestsInstrumentor
from opentelemetry import trace
from opentelemetry.sdk.trace import TracerProvider

app = Flask(__name__)
app.logger.setLevel(logging.INFO)

trace.set_tracer_provider(TracerProvider())

FlaskInstrumentor().instrument_app(app)
RequestsInstrumentor().instrument()

@app.route('/')
def hello():
    headers = dict(request.headers)
    app.logger.info(f"Received headers: {headers}")

    request_url = os.environ.get("REQUEST_URL")
    app.logger.info(f"Calling: {request_url}")
    response = requests.get(f'{request_url}')
    return f"\nHello from API 2!\n{response.text}"

if __name__ == '__main__':
    app.run(host=os.environ.get("HOST", "0.0.0.0"), port=os.environ.get("PORT", 5000))
Note: In the repository folder “app”, you can find the full set of applications (app1, app2, app3) in Python leveraging OpenTelemetry libraries.
You can see, in the function, there is no code to pass the baggage header. It is done by the tracing system when you define the FlaskInstrumentor.
In other services, you can access the baggage header like this:
# [...]
@app.route('/')
def hello():
    headers = dict(request.headers)
    app.logger.info(f"Received headers: {headers}")
    productid = baggage.get_baggage("product-id")
# [...]
Routing based on Baggage header
Knowing that we can pass transparent data from one service to another, we can use it to control the routing with Istio Service Mesh.
apiVersion: networking.istio.io/v1beta1
kind: VirtualService
metadata:
name: app3
spec:
hosts:
- app3.my-system.svc.cluster.local
http:
- name: "new-version"
match:
- headers:
baggage:
regex: ".*pr=(.*)?"
route:
- destination:
host: app3-new-version.my-system.svc.cluster.local
- name: "live-version"
route:
- destination:
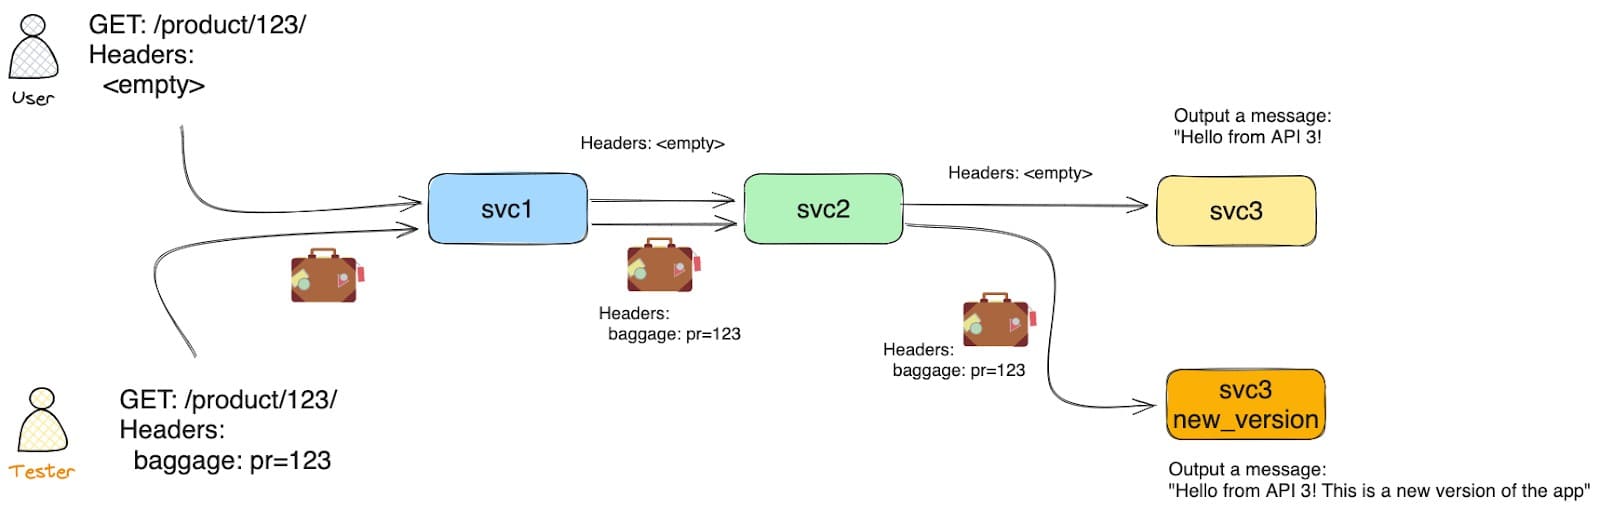
host: app3.my-system.svc.cluster.localWith this VirtualDestination, we are redirecting traffic to a blue version of app3 when the baggage header contains a value pr=XXX. And to a green version of app3 when the baggage header is not present.
This is used for Testing In Production scenarios as you can read in this article: Service Mesh for Developers, Part 2: Testing in Production.
Demo
In this demo, you will learn how to use the baggage header to control the routing of your services.
Architecture:
Clone the repository
git clone git@github.com:antonioberben/test-in-production.git
cd test-in-production
Deploy Istio
istioctl install -f ./k8s/istio-values.yaml -yDeploy the services
kubectl create ns my-system

kubectl label namespace my-system istio.io/rev=1-21 --overwrite

kubectl apply -f ./k8s/app.yaml
kubectl apply -f ./k8s/app3-new-version.yaml
Deploy the Istio Resources
kubectl apply -f ./k8s/istio-virtualservice.yamlTest the services
kubectl port-forward -n my-system svc/app1 5000And then
curl localhost:5000/product/123You will see the response from app1, app2 and app3 together:
Hello from API 1!
Hello from API 2!
Hello from API 3!
Now, adding the baggage header which will be propagated across the services:
curl localhost:5000/product/123 -H "baggage: pr=123"You will see the response from app3 with the blue version:
Hello from API 1!
Hello from API 2!
Hello from API 3! This is a new version of the app
Checking the logs for the proxy,
kubectl logs -n my-app deploy/app3 -n my-system -c istio-proxy --tail 1You will see outputted the baggage header that was passed to the application. Notice that app1 added some extra baggage.
[ACCES_LOGS] "baggage":
"x=1,pr=123,product-id=123,other-baggage=value2,another-baggage=3,url-baggage=%2Ftest%2F1%3Fattr%3D1" "authority": "app3.my-system.svc.cluster.local:5000" "method": "GET" "path": "/"
Conclusion
You have tested how Istio and OpenTelemetry can be leveraged to achieve transparent context propagation between microservices using the W3C baggage header standard. This eliminates the need for manual code modifications and enables features like traffic routing based on baggage data, facilitating safe testing in production environments.
Now that you can Test In Production, the next goal is to Develop In Production. Do you want to know how?
For that and other interesting tricks, reach out to me.