

Project post by Congwang Li, Dragonfly
This document will help you experience how to use dragonfly with TorchServe. During the downloading of models, the file size is large and there are many services downloading the files at the same time. The bandwidth of the storage will reach the limit and the download will be slow.
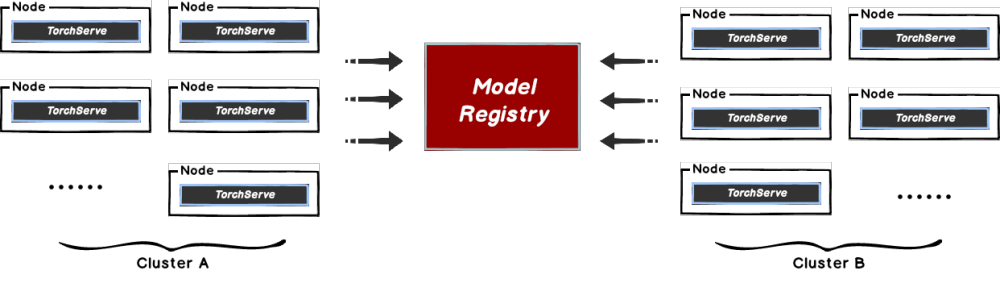
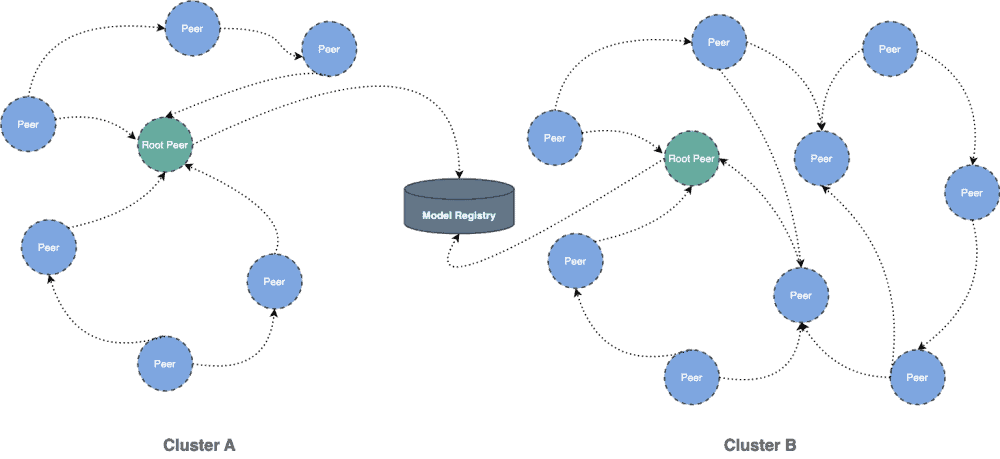
Dragonfly can be used to eliminate the bandwidth limit of the storage through P2P technology, thereby accelerating file downloading.
Architecture
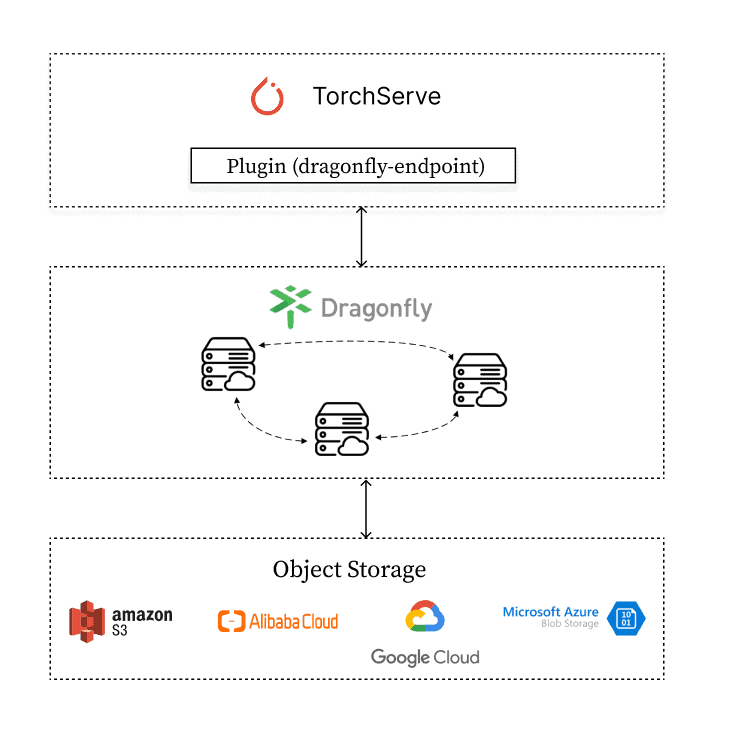
Dragonfly Endpoint plugin forwards TorchServe download model requests to the Dragonfly P2P network.
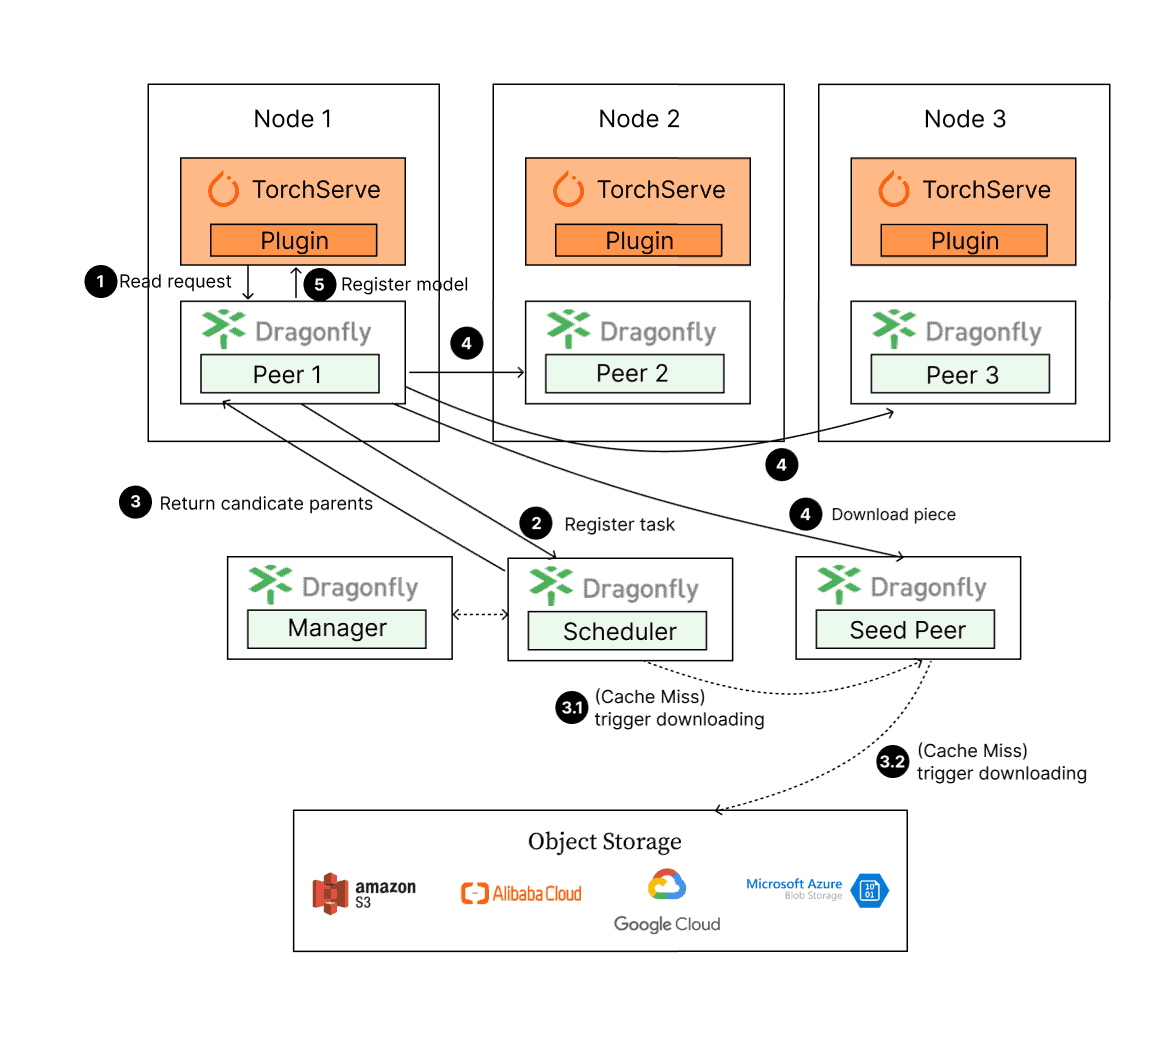
The models download steps:
- TorchServe sends a model download request and the request is forwarded to the Dragonfly Peer.
- The Dragonfly Peer registers tasks with the Dragonfly Scheduler.
- Return the candidate parents to Dragonfly Peer.
- Dragonfly Peer downloads model from candidate parents.
- After downloading the model, TorchServe will register the model.
Installation
By integrating Dragonfly Endpoint into TorchServe, download traffic through Dragonfly to pull models stored in S3, OSS, GCS, and ABS, and register models in TorchServe. The Dragonfly Endpoint plugin is in the dragonfly-endpoint repository.
Prerequisites
| Name | Version | document |
| Kubernetes cluster | 1.20+ | kubernetes.io |
| Helm | 3.8.0+ | helm.sh |
| TorchServe | 0.4.0+ | pytorch.org/serve/ |
Notice: Kind is recommended if no kubernetes cluster is available for testing.
Dragonfly Kubernetes Cluster Setup
For detailed installation documentation, please refer to quick-start-kubernetes.
Prepare Kubernetes Cluster
Create kind multi-node cluster configuration file kind-config.yaml, configuration content is as follows:
kind: Cluster
apiVersion: kind.x-k8s.io/v1alpha4
nodes:
  - role: control-plane
  - role: worker
  - role: worker
Create a kind multi-node cluster using the configuration file:
kind create cluster --config kind-config.yaml
Switch the context of kubectl to kind cluster:
kubectl config use-context kind-kind
Kind loads dragonfly image
Pull dragonfly latest images:
docker pull dragonflyoss/scheduler:latest
docker pull dragonflyoss/manager:latest
docker pull dragonflyoss/dfdaemon:latest
Kind cluster loads dragonfly latest images:
kind load docker-image dragonflyoss/scheduler:latest
kind load docker-image dragonflyoss/manager:latest
kind load docker-image dragonflyoss/dfdaemon:latest
Create dragonfly cluster based on helm charts
Create helm charts configuration file charts-config.yaml and set dfdaemon.config.agents.regx to match the download path of the object storage, configuration content is as follows:
scheduler:
  replicas: 1
  metrics:
    enable: true
  config:
    verbose: true
    pprofPort: 18066

seedPeer:
  replicas: 1
  metrics:
    enable: true
  config:
    verbose: true
    pprofPort: 18066

dfdaemon:
  hostNetwork: true
  metrics:
    enable: true
  config:
    verbose: true
    pprofPort: 18066
    proxy:
      defaultFilter: "Expires&Signature&ns"
      security:
        insecure: true
        cacert: ""
        cert: ""
        key: ""
      tcpListen:
        namespace: ""
        port: 65001
      registryMirror:
        url: https://index.docker.io
        insecure: true
        certs: []
        direct: false
      proxies:
      - regx: blobs/sha256.*
      - regx: .*amazonaws.*

manager:
  replicas: 1
  metrics:
    enable: true
  config:
    verbose: true
    pprofPort: 18066

jaeger:
  enable: true
Create a dragonfly cluster using the configuration file:
$ helm repo add dragonfly https://dragonflyoss.github.io/helm-charts/
$ helm install --wait --create-namespace --namespace dragonfly-system dragonfly dragonfly/dragonfly -f charts-config.yaml
LAST DEPLOYED: Mon Sep  4 10:24:55 2023
NAMESPACE: dragonfly-system
STATUS: deployed
REVISION: 1
TEST SUITE: None
NOTES:
1. Get the scheduler address by running these commands:
  export SCHEDULER_POD_NAME=$(kubectl get pods --namespace dragonfly-system -l "app=dragonfly,release=dragonfly,component=scheduler" -o jsonpath={.items[0].metadata.name})
  export SCHEDULER_CONTAINER_PORT=$(kubectl get pod --namespace dragonfly-system $SCHEDULER_POD_NAME -o jsonpath="{.spec.containers[0].ports[0].containerPort}")
  kubectl --namespace dragonfly-system port-forward $SCHEDULER_POD_NAME 8002:$SCHEDULER_CONTAINER_PORT
  echo "Visit http://127.0.0.1:8002 to use your scheduler"

2. Get the dfdaemon port by running these commands:
  export DFDAEMON_POD_NAME=$(kubectl get pods --namespace dragonfly-system -l "app=dragonfly,release=dragonfly,component=dfdaemon" -o jsonpath={.items[0].metadata.name})
  export DFDAEMON_CONTAINER_PORT=$(kubectl get pod --namespace dragonfly-system $DFDAEMON_POD_NAME -o jsonpath="{.spec.containers[0].ports[0].containerPort}")
  You can use $DFDAEMON_CONTAINER_PORT as a proxy port in Node.

3. Configure runtime to use dragonfly:
  https://d7y.io/docs/getting-started/quick-start/kubernetes/


4. Get Jaeger query URL by running these commands:
  export JAEGER_QUERY_PORT=$(kubectl --namespace dragonfly-system get services dragonfly-jaeger-query -o jsonpath="{.spec.ports[0].port}")
  kubectl --namespace dragonfly-system port-forward service/dragonfly-jaeger-query 16686:$JAEGER_QUERY_PORT
  echo "Visit http://127.0.0.1:16686/search?limit=20&lookback=1h&maxDuration&minDuration&service=dragonfly to query download events"
Check that dragonfly is deployed successfully:
$ kubectl get po -n dragonfly-system
NAME                                 READY   STATUS    RESTARTS      AGE
dragonfly-dfdaemon-7r2cn             1/1     Running   0          3m31s
dragonfly-dfdaemon-fktl4             1/1     Running   0          3m31s
dragonfly-jaeger-c7947b579-2xk44     1/1     Running   0          3m31s
dragonfly-manager-5d4f444c6c-wq8d8   1/1     Running   0          3m31s
dragonfly-mysql-0                    1/1     Running   0          3m31s
dragonfly-redis-master-0             1/1     Running   0          3m31s
dragonfly-redis-replicas-0           1/1     Running   0          3m31s
dragonfly-redis-replicas-1           1/1     Running   0          3m5s
dragonfly-redis-replicas-2           1/1     Running   0          2m44s
dragonfly-scheduler-0                1/1     Running   0          3m31s
dragonfly-seed-peer-0                1/1     Running   0          3m31s
Expose the Proxy service port
Create the dfstore.yaml configuration to expose the port on which the Dragonfly Peer’s HTTP proxy listens. The default port is 65001 and settargetPort to 65001.
kind: Service
apiVersion: v1
metadata:
  name: dfstore
spec:
  selector:
    app: dragonfly
    component: dfdaemon
    release: dragonfly

  ports:
  - protocol: TCP
    port: 65001
    targetPort: 65001

  type: NodePort
Create service:
kubectl --namespace dragonfly-system apply -f dfstore.yaml
Forward request to Dragonfly Peer’s HTTP proxy:
kubectl --namespace dragonfly-system port-forward service/dfstore 65001:65001
Install Dragonfly Endpoint plugin
Set environment variables for Dragonfly Endpoint configuration
Create config.json configuration,and set DRAGONFLY_ENDPOINT_CONFIG environment variable for config.json file path.
export DRAGONFLY_ENDPOINT_CONFIG=/etc/dragonfly-endpoint/config.json
The default configuration path is:
- linux: /etc/dragonfly-endpoint/config.json
- darwin: ~/.dragonfly-endpoint/config.json
Dragonfly Endpoint configuration
Create the config.json configuration to configure the Dragonfly Endpoint for S3, the configuration is as follows:
{
"addr": "http://127.0.0.1:65001",
"header": {
},
"filter": [
"X-Amz-Algorithm",
"X-Amz-Credential",
    "X-Amz-Date",
  "X-Amz-Expires",
  "X-Amz-SignedHeaders",
  "X-Amz-Signature"
],
"object_storage": {
"type": "s3",
"bucket_name": "your_s3_bucket_name",
"region": "your_s3_access_key",
"access_key": "your_s3_access_key",
"secret_key": "your_s3_access_key"
}
}
- addr: The address of Drangonfly’s Peer HTTP proxy.
- header: Adds a request header to the request.
- filter: Used to generate unique tasks and filter unnecessary query parameters in the URL.
- object_storage: The object storage configuration, where type can be s3, oss, abs, gcs, refer to the object storage configuration for details.
In the filter of the configuration, set different values when using different object storage:
| Type | Value |
| OSS | “Expires&Signature&ns” |
| S3 | “X-Amz-Algorithm&X-Amz-Credential&X-Amz-Date&X-Amz-Expires&X-Amz-SignedHeaders&X-Amz-Signature” |
| OBS | “X-Amz-Algorithm&X-Amz-Credential&X-Amz-Date&X-Obs-Date&X-Amz-Expires&X-Amz-SignedHeaders&X-Amz-Signature” |
Object storage configuration
In addition to S3, Dragonfly Endpoint plugin also supports OSS, GCS and ABS. Different object storage configurations are as follows:
OSS(Object Storage Service)
{
  "addr": "http://127.0.0.1:65001",
  "header": {},
  "filter": ["Expires", "Signature"],
  "object_storage": {
    "type": "oss",
    "bucket_name": "your_oss_bucket_name",
    "endpoint": "your_oss_endpoint",
    "access_key_id": "your_oss_access_key_id",
    "access_key_secret": "your_oss_access_key_secret"
  }
}
GCS(Google Cloud Storage)
{
  "addr": "http://127.0.0.1:65001",
  "header": {},
  "object_storage": {
    "type": "gcs",
    "bucket_name": "your_gcs_bucket_name",
    "project_id": "your_gcs_project_id",
    "service_account_path": "your_gcs_service_account_path"
  }
}
ABS(Azure Blob Storage)
{
  "addr": "http://127.0.0.1:65001",
  "header": {},
  "object_storage": {
    "type": "abs",
    "account_name": "your_abs_account_name",
    "account_key": "your_abs_account_key",
    "container_name": "your_abs_container_name"
  }
}
TorchServe integrates Dragonfly Endpoint plugin
For detailed installation documentation, please refer to TorchServe document.
Binary installation
Prerequisites
| Name | Version | Document |
| Python | 3.8.0+ | https://www.python.org/ |
| TorchServe | 0.4.0+ | pytorch.org/serve/ |
| Java | 11 | https://openjdk.org/projects/jdk/11/ |
Install TorchServe dependencies and torch-model-archiver:
python ./ts_scripts/install_dependencies.py
conda install torchserve torch-model-archiver torch-workflow-archiver -c pytorch
Clone TorchServe repository:
git clone https://github.com/pytorch/serve.git
cd serve
Create model-store directory to store the models:
mkdir model-store
chmod 777 model-store
Create plugins-path directory to store the binaries of the plugin:
mkdir plugins-path
Package Dragonfly Endpoint plugin
Clone dragonfly-endpoint repository:
git clone https://github.com/dragonflyoss/dragonfly-endpoint.git
Build the dragonfly-endpoint project to generate file in the build/libs directory:
cd ./dragonfly-endpoint
gradle shadowJar
Note: Due to the limitations of TorchServe’s JVM, the best Java version for Gradle is 11, as a higher version will cause the plugin to fail to parse.
Move the Jar file into the plugins-path directory:
mv build/libs/dragonfly_endpoint-1.0-all.jar <your plugins-path>
Prepare the plugin configuration config.json, and use S3 as the object storage:
{
"addr": "http://127.0.0.1:65001",
"header": {
},
"filter": [
"X-Amz-Algorithm",
"X-Amz-Credential",
    "X-Amz-Date",
  "X-Amz-Expires",
  "X-Amz-SignedHeaders",
  "X-Amz-Signature"
],
"object_storage": {
"type": "s3",
"bucket_name": "your_s3_bucket_name",
"region": "your_s3_access_key",
"access_key": "your_s3_access_key",
"secret_key": "your_s3_access_key"
}
}
Set the environment variables for the configuration:
export DRAGONFLY_ENDPOINT_CONFIG=/etc/dragonfly-endpoint/config.json
–model-storesets the previously created directory to store the models and –plugins-path sets the previously created directory to store the plugins. Start the TorchServe with Dragonfly Endpoint plugin:
torchserve --start --model-store <path-to-model-store-file> --plugins-path=<path-to-plugin-jars>
Verify
Prepare the model. Download a model from Model ZOO or package the model refer to Torch Model archiver for TorchServe. Use squeezenet1_1_scripted.mar model to verify:
wget https://torchserve.pytorch.org/mar_files/squeezenet1_1_scripted.mar
Upload the model to object storage. For detailed uploading the model to S3, please refer to S3。
# Download the command line tool
pip install awscli
# Configure the key as prompted
aws configure
# Upload file
aws s3 cp < local file path > s3://< bucket name >/< Target path >
TorchServe plugin is named dragonfly, please refer to TorchServe Register API for details of plugin API. The url parameter are not supported and add the file_name parameter which is the model file name to download.
Download the model:
curl -X POST "http://localhost:8081/dragonfly/models?file_name=squeezenet1_1.mar"
Verify the model download successful:
{
"Status": "Model "squeezenet1_1" Version: 1.0 registered with 0 initial workers. Use scale workers API to add workers for the model."
}
Added model worker for inference:
curl -v -X PUT "http://localhost:8081/models/squeezenet1_1?min_worker=1"
Check the number of worker is increased:
* About to connect() to localhost port 8081 (#0)
*   Trying ::1...
* Connected to localhost (::1) port 8081 (#0)
> PUT /models/squeezenet1_1?min_worker=1 HTTP/1.1
> User-Agent: curl/7.29.0
> Host: localhost:8081
> Accept: */*
>
< HTTP/1.1 202 Accepted
< content-type: application/json
< x-request-id: 66761b5a-54a7-4626-9aa4-12041e0e4e63
< Pragma: no-cache
< Cache-Control: no-cache; no-store, must-revalidate, private
< Expires: Thu, 01 Jan 1970 00:00:00 UTC
< content-length: 47
< connection: keep-alive
<
{
  "status": "Processing worker updates..."
}
* Connection #0 to host localhost left intact
Call inference API:
# Prepare pictures that require reasoning.
curl -O  https://raw.githubusercontent.com/pytorch/serve/master/docs/images/kitten_small.jpg
curl -O  https://raw.githubusercontent.com/pytorch/serve/master/docs/images/dogs-before.jpg

# Call inference API.
curl http://localhost:8080/predictions/squeezenet1_1 -T kitten_small.jpg -T dogs-before.jpg
Check the response successful:
{
  "lynx": 0.5455784201622009,
  "tabby": 0.2794168293476105,
  "Egyptian_cat": 0.10391931980848312,
  "tiger_cat": 0.062633216381073,
  "leopard": 0.005019133910536766
}
Install TorchServe with Docker
Docker configuration
Pull dragonflyoss/dragonfly-endpoint image with the plugin. The following is an example of the CPU version of TorchServe, refer to Dockerfile.
docker pull dragonflyoss/dragonfly-endpoint
Create model-store directory to store the model files:
mkdir model-store
chmod 777 model-store
Prepare the plugin configuration config.json, and use S3 as the object storage:
{
"addr": "http://127.0.0.1:65001",
"header": {
},
"filter": [
"X-Amz-Algorithm",
"X-Amz-Credential",
    "X-Amz-Date",
  "X-Amz-Expires",
  "X-Amz-SignedHeaders",
  "X-Amz-Signature"
],
"object_storage": {
"type": "s3",
"bucket_name": "your_s3_bucket_name",
"region": "your_s3_access_key",
"access_key": "your_s3_access_key",
"secret_key": "your_s3_access_key"
}
}
Set the environment variables for the configuration:
export DRAGONFLY_ENDPOINT_CONFIG=/etc/dragonfly-endpoint/config.json
Mount the model-store and dragonfly-endpoint configuration directory. Run the container:
# 使用环境变量的配置路径
sudo docker run --rm -it --network host -v $(pwd)/model-store:/home/model-server/model-store  -v ${DRAGONFLY_ENDPOINT_CONFIG}:${DRAGONFLY_ENDPOINT_CONFIG} dragonflyoss/dragonfly-endpoint:latest
Verify
Prepare the model. Download a model from Model ZOO or package the model refer to Torch Model archiver for TorchServe. Use squeezenet1_1_scripted.mar model to verify:
wget https://torchserve.pytorch.org/mar_files/squeezenet1_1_scripted.mar
Upload the model to object storage. For detailed uploading the model to S3, please refer to S3。
# Download the command line tool
pip install awscli
# Configure the key as prompted
aws configure
# Upload file
aws s3 cp < local file path > s3://< bucket name >/< Target path >
TorchServe plugin is named dragonfly, please refer to TorchServe Register API for details of plugin API. The url parameter are not supported and add the file_name parameter which is the model file name to download.
Download a model:
curl -X POST "http://localhost:8081/dragonfly/models?file_name=squeezenet1_1.mar"
Verify the model download successful:
{
"Status": "Model "squeezenet1_1" Version: 1.0 registered with 0 initial workers. Use scale workers API to add workers for the model."
}
Added model worker for inference:
curl -v -X PUT "http://localhost:8081/models/squeezenet1_1?min_worker=1"
Check the number of worker is increased:
* About to connect() to localhost port 8081 (#0)
*   Trying ::1...
* Connected to localhost (::1) port 8081 (#0)
> PUT /models/squeezenet1_1?min_worker=1 HTTP/1.1
> User-Agent: curl/7.29.0
> Host: localhost:8081
> Accept: */*
>
< HTTP/1.1 202 Accepted
< content-type: application/json
< x-request-id: 66761b5a-54a7-4626-9aa4-12041e0e4e63
< Pragma: no-cache
< Cache-Control: no-cache; no-store, must-revalidate, private
< Expires: Thu, 01 Jan 1970 00:00:00 UTC
< content-length: 47
< connection: keep-alive
<
{
  "status": "Processing worker updates..."
}
* Connection #0 to host localhost left intact
Call inference API:
# Prepare pictures that require reasoning.
curl -O  https://raw.githubusercontent.com/pytorch/serve/master/docs/images/kitten_small.jpg
curl -O  https://raw.githubusercontent.com/pytorch/serve/master/docs/images/dogs-before.jpg

# Call inference API.
curl http://localhost:8080/predictions/squeezenet1_1 -T kitten_small.jpg -T dogs-before.jpg
Check the response successful:
{
  "lynx": 0.5455784201622009,
  "tabby": 0.2794168293476105,
  "Egyptian_cat": 0.10391931980848312,
  "tiger_cat": 0.062633216381073,
  "leopard": 0.005019133910536766
}
Performance testing
Test the performance of single-machine model download by TorchServe API after the integration of Dragonfly P2P. Due to the influence of the network environment of the machine itself, the actual download time is not important, but the ratio of the increase in the download time in different scenarios is very important.
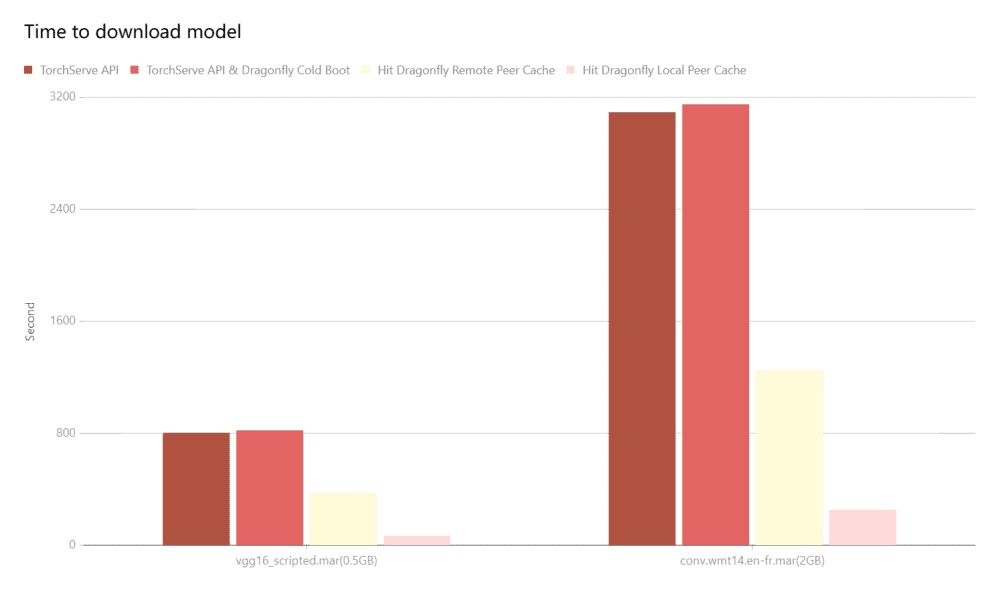
- TorchServe API: Use signed URL provided by Object Storage to download the model directly.
- TorchServe API & Dragonfly Cold Boot: Use TorchServe API to download model via Dragonfly P2P network and no cache hits.
- Hit Remote Peer: Use TorchServe API to download model via Dragonfly P2P network and hit the remote peer cache.
- Hit Local Peer: Use TorchServe API to download model via Dragonfly P2P network and hit the local peer cache.
Test results show TorchServe and Dragonfly integration. It can effectively reduce the file download time. Note that this test was a single-machine test, which means that in the case of cache hits, the performance limitation is on the disk. If Dragonfly is deployed on multiple machines for P2P download, the models download speed will be faster.
Links
Dragonfly community
- Website: https://d7y.io/
- Github Repo: https://github.com/dragonflyoss/Dragonfly2
- Slack Channel: #dragonfly on CNCF Slack
- Discussion Group: dragonfly-discuss@googlegroups.com
- Twitter: @dragonfly_oss
Pytorch
- Website: https://pytorch.org/
- Github Repo: https://github.com/pytorch/pytorch
- TorchServe Document: https://pytorch.org/serve/
TorchServe Github Repo: https://github.com/pytorch/serve