


Member post originally published on InfraCloud’s blog by Atulpriya Sharma
In an ideal world, developers focus on coding applications while the operations team focuses on their seamless deployments of workloads to different environments. However, this is far from the reality.
Developers often struggle to understand the nuances of each deployment target which increases their cognitive burden. For instance, they may be using Docker Compose for local development, but their workloads may be deployed in a Kubernetes environment. This gap can result in errors and inconsistencies, affecting the development and deployment of workloads.
And that’s why there’s a pressing need for a standardized approach to configure workloads. Platform engineering tries to solve this issue by means of internal developer platforms (IDP) that provide developers with tools to help them manage workloads.
In this blog post, we’ll look into the intricacies of workload specifications that simplify the transitioning of code from one environment to another and also reduce the cognitive load on the developers. Sounds exciting? Let’s deep dive.
Understanding workload specification
Workload specification acts as a compass for software development and deployment. It is a structured blueprint that outlines various configurations, resource requirements for the applications, dependencies, and scaling strategies to name a few that are required for the workload. This simplifies the deployment process by making it consistent and accurate and promoting error-free and efficient workloads.
Let us look at some scenarios that highlight the need for a workload specification.
Consistent deployments
Deploying workloads to different environments means that each deployment becomes a unique challenge. Every deployment will have different configuration settings, scaling parameters, and resource requirements. This can lead to inconsistencies and errors making deployment and migration a nightmare. Using workload specification, teams can have standardized templates that follow best practices which not only reduces the errors but also leads to a consistent deployment of workloads.
Reduced cognitive load
Developers deal with multiple environments like staging, integration, production, etc., they need to keep a tab on the different configurations for each of these environments. They must remember and apply these changes to their workloads while deploying on different environments which leads to a higher risk of configuration errors. Workload specification reduces this cognitive load of developers and serves as a single comprehensive template for workloads.
Better collaboration
With the presence of multiple environments to deploy workloads, both the development and operations teams need to meet the requirements correctly. Developers may struggle to communicate the exact requirements for their workloads while operations teams may find it difficult to implement these configurations consistently across environments. Workload specification acts as a common language for both the development and operations team thus fostering collaboration and clear communication leading to smoother workflows.
Having understood what workload specifications are and why they are needed, we’ll look into the various options available to specify workloads in the following section.
Workload specification in practice
Adopting workload specifications offers a practical solution to the challenges discussed earlier. A workload specification streamlines the process of configuring, deploying, and managing workloads, promoting consistency, reducing errors, and improving collaboration across the development and operations teams.
There are multiple ways and tools that allow you to specify your workloads. In this section, we will explore three popular open source options available for workload specifications and how you can use them.
Score
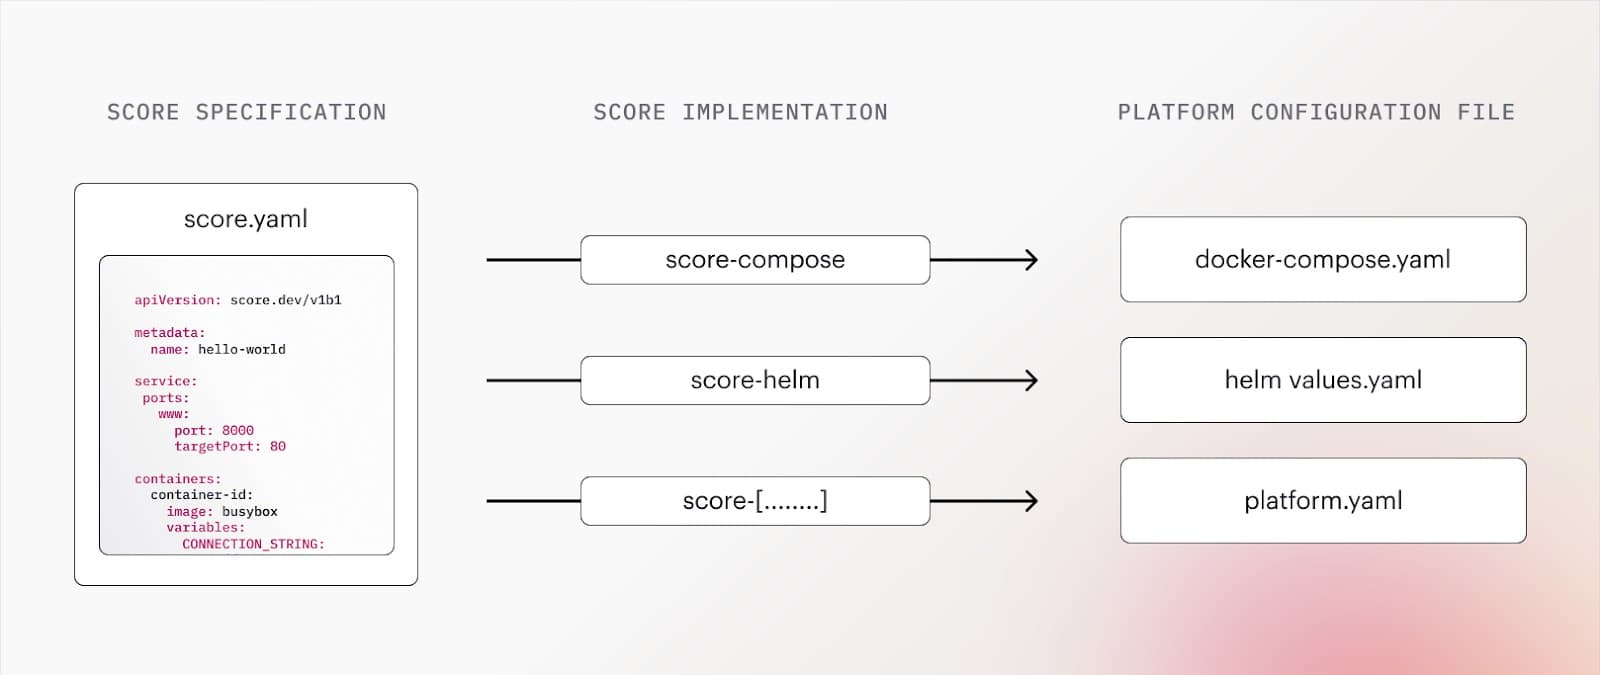
Score is a container-based, workload specification that is platform-agnostic. Using Score you can create a unified definition for your workloads which can be translated to other platforms like Helm, and Docker Compose using the Score CLI.
It simplifies workload descriptions by providing a score.yaml file that automates and standardizes configuration generation. This specification when executed with a Score implementation like score-compose or score-yaml yields platform-specific configuration files such as docker-compose.yaml and Helm values.yaml respectively. These files can directly be executed in the respective environments and can also be customized further.
Score to YAML Example
As discussed earlier, Score provides different implementations that can be used to process a score.yaml file to generate a specific workload configuration file. We’ll see how we can convert a score.yaml into values.yaml file that can be used with Helm.
Below is a sample score.yaml file that defines the details of your workload.apiVersion: score.dev/v1b1 metadata: name: hello-world containers: hello: image: busybox command: ["/bin/sh"] args: ["-c", "while true; do echo Hello World!; sleep 5; done"]
By running score-helm run -f ./score.yaml -o ./values.yaml command, Score automatically converts your score.yaml file to a valid values.yaml file.containers: hello: args: - -c - while true; do echo Hello World!; sleep 5; done command: - /bin/sh image: name: busybox
You can deploy the workload using helm install hello --values ./values.yaml
This way you can use Score to specify a single workload specification for your workloads and convert it to a Docker Compose, Helm, or a custom specification.
Benefits of using Score
Score brings substantial benefits to the table when it comes to workload specifications. Some of them are:
- Declarative: Score allows developers to declaratively define the resources required by their workloads. You can declare “what” resources are required for your workloads, without worrying about “how” these resources would be provisioned. The “how” is usually an environment-specific implementation that Score takes care of.
- Integration: The
score.yamlfile can be converted using a Score implementation to generate specifications that can seamlessly work with different environments and become a part of your workflow. It provides you with a single file change and Score can take care of it irrespective of any changes to your underlying tech stack.
Refer to Score documentation to learn more Score and get started.
Acorn
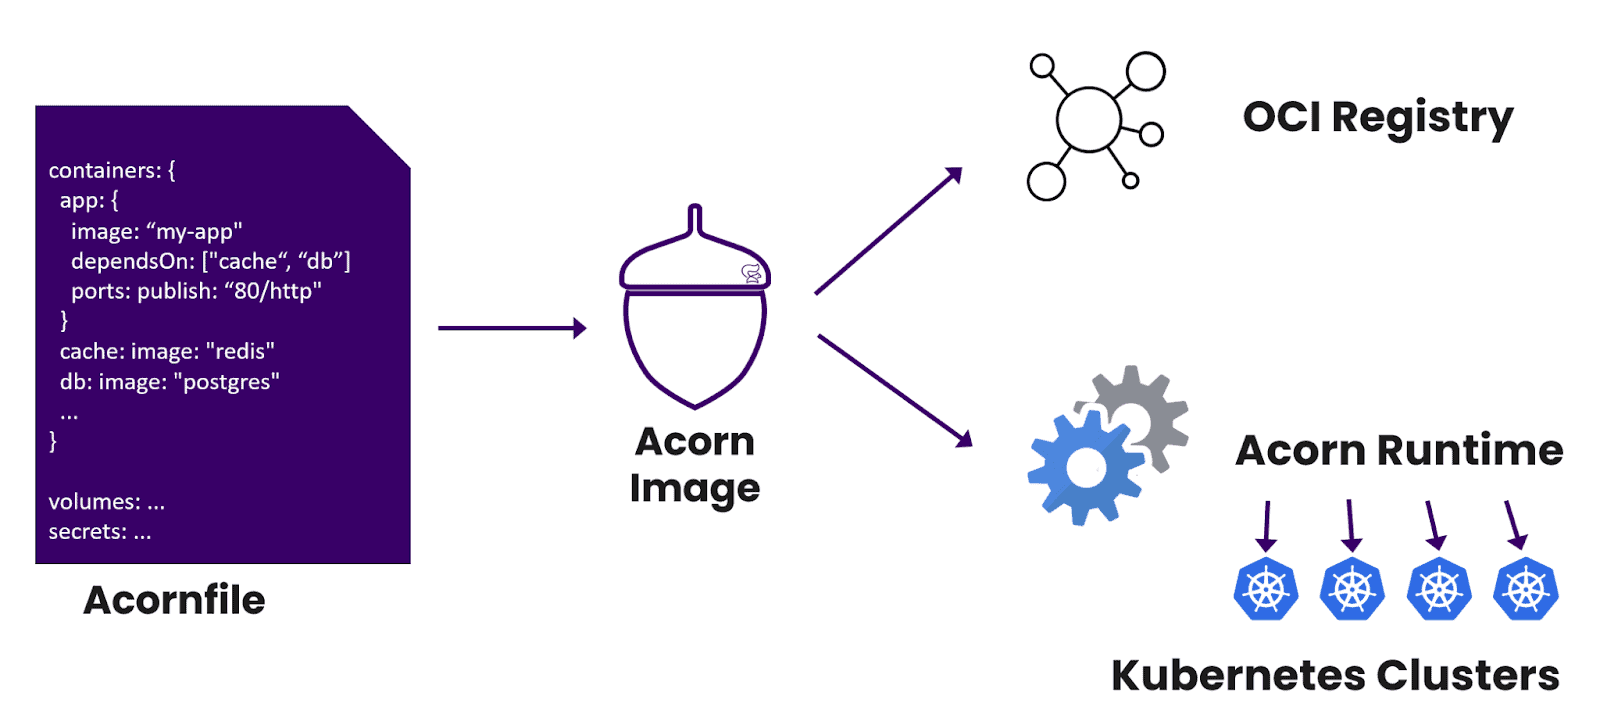
Acorn is another open source packaging tool for deploying applications on Kubernetes. It bundles the docker images, settings, and deployment into a single Acorn image package. This package can be uploaded to any OCI container repository, making it suitable for deployment to any Kubernetes environment.
Developers describe the application setup in an Acornfile. The file covers the aspects of the application without the developers needing to go through the complexities of Kubernetes yaml files. You can use the Acorn CLI to create, deploy, and manage Acorn images on a Kubernetes cluster which simplifies the process of deploying applications on Kubernetes.
Acornfile example
An Acornfile follows a familiar syntax like yaml, so as a developer, you don’t need to learn anything new. The template contains different components like containers, volumes, secrets, jobs, services, permissions, and other components that define a workload.
Below is a simple Acornfile with an Nginx container and an index.html file that prints a message on the screen.containers: { web: { image: "nginx" ports: publish: "80/http" files: { // Simple index.html file "/usr/share/nginx/html/index.html": "<h1>My First Acorn!</h1>" } } }
One can deploy the above Acornfile using acorn run . and Acorn will deploy the application to the targeted Kubernetes cluster and configure the networks, and storage for you. So without even understanding Helm, you can deploy an application to a Kubernetes cluster.
Benefits of using Acorn
Acorn offers compelling benefits to developers and DevOps teams alike as a workload specification and application packaging tool. Some of them are:
- Application level definitions: Using an Acornfile, developers can define not only infrastructure-level constructs but also application-level configurations as well. From environment variables and secrets to service addresses and ports, Acornfile allows you to define all the required configurations from a single file and bring structure to application deployment.
- OCI-compliant images: OCI compliance is a critical standard in the world of containers ensuring that containers are interoperable and can run across different container runtimes. The Acorn image artifact which contains the docker images, configurations, and deployment specifications, adheres to OCI standards which simplifies the deployment process and improves the portability of applications.
You can read more about working with Acorn to learn more.
Dagger
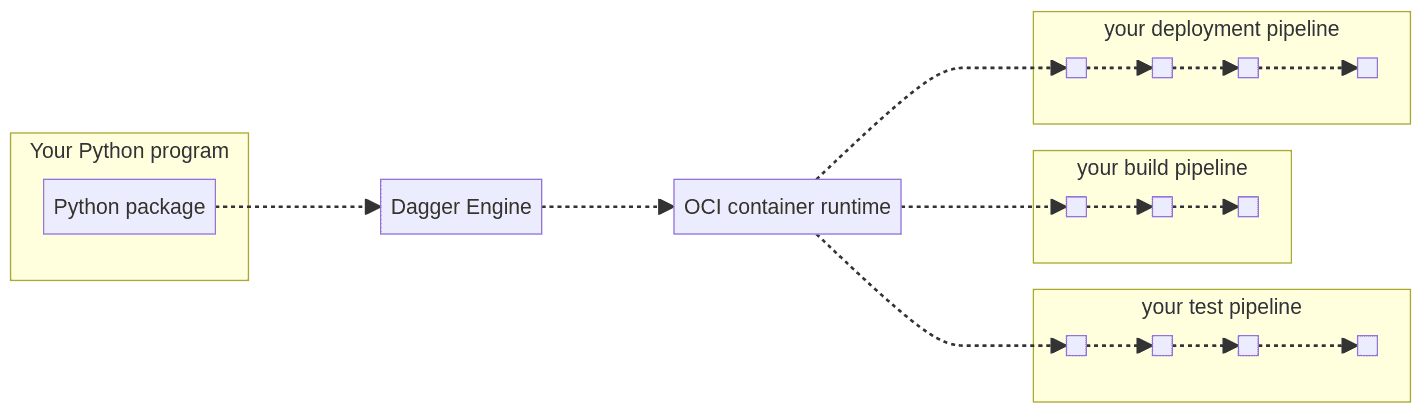
If you are a platform engineer who is building custom tooling to unify continuous delivery across your organization, then Dagger is a good option to explore. Dagger allows you to code your workflows like CI/CD pipelines in the same language as your application thus making it easier and faster. It runs your pipelines as standard OCI containers.
You can use a Dagger SDK based on the programming language you use to prepare the workflows to execute programmatically. With this as input, the underlying Dagger engine computes a Directed Acyclic Graph of operations required to process operations. At the time of writing this post, Dagger has Go, Python, and NodeJS SDKs that are available.
Dagger pipeline example
As Dagger allows you to code your pipeline using the language of your choice, we’ll quickly look into how you can use Dagger Python SDK. After you install the SDK, you can create a Python file similar to what is shown below."""Execute a command.""" import sys import anyio import dagger async def test(): async with dagger.Connection(dagger.Config(log_output=sys.stderr)) as client: python = ( client.container() # pull container .from_("python:3.11-slim-buster") # get Python version .with_exec(["python", "-V"]) ) # execute version = await python.stdout() print(f"Hello from Dagger and {version}") anyio.run(test)
The above file basically creates a Dagger client that acts as an interface with the Dagger Engine. It also initializes a new container from an image (Python 3.11 slim in this case) which returns a container. This container is then used to execute the commands specified.
Upon executing this using dagger run python test.py, it creates a container and executes the command, and returns the result.Hello from Dagger and Python 3.11.1
You can configure the container with different configurations that you require for your workload and Dagger will create them with containers thus providing a consistent environment every time.
Benefits of using Dagger
Dagger makes it easier for developers to pipeline as code and provide a consistent environment always. Below are a few benefits that make it stand out from the rest:
- Portability: Dagger’s biggest advantage is portability. The workflow that you create using Dagger can be executed on your local machine, any container hosting service, or a server. This eliminates the need for extensive configuration changes and ensures smoother and consistent deployment.
- Cross-language support: Daggers supports building workflows in your preferred language which empowers teams to utilize each other’s tools and resources without the need of learning new languages. This allows diverse teams to work together using their preferred stacks without any cognitive load of learning something new thus accelerating the development cycles.
You can refer to Dagger documentation to learn more about creating workflows using Dagger.
These were some of the popular open source tools that allow you to specify your workloads. We understand that not everyone will have the same workload requirements, but does that mean you should build your own tool that helps you define and manage your workloads?
Open Source Tools or DIY for Workload Specification – Which one to choose?
What we discussed in the earlier sections of this blog post were open source solutions. But not always everything fits your bill, that’s when you may want to consider building something that is specific to what you need.
However, the decision to choose between open source solutions and Do-It-Yourself solutions can be critical. While DIY might seem like an enticing option where you have full control over everything, it may lead to additional responsibilities.
For instance, building and maintaining a custom solution can be a drain on your team’s productivity, diverting their focus from core development tasks. Further, DIY solutions often require continuous maintenance and updates, and failing to keep up with these may lead to vulnerabilities and compatibility issues.
Below are a few thoughts about why choosing an open source solution is better.
Optimal resource utilization
If you choose to build a workload specification tool yourself, chances are high that you will spend a lot of time and resources on it. You’ll not only require resources to build it but to maintain it as well. DIY solutions will require continuous attention to address bugs, implement new features, and adapt to changing requirements.
Leverage best practices
Creating a DIY solution may deliver what you need, however, you may miss out on industry best practices. Due to these, you may compromise on the established practices that improve efficiency and quality. Such a tool might lack several optimizations which can lead to less efficient outcomes.
Avoid re-inventing the wheel
Why build from scratch when you already have something that is efficient and has a wealth of features? Opting for an open source solution allows you to tap into a well-built product that will save you time and resources and provide you with industry best practices, community support, and expertise. Still want to reinvent the wheel?
Summary
With the increasing number of environments, developers often need to learn the nuances of every environment to deploy their applications. This is where workload specifications come in handy. They define a blueprint that allows developers to specify one specification and deploy their application to different environments without any additional cognitive load.
Tools like Score, Acorn, and Dagger streamline the process of creating workload specifications by improving developer productivity. These open source tools help developers and DevOps teams to deploy workloads to different environments with ease.
While building your own solution may be tempting, open source solutions offer industry-leading features along with saving you time and effort. This is where we at InfraCloud can provide tailored solutions to manage your workloads.
Also, do share your thoughts on this blog post, and platform engineering in general with me. Connect with me on LinkedIn or Twitter.