


Ambassador post originally published on Medium by Mitch Connors
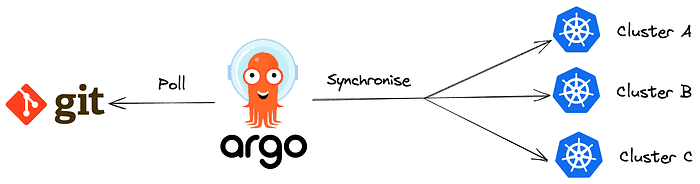
In preparation for my upcoming talk with Christian Hernandez, I’m setting up an ArgoCD instance which pulls config from a private GitHub repository. While this is my first time using Argo with a private repository, this is a common requirement for enterprises who adopt GitOps — after all, who wants to share the nitty gritty details of their internal application catalogue with the world.
GitHub has, over several years, been reworking the way apps that automate tasks on GitHub authenticate, moving from personal access tokens, which allow the app to completely impersonate the user (!!), to fine-grained tokens, which can have limited permissions, but which still need to be manually rotated occasionally, to GitHub Apps, an auth scheme that allows the automated system to automatically rotate credentials on a periodic basis. You can read more about GitHub Apps here.
Since the purpose of our talk is to demonstrate how to implement best practices for Istio upgrades in ArgoCD, I decided it would be best to use best practices for authentication as well, and adopt the new GitHub Apps standard. The process was successful, but I ran into several surprises along the way, and thought I might share my experience for others in my shoes.
You can find the docs for authenticating Argo with GitHub Apps here, but for the most part, Argo relies on GitHub’s documentation for creating apps, and that’s where things get a bit complicated. GitHub Apps is a very powerful platform that can enable you to ship GitHub integration software as a service to thousands of users across different projects and enterprises with a single GitHub App. In our case, most of that complexity is overkill, as we just want to allow ArgoCD to see our private repo.
Creating Your GitHub App
To get started, create a new GitHub App (through Profile > Settings > Developer Settings > GitHub Apps > Create). You are initially required to give your app a name and URL along with an optional description, which gives the impression that your app will be visible to the public, but at the bottom of the page you’ll find a radio button that controls visibility. I’ve set mine to “Only on this account.”
In the sections of the Create App form that follow, you’ll be exposed to a barrage of complex questions: SetUp URL, Callback URL, Webhook URL and secret, etc. These options demonstrate just how powerful GitHub Apps can be — but they also are completely unnecessary for connecting Argo to your cluster. I left the default options selected, and blank text boxes, with the exception of the “Active” checkbox under Webhook, which I had to uncheck (webhooks can be used to trigger Argo as soon as a commit is pushed, but I’m happy to use polling for now). Finally, the permissions section presents all the possible actions an application can take. For my Argo Connector App, the only needed permission is to read repositories. Everything else can be left with default values again.
Configuring Your App
After clicking create, we need to create credentials to authenticate our app, and make note of a few values which Argo will need later on. From the page listing the apps we own (which should be what you see after creating your app), click the Edit button next to your connector app, and copy down the Application ID from the top of the screen. Scroll to the bottom of the page, and create a private key for your application, which will be automatically downloaded to your machine.
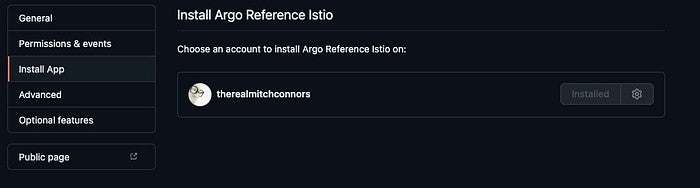
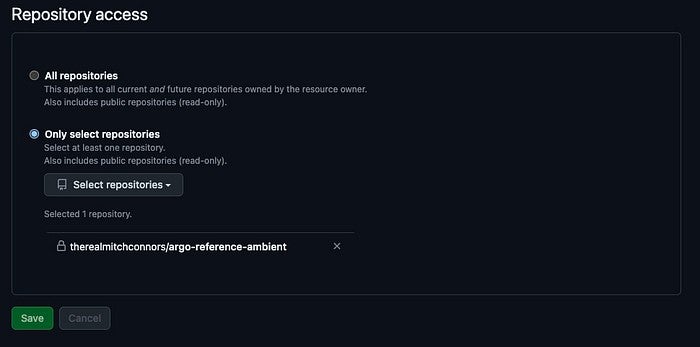
Now that our app is configured, let’s make use of our GitHub App within our private repository so that the set of permissions we selected in the previous step can be applied to our particular repository. From the Edit App page, click “Install” on the left menu, and choose the account you are installing the app into (for most users, this is their own account). Finally, on the installation details page, I recommend installing this app only for the particular repo you’d like to connect to from Argo, to minimize the potential for accidental data leaks. Finally, note the eight digit number that the install page URL ends with, as this is your Installation ID, which we will give to Argo in the next step.
Using Your App in ArgoCD
To use our newly installed GitHub App from Argo, navigate to Settings > Repositories > Connect Repo. Select GitHub App as your Connection Method, and supply the URL of your Private Repository. Then provide the App ID and Installation ID noted in the previous section. Finally copy the text of your private key downloaded in the previous section, being careful not to include any extra whitespace. Click “connect” and you should be off to the races!
Conclusion
ArgoCD is a powerful tool for GitOps and platform engineering, but configuring it to work securely with other tools can definitely be a challenge. I look forward to sharing more lessons learned upgrading Istio Ambient Mesh with ArgoCD at the upcoming IstioDay North America in Chicago. Until then, enjoy your extra secure ArgoCD with GitHub Apps for private repos!