


Project post originally published on the Linkerd blog by Flynn
This blog post is based on a workshop that Russ Parmer of WeaveWorks and I delivered at Buoyant’s Service Mesh Academy. If this seems interesting, check out the full recording!
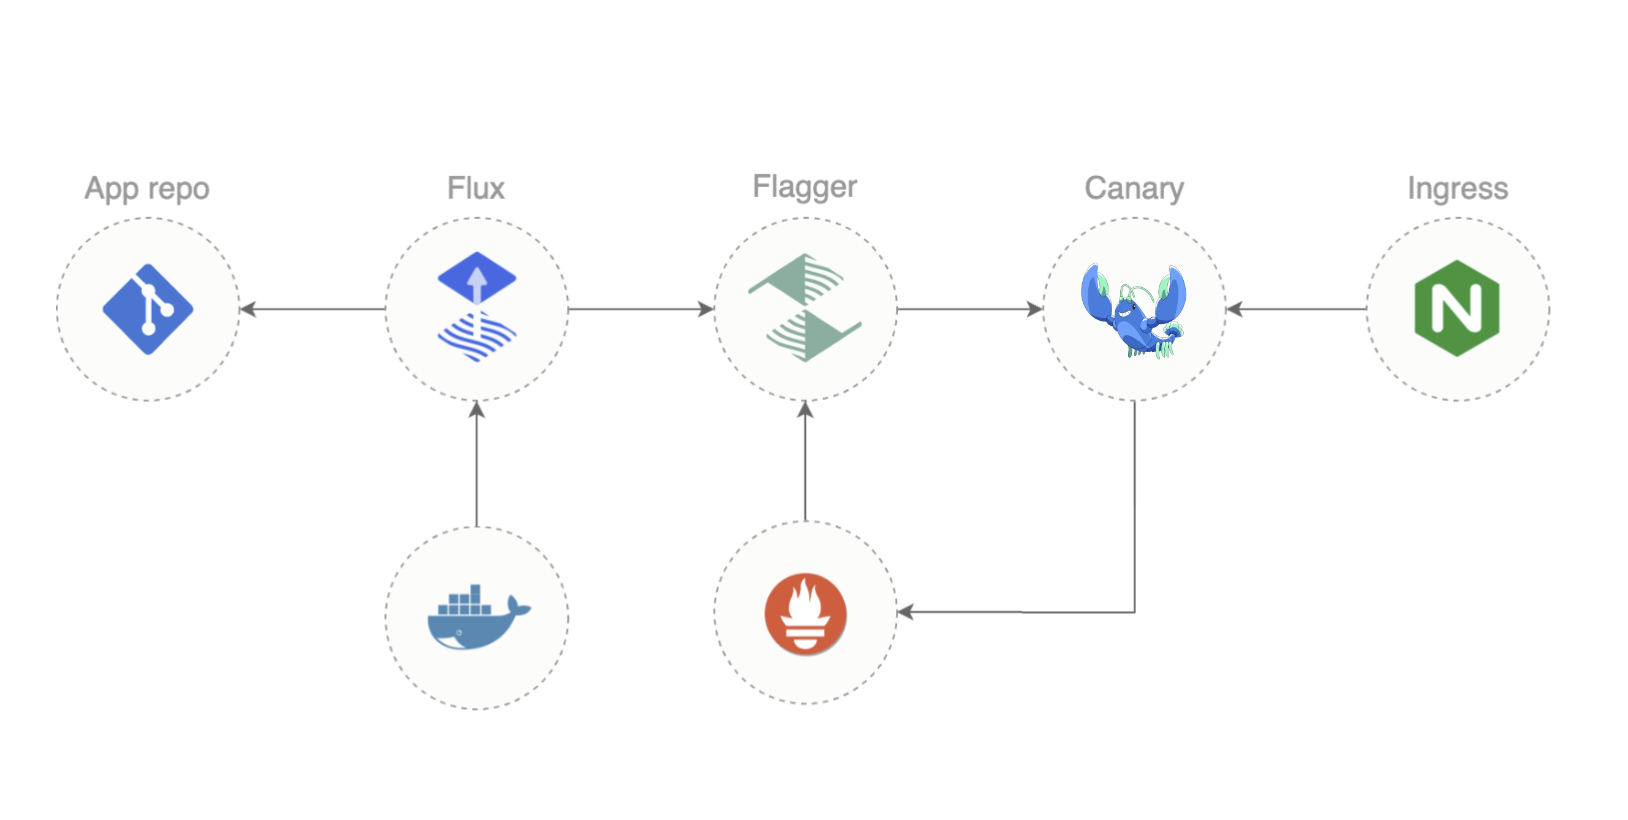
“GitOps” and “service mesh” may not be things you immediately think of together – but maybe they should be! These two wildly different technologies are each enormously capable independently, and combined they deliver far more than the sum of their parts. In this blog post, I’ll walk you through what you need to know to use Flux, Flagger, and Linkerd together for successful GitOps in the real world.
Why Are We Here?
First, though, let’s talk a bit about what we can – and can’t – really do in the structure of a static-text blog post. This post will not make you a GitOps expert by itself. GitOps is complex, and there’s no actual substitute for practice. You can’t get that from reading a blog post.
What we can deliver here, though, is a careful look at the good, the bad, and the ugly of making GitOps actually work. We’ll talk about concepts and conventions, about what works well and what doesn’t, and we’ll equip you to get the most out of the practice you put in later.
Finally, don’t forget that we have a ready-made demo repo for you to practice with! You can find that at https://github.com/BuoyantIO/gitops-linkerd – check out its README.md for the full instructions.
A Quick Introduction to GitOps
If you’re completely new to GitOps, you may find all the definitions talking about “continuous deployment” and “single immutable source of truth” to be more confusing than helpful. A simple way to view GitOps for our purposes is that it’s a way to manage configuration of a cluster by putting the configuration we want in a git repository, then having software that makes the cluster match the repo.
In other words, you don’t make changes to your cluster by running kubectl apply: you do it with a Git commit.
This might seem like a step backward, but it’s a wonderful way to accomplish two things that are very important in production:
- You can always know exactly what configuration your cluster is running.
- You can always know who made a particular change.
These two things open the door to a host of good things because knowing the state of the cluster means you can easily replicate it. Knowledge is power.
Under the hood, we’ll use Flux and Flagger, both from WeaveWorks, to make this work.
Flux
A Kubernetes cluster can’t natively interact with a git repo. Flux is a tool that bridges the gap: a Flux agent runs in your cluster and watches for changes in the repo and in the cluster. Whenever it notices a change (in either place), it does whatever it needs to do to make the cluster look like the repo.
Note: Flux will only make the cluster look like the repo. There’s no provision to go the other direction, because it would be a terrible idea! The whole point of GitOps is that the git repo holds the truth of what state you want, so allowing the repo to modify it would not be an antipattern.
Flux is fairly simple: it can read Git repos from GitHub or GitLab, and you point it to a directory in the repo that contains YAML files defining Flux Kustomizations. A Kustomization definition includes three critical components:
- The source tells Flux where to go to read the base resources that should exist in the cluster. A source can be a directory in a Git repo or a Helm chart.
- An optional set of patches, which are standard JSONpatch definitions, tell Flux how to modify the base resources before applying them to the cluster.
- An optional list of dependencies tells Flux which other Kustomizations must be applied before applying this one.
The combination of these three is quite powerful while being relatively simple (though I’ll be the first to acknowledge that JSONpatch isn’t always pleasant to use). We’ll dig into how to approach Kustomizations, and what a typical Kustomization might look like, shortly.
Flagger
Flagger is a companion to Flux that’s specifically dealing with progressive delivery. This is the idea that when you deploy a new version of a workload, you should slowly ramp traffic over to it to make sure that the new version will work, rather than just instantly cutting all the traffic over to the new (possibly broken) version.
What can initially seem strange about Flagger is that you don’t explicitly supply a resource that says “please do a progressive rollout now”. Instead, you just edit a Deployment, and Flagger takes it from there: it notices any change to objects under its management and automatically tweaks things in the cluster to set up a progressive rollout.
This means that Flagger needs a a way to control the amount of traffic that goes to the new version. It doesn’t do this directly: instead, it needs to alter configuration for some other piece of the system to actually do the traffic shifting. Flagger has a few different options for this:
- For workloads at the top of the call graph, it can work with several ingress controllers directly;
- It can use SMI TrafficSplits for traffic anywhere in the call graph; or
- It can use Gateway API HTTPRoutes.
(At the moment, Linkerd relies on the SMI TrafficSplit mechanism. More on this in a bit.)
A Quick Introduction to Linkerd
If you haven’t run across Linkerd before now, it’s a service mesh: an infrastructure layer providing security, reliability, and observability features at a platform level, without having to modify your application. It’s currently the only CNCF graduated service mesh, in fact, offering excellent security, best-in-class operational simplicity, and the least overhead of any production service mesh.
Like most other meshes, Linkerd works by placing a sidecar proxy next to each workload container, and allowing the sidecar to intercept all traffic to and from the workload. This low-level access permits Linkerd to have enormous control and visibility over what’s happening with network communications in the cluster.
Linkerd supports both the SMI TrafficSplit resource and (as of 2.12) the Gateway API HTTPRoute resource. However, in 2.12 and 2.13, Linkerd’s HTTPRoute support is limited, meaning that Flagger needs to use the SMI TrafficSplit interface.
Putting It Into Practice: Flux
As with many things, the jump from basic theory to actual practice can be tricky. A good way to start is with the demo repo mentioned above, https://github.com/BuoyantIO/gitops-linkerd. Its README.md has full instructions for how to get everything running, but let’s hit the highlights and the gotchas here too.
You’ll need to start by having an empty cluster, a working kubectl command, and the flux CLI. Check out https://fluxcd.io/flux/installation/ for full instructions, but the easy way on Mac and Linux is brew install fluxcd/tap/flux.
Repo Layout and flux bootstrap
Something very important to understand is that, when working with Flux, you’ll generally set up all your Kustomizations, install Flux to your local machine, then run flux bootstrap to tell Flux to set up everything in the cluster for you! You don’t set up the cluster by hand at any point.
When you run flux bootstrap, you tell Flux the git repo to use, and the branch and path within that repo to to start looking in your repo for its configuration. This brings up two really important points:
- Flux will need access to your Git repo, which is typically going to mean that it’ll need access to GitHub or GitLab, which means you’ll need to set up an access token for Flux to use.For full details here, check out https://fluxcd.io/flux/installation/#bootstrap – but the gotcha is that Flux needs to be able to write as well as read (for example, with GitHub it needs to be able to create deploy keys). Read carefully about the permissions to set up the token.
- If you’re trying to understand a Flux setup, you will need to know what branch and path were given to
flux bootstrap, so that you’ll know where to start reading to figure out what’s going on.
In this blog post, we’re not going to include the full flux bootstrap command for the gitops-linkerd: we want to focus on concepts and gotchas, not all the details of setting up Git permissions and such. Check out the README.md in the gitops-linkerd repo for all the bootstrap details.
However, it’s very much worth looking at a couple of things in our gitops-linkerd repo’s configuration. The starting point for its configuration is the clusters/my-cluster directory on the main branch, in which you’ll find all the needed definitions for the cluster infrastructure and a reference to another repo for the application itself. If you want to use this for your own Flux/Flagger/Linkerd setup, a good start would be to leave the cluster infrastructure alone, but to replace the application definition with your own.
clusters/my-cluster uses a fairly typical Flux layout:
infrastructure.yamltells Flux about cluster infrastructure to set up;apps.yamltells Flux about the application(s) we want to run over that infrastructure; andflux-systemis a directory with customization of Flux itself. We’re not going to get intoflux-systemin this blog post, but it’s good to know what it is.
The split between “infrastructure” and “app” is blurry, and largely convention, but if you want to use gitops-linkerd as the basis of your own cluster definition, you can likely focus on apps.yaml and leave the cluster infrastructure alone at first.
gitops-linkerd Cluster Infrastructure
infrastructure.yaml defines five separate components for cluster infrastructure. Each of these is represented by a separate document in this YAML file:
- cert-manager
- Linkerd
- NGINX
- Flagger
- Weave GitOps
(Recall that Flux itself is the only thing we install by hand. Also, Weave GitOps is a dashboard for Flux; check it out at https://www.cncf.io/blog/2023/04/24/how-to-use-weave-gitops-as-your-flux-ui/.)
Importantly, infrastructure.yaml also defines the dependencies between these components; this is an especially powerful aspect of Flux. We’ll take a quick look at the first two elements here: cert-manager and linkerd.
The cert-manager component
The first document in infrastructure.yaml looks like this:
---
apiVersion: kustomize.toolkit.fluxcd.io/v1beta2
kind: Kustomization
metadata:
  name: cert-manager
  namespace: flux-system
spec:
  interval: 1h
  retryInterval: 1m
  timeout: 5m
  prune: true
  wait: true
  sourceRef:
    kind: GitRepository
    name: flux-system
  path: ./infrastructure/cert-manager
There are few things to understand here:
name: cert-managersets the name of the Kustomization. This is how we’ll refer to this component when describing dependencies.namespace: flux-systemplaces the Kustomization itself in theflux-systemnamespace; this does not mean that cert-manager will live influx-system, though.
By convention, flux-system is the home for core elements of cluster infrastructure, with other namespaces used for applications.
- There’s no
dependsOnattribute, so this Kustomization doesn’t depend on anything. sourceRefis a bit magic: referring to theflux-systemGitRepositoryreally means “the same Git repo as the Kustomization itself”.path: ./infrastructure/cert-managertells us where in the source to look for more files for this Kustomization.wait: truemeans that Flux will wait for everything installed to be ready before proceeding with other Kustomizations.interval: 1hmeans that Flux will check once an hour to see if there are new changes that need to be handled.
If we look into ./infrastructure/cert-manager, we’ll find a few files:
kustomization.yaml
namespace.yaml
release.yaml
repository.yaml
The place to start reading is always kustomization.yaml, which is simple here:
apiVersion: kustomize.config.k8s.io/v1beta1
kind: Kustomization
namespace: cert-manager
resources:
  - namespace.yaml
  - repository.yaml
  - release.yaml
This tells Flux to apply those three YAML files. We’re not going to dig too far into them here – the gitops-linkerd demo goes into much more detail – but it’s important to know that
namespace.yamlcreates thecert-managernamespace;repository.yamltells Flux tohelm repo adda Helm repository; andrelease.yamltells Flux tohelm installa chart from the repo added byrepository.yaml.
Note that this is actually an unordered list: kustomize automatically sorts all the resources contained in all of these files to make sure that the the resources it’s working with are applied in the correct order.
We’re going to leave the deep dive into these files for the gitops-linkerd demo itself, except for one note: if you look at repository.yaml and release.yaml, you’ll see that they define resources in the cert-manager namespace, not the flux-system namespace. This is a pattern you’ll see again and again: the resources managed by the Kustomization should go in a namespace appropriate for the component being managed.
So the three important concepts to take away from this are:
- You don’t have to apply any patches in a Kustomization, despite its name.
- You can apply Kubernetes resources and higher-level Flux resources in a Kustomization.
- The resources created and managed by the Kustomization belong in an appropriate namespace for the component, not
flux-system.
You’ll see these same concepts over and over as you look at the gitops-linkerd definitions.
The linkerd component
The second document in infrastructure.yaml defines the linkerd component:
---
apiVersion: kustomize.toolkit.fluxcd.io/v1beta2
kind: Kustomization
metadata:
  name: linkerd
  namespace: flux-system
spec:
  dependsOn:
    - name: cert-manager
  interval: 1h
  retryInterval: 1m
  timeout: 5m
  prune: true
  wait: true
  sourceRef:
    kind: GitRepository
    name: flux-system
  path: ./infrastructure/linkerd
Much of this lines up with the cert-manager Kustomization: we have a name, we’re still in the flux-system namespace, we’ll find more files in ./infrastructure/linkerd, etc.
The main difference is the new dependsOn attribute, which says that the linkerd Kustomization depends on the cert-manager Kustomization. (Note, too, that dependsOn takes an array value, so you can list many dependencies.) This is one of the most powerful features of Flux: defining complex start ordering is just a matter of explaining what depends on what, then letting Flux do all the hard work.
Taking a quick look into the ./infrastructure/linkerd directory, we’ll find quite a lot more to read than we did for cert-manager:
README.md
ca.crt
ca.key
kustomization.yaml
kustomizeconfig.yaml
linkerd-certs.yaml
linkerd-control-plane.yaml
linkerd-crds.yaml
linkerd-smi.yaml
linkerd-viz.yaml
namespaces.yaml
repositories.yaml
As before, though, the place to start reading is still kustomization.yaml. It’s more complex, since we’re installing four separate Linkerd components (its CRDs, the control plane, the SMI extension, and the Viz extension) and we need to configure Linkerd to use custom secrets from cert-manager – but you’ll be able to see it all laid out in the files.
Again, we’ll mostly leave the deep dive for the gitops-linkerd demo, but it’s worth pointing out that where the cert-manager Kustomization had a repository.yaml file, the linkerd Kustomization has repositories.yaml, with the name pluralized. The name doesn’t matter at all to Flux, since it has to be listed explicitly in kustomization.yaml: this means you’re free to choose names that help later readers follow what’s going on.
There’s a lot more in the infrastructure.yaml file, but we’re going to leave the rest for the gitops-linkerd demo and your own reading. Let’s continue on to the application.
gitops-linkerd Application
The gitops-linkerd repo is set up to install the Faces demo as its application. This is defined in clusters/my-cluster/apps.yaml, which is set up basically exactly the same way as infrastructure.yaml:
---
apiVersion: kustomize.toolkit.fluxcd.io/v1beta2
kind: Kustomization
metadata:
  name: apps
  namespace: flux-system
spec:
  dependsOn:
    - name: flagger
    - name: ingress-nginx
  interval: 10m
  retryInterval: 1m
  timeout: 5m
  prune: true
  wait: true
  sourceRef:
    kind: GitRepository
    name: flux-system
  path: ./apps
Things worth noting here:
- We’re checking for changes every ten minutes, not every hour.
- We explicitly list only
flaggerandingress-nginxas dependencies, because those two are the leaves of our infrastructure dependency graph. Flux will figure out all the rest from there.
You’ll also notice, when you look in ./apps, that things in there look quite different. First, the only thing in ./apps is another directory, faces. This is because Flux is well-suited to managing multiple applications at the same time: since it automatically recurses into directories, we can just have a separate directory per app.
As always, for the faces app, we start with its ./apps/faces/kustomization.yaml file:
apiVersion: kustomize.config.k8s.io/v1beta1
kind: Kustomization
namespace: faces
resources:
  - namespace.yaml
  - faces-sync.yaml
  - faces-ingress.yaml
  - faces-canary.yaml
  - faces-abtest.yaml
This part looks straightforward, except that the names imply that things are very different from our infrastructure. Again, we’ll leave the really deep dive for the gitops-linkerd demo, but there are a few concepts worth looking at here.
kustomization.yaml Defines the App Namespace
First note that the Kustomization has a toplevel namespace attribute, rather than having metadata.name and metadata.namespace. The toplevel namespace attribute sets the namespace for every resource referenced in this Kustomization, whether or not the resource tries to define the namespace itself.
The idea here is that it makes it easy to clone an application and place it in whatever namespace fits your needs, without having to edit each individual metadata.namespace.
faces-sync.yaml Uses a Git Repository
The Kustomization references faces-sync.yaml; if we look in that file, we see a Git repo as a source, rather than a Helm chart:
---
apiVersion: source.toolkit.fluxcd.io/v1beta2
kind: GitRepository
metadata:
  name: faces
spec:
  interval: 10m
  url: https://github.com/BuoyantIO/faces-demo
  ref:
    branch: main
  ignore: |
    /*
    !/k8s/01-base/*-profile.yaml
    !/k8s/01-base/faces.yaml
!/k8s/01-base/faces-gui.yaml - We use the
httpsURL to the Git repo so that Flux does not need any special permissions: it’s just reading a public repository from GitHub. ref.branch: maintells Flux to look at themainbranch.- Finally, the
ignoreattribute is important and easy to overlook: there is a lot of stuff in thefaces-demorepo, and Flux needs almost none of it! So we can explicitly tell Flux to ignore everything except the few files we need to pay attention to. faces-sync.yamlalso defines some patches to be applied to the files it pulls from GitHub. These are described in thegitops-linkerddemo.
faces-canary.yaml and faces-abtest.yaml Set Up Flagger
We’ll talk more about these in the Flagger section, below.
Bootstrapping the Cluster
After all this background, we can talk about what happens when you actually run flux bootstrap! It’s a beautiful example of an awful lot of complexity made into a simple thing for a user.
(Once again, we’re deliberately not giving the full flux bootstrap command for the gitops-linkerd in this blog post. Check out the README.md in the gitops-linkerd repo for all the bootstrap details.)
- First,
flux bootstrapwill set up access to the Git repo you point it to. It’ll verify its credentials, check out the correct branch, create deploy keys, etc. - Next, it’ll look at all the YAML files in the starting directory you give it. It’ll use these to do any necessary configuration of Flux itself and, critically, build the whole dependency graph.
- After that, it will start walking the dependency graph, installing things as efficiently as it can. Flux is perfectly happy to work in parallel wherever it can, only blocking components where needed.
A very very important Flux CLI command is flux get kustomizations – this will show you all the Kustomizations that Flux knows about and, critically, their status. You can also use the Weave GitOps UI for a graphical view here. This is so useful during bootstrap that flux get kustomizations --watch will give you a continuously updating view.
A final critical point: since nothing depends on our application, Flux will not wait for the application to be ready and running before declaring success! To make sure that the app is running after flux bootstrap completes, either add a dummy component that depends on the application, or (much simpler!) just use kubectl rollout status to wait for your application to be ready.
The Biggest Flux Gotcha Of All
Once in operation, Flux is fairly straightforward, with one big exception: it’s not really possible to watch Git repositories in any standard way, so Flux polls for changes. This polling can be fairly slow, because often it’s just not a big deal if it takes several minutes or an hour to catch a change and roll it out.
Of course, that changes if you’re actively developing something! It can be quite disorienting to push a commit and then have nothing happen. While you can crank the poll interval down to make this better, a better plan might be to use the flux reconcile command to trigger an immediate pass over a given Kustomization, e.g.
flux reconcile kustomization apps --with-sourceAn important note for flux reconcile is that it will not recursively reconcile other Kustomizations contained within the one you pass it on the command line. This matters for the Kustomizations in the gitops-linkerd repo: apps includes a Kustomization for faces that points to a separate Git repo. If we change something in that secondary Git repo and we want to trigger a new reconciliation, we need to explicitly tell Flux to look at the faces Kustomization (which, remember, is in the faces namespace):
flux reconcile kustomization faces -n faces --with-sourcePutting It Into Practice: Flagger
Flux gives you a very powerful set of tools for managing your cluster by committing to a Git repo rather than directly modifying the cluster. Flagger builds on Flux by introducing progressive deployment: rather than updating a Deployment to a new version all at once, Flagger can move traffic gracefully to a new version and monitor how well the new version works, making it much safer to do live updates.
Flagger relies on external components to make this happen:
- First, some external thing needs to be able to shift traffic smoothly from the old version to the new version. This could be an ingress controller for things at the edge of the call graph, or an SMI TrafficSplit or Gateway API HTTPRoute for things deeper in the call graph.
gitops-linkerdshows how to use NGINX and Linkerd’s SMI extension for this purpose. Future versions of Linkerd will also support the HTTPRoute mechanism. - Second, Flagger needs to monitor external metrics to be sure that the new version is working, and it needs to know how the Deployments you want to work with are labeled. These are both set by supplying values to the Flagger Helm chart.
In gitops-linkerd, we set up Flagger in infrastructure/flagger/release.yaml, supplying the following values to Helm:
  values:
    meshProvider: linkerd
    metricsServer: http://prometheus.linkerd-viz:9090
    selectorLabels: app,name,app.kubernetes.io/name,service
In order:
meshProvidertells Flagger the service mesh in play.metricsServerpoints Flagger to the same Prometheus that Linkerd’s Viz extension uses for its metrics. Flagger must use the same Prometheus as Linkerd Viz for this to work. If you point Linkerd Viz to a new Prometheus instance, you must change Flagger’s configuration as well.selectorLabelstells Flagger about the labels Deployments will use to find their Pods. The Faces demo mostly usesservice, which is not part of theselectorLabelslist by default.
Flagger Canaries
Where Flux commonly deals with Kustomization resources, Flagger commonly deals with Canary resources, named for the common “canary” deployment pattern where a new version gets a small amount of traffic shifted to it, then slowly more and more until it’s taking all the load. Flagger can also manage an A/B deployment pattern, where the new version takes all traffic marked with a particular header or the like: you’ll still use a Canary resource for this, though.
Let’s look at one of the Canary definitions for gitops-linkerd. This is the first document in apps/faces/faces-canary.yaml:
---
apiVersion: flagger.app/v1beta1
kind: Canary
metadata:
  name: face
spec:
  provider: linkerd
  targetRef:
    apiVersion: apps/v1
    kind: Deployment
    name: face
  progressDeadlineSeconds: 60
  service:
    port: 80
    targetPort: http
  analysis:
    interval: 10s
    threshold: 3
    maxWeight: 50
    stepWeight: 5
    metrics:
      - name: request-success-rate
        thresholdRange:
          min: 70
        interval: 1m
    webhooks:
      - name: load-test
        type: rollout
        url: http://flagger-loadtester.flagger-system/
        metadata:
          cmd: "hey -z 2m -q 10 -c 2 http://face-canary.faces/"
As always, the really deep dive will happen in the gitops-linkerd demo, but let’s take a look at the highlights here:
- The
targetRefspecifies which resource we need to watch for changes. In this case, it’s the Deployment namedface. (Flagger also knows how to handle DaemonSets, but the target must be in the same namespace as the Canary.) provider: linkerdmeans that we want Flagger to interact with Linkerd to shift traffic (by managing an SMI TrafficSplit).- The
serviceattribute tells Flagger which traffic, exactly, needs to be shifted. This needs to match up with a port defined in the Deployment.
- The
- In the
analysissection, several attributes work together to define how quickly traffic is shifted.- As shown, we’ll start with 0% traffic, then every 10 seconds (
analysis.interval) we’ll shift another 5% of traffic (analysis.stepWeight). Once we hit 50% (analysis.maxWeight) we’ll call it good, and go to 100%. - The overall effect is that if all goes well, it will take just shy of two minutes to shift all the traffic to the new version. The analysis section gives you a lot of control to tune this so that it fits your application’s needs.
- As shown, we’ll start with 0% traffic, then every 10 seconds (
analysis.metricsdescribes how to determine that things are going OK. Here, we’ll look at therequest-success-rate, and require it to be over 70%. (request-success-rateis a builtin analysis metric for Flagger: it means look at the Prometheus that Flagger was configured to use, and check the success rate for the service being canaried.)analysis.thresholddescribes when the test has failed. In this case, if we see three instances of the success rate falling before 70%, we abort the rollout.analysis.webhooksis using Flagger’s builtin load generator to provide load to the canary to make sure that our metrics are meaningful. For more on this, see https://docs.flagger.app/usage/webhooks#load-testing.
Flagger A/B Tests
Where a canary rollout slowly shifts traffic over time as long as things succeed, and finishes once all the traffic is shifting, an A/B test shifts only traffic that matches a particular criterion. A/B tests can end after a certain amount of time, or they can run until a user explicitly decides it’s over.
A common use for A/B testing is to show one subset of users a new look for a UI, for example, while collecting user feedback. When the UI designers think they have enough feedback, they can decide whether to roll out the new version to everyone, or to roll everyone back to the old UI.
In Flagger, A/B tests are also implemented with the Canary resource. Here’s the Canary defined in apps/faces/faces-canary.yaml in gitops-linkerd:
apiVersion: flagger.app/v1beta1
kind: Canary
metadata:
  name: faces-gui
spec:
  provider: nginx
  targetRef:
    apiVersion: apps/v1
    kind: Deployment
    name: faces-gui
  ingressRef:
    apiVersion: networking.k8s.io/v1
    kind: Ingress
    name: faces-gui
  progressDeadlineSeconds: 60
  service:
    port: 80
    targetPort: http
  analysis:
    interval: 10s
    threshold: 3
    iterations: 10
    # A/B test routing
    match:
      - headers:
          x-faces-user:
            exact: "testuser"
    metrics:
      - name: request-success-rate
        thresholdRange:
          min: 70
        interval: 1m
    webhooks:
      - name: load-test
        type: rollout
        url: http://flagger-loadtester.flagger-system/
        metadata:
          cmd: "hey -z 2m -q 10 -c 2 -H 'x-faces-user: testuser' -host faces-gui.faces.sslip.io http://ingress-nginx-controller.ingress-nginx"
      - name: load-test-primary
        type: rollout
        url: http://flagger-loadtester.flagger-system/
        metadata:
          cmd: "hey -z 2m -q 10 -c 2 -H 'x-faces-user: normaluser' -host faces-gui.faces.sslip.io http://ingress-nginx-controller.ingress-nginx"
Most of this should be familiar by now, but there are definitely some differences:
providerisnginxrather thanlinkerd. For this A/B test, Flagger will edit an Ingress resource that’s being monitored by NGINX, rather than editing an SMI TrafficSplit that’s being monitored by Linkerd.ingressRefspecifies which Ingress resource Flagger should manage.- There’s a new
analysis.matchsection which describes which traffic to shift. In this case, we’ll route traffic with the headerx-faces-user: testuserto the B side of the test (the new version). - This A/B test is time-based: after 10 (
analysis.iterations) periods of 10 seconds (analysis.interval), the test will be over and the new version will be promoted.- It’s possible to do manual gating with webhooks. This is a bit more advanced: see https://docs.flagger.app/usage/webhooks#manual-gating for more information.
- In
analysis.webhooks, we supply load to both the A side and the B side.
Worth a note: Flagger can’t currently do an A/B test using the linkerd provider. As Linkerd adopts more of the Gateway API, though, this will change!
Flagger Under the Hood
There is, of course, an enormous amount more that we could discuss about Flagger. As always, we’ll avoid the temptation in most cases, but there are a few aspects that we should definitely cover to make it easier to understand what’s going on.
First, the way Flagger handles services can be very confusing at first. As an example, consider a Canary for a Deployment called face, with a Service named face:
---
apiVersion: v1
kind: Service
metadata:
  name: face
  namespace: faces
spec:
  type: ClusterIP
  selector:
    service: face
  ports:
  - port: 80
    targetPort: http
---
apiVersion: apps/v1
kind: Deployment
metadata:
  name: face
  namespace: faces
spec:
  selector:
    matchLabels:
      service: face
  template:
    metadata:
      labels:
        service: face
    spec:
      containers:
      - name: face
        image: dwflynn/faces-service:0.8.0
        imagePullPolicy: Always
        ports:
        - name: http
          containerPort: 8000
...- Flagger needs to understand the selector used by the Deployment to match up with its Pods. In our case, since we told Flagger that
servicewas in itsselectorLabels, Flagger will find theservice: facelabel. - Flagger will create a new Deployment named
face-primary, which will be labeled withservice: face-primary. - Flagger will create a new Service named
face-primary, which will use a selector ofservice: face-primary. - Flagger will edit the
faceService to also use a selector ofservice: face-primary. - Flagger will create a new Service named
face-canaryusing a selector ofservice: face.At this point:- Service
faceand Serviceface-primaryboth select theface-primaryDeployment. This is the original productionfaceworkload. - Service
face-canarywill select thefaceDeployment. This will be the canary workload.
- Service
- Flagger will route 100% of
facetraffic to theface-primaryService, and 0% to thefaceService.
This means that all traffic for face will go to the production workload.
When a Canary becomes active, Flagger will edit the face Deployment to have the canary workload, and gradually start routing traffic to the canary service using whatever traffic-shifting mechanism is active.
When the Canary completes, Flagger will edit the face-primary Deployment to have the promoted workload, then reset traffic to go 100% to face-primary and 0% to face.
There are two critical things to bear in mind here:
- To monitor a Canary while it’s in progress, you can use
kubectl get canariesto look at the Canary objects, but you can also use Linkerd Viz to directly look at the traffic weighting. Using Linkerd Viz can be simpler, especially if you’re using the Linkerd Viz dashboard. - Both Deployments and both Services always exist. Don’t be confused by this: look at the Canary resources or the traffic split!
The Biggest Flagger Gotcha Of All
Finally, there is one huge gotcha when working with Flagger. It doesn’t have to be frequent, nor is it that strange when you think about it, but it is very important to understand:
When a Canary rollout fails, the rollout will be reset but Flagger cannot change the Git commit that triggered the rollout.
What this means is that if you start a Flagger rollout by, say, updating the face Deployment from version 1.0.0 of your image to version 1.1.0, and that fails, your Git repository will still show version 1.1.0, but your cluster will be running version 1.0.0. This is not a bug: you do not want Flagger to be able to edit your Git repository. It is, however, the biggest way in which the idea that “Git is always true” can break down.
The easiest way to deal with this is dirt simple: watch your rollouts until they finish, and if they fail, deal with it! Either fix the issue and roll forward, or push a commit to reflect the version that you’re still using.
Real-World GitOps: Flux, Flagger, and Linkerd
And there you have it: a whirlwind tour of Flux, Flagger, and Linkerd! You can find the source for the more detailed workshop at https://github.com/BuoyantIO/gitops-linkerd: check out README.md and DEMO.md for all you need to know about how to explore the repo and how to run the demo (with many thanks to Russ Parmer of WeaveWorks for invaluable assistance putting this all together: any errors are mine, not his!).
If you found this interesting, check out the Service Mesh Academy workshop on Real-World GitOps with Flux, Flagger, and Linkerd for hands-on exploration of everything I’ve talked about here! And, as always, feedback is always welcome – you can find me as @flynn on the Linkerd Slack.