

Ambassador post by Daniel Oh, Senior Principal Developer Advocate at Red Hat and CNCF Ambassador
Since Keycloak joined CNCF as an incubating project back in April 2023, I’ve asked a lot of enterprise Java developers how they can bring this cool cloud-native Single Sign-On server, Keycloak into their application portfolio stack, especially handling a role-based access control (RBAC) because the application runtime environments are getting more complex and variant from physical servers to cloud with Kubernetes and Linux container packages in terms of high scalability, flexibility, and portability.
This article takes developers through how to integrate Keycloak’s RBAC capabilities into cloud-native microservices for security with a step-by-step tutorial.
Overview of the OpenID Connect authorization code flow
OpenID Connect (OIDC) is a standard protocol that enables authentication and authorization for securing applications. It is built on the OAuth 2.0 framework to provide additional features for authentication, such as user information exchange and session management.
In OIDC, a user logs in to an application using their identity provider (IDP) credentials, such as their username and password. The IDP then sends an ID token to the application, which contains information about the user’s identity, such as their name and email address. This token is then used to authenticate the user and to provide access to protected resources, as below in Figure 1.
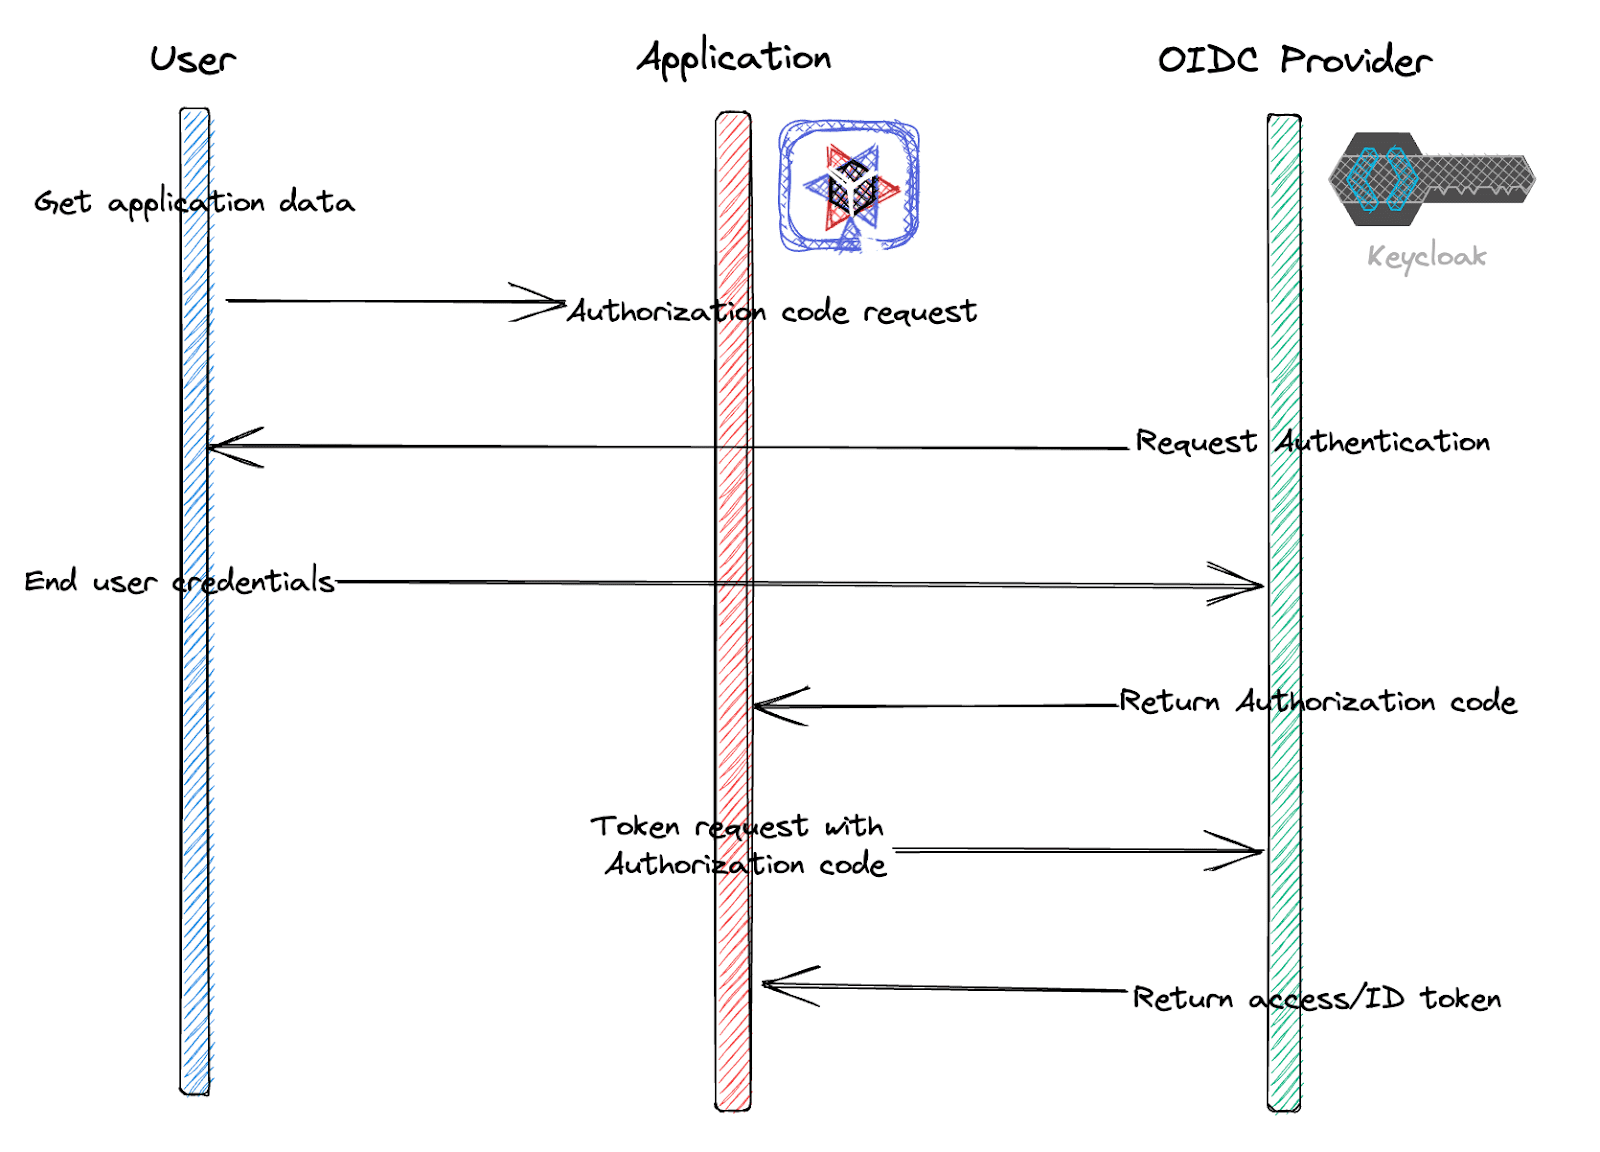
OIDC can also simplify the user experience by enabling Single Sign-On (SSO), which allows users to authenticate once and then access multiple applications without having to log in again.
In this tutorial, we’ll use Quarkus, Kubernetes native Java framework with Keycloak to implement the above OpenID Connect authorization code flow. Because Quarkus provides an out-of-box OpenID Connect (OIDC) extension to verify bearer access tokens and authenticate user credentials along with the authorization code flow.
Create a new secured APIs project
Let’s create a new project using the Quarkus command which simplifies generating a project and managing Quarkus extensions programmatically. Find more information about Quarkus command here. Run the following command.
quarkus create secured-apis-keycloak-quarkus
The output should look like this.
Creating an app (default project type, see --help).
Looking for the newly published extensions in registry.quarkus.io
-----------

applying codestarts...
📚 java
🔨 maven
📦 quarkus
📝 config-properties
🔧 dockerfiles
🔧 maven-wrapper
🚀 resteasy-reactive-codestart

-----------
[SUCCESS] ✅  quarkus project has been successfully generated in:
--> /Users/danieloh/Downloads/demo/secured-apis-keycloak-quarkus
-----------
Navigate into this directory and get started: quarkus dev
Navigate into this directory and get started: quarkus dev
Note that you can find the solution here.
Start Live Coding with Quarkus Dev mode
Quarkus provides great developer experiences that can reduce inner loop process time such as writing, compiling, and testing code repeatedly but developers can also have spare time to address outer loop processes such as containerizing images, deploying, and verifying them on Kubernetes.
To use the developer experience, let’s start Quarkus development mode also known as live coding. Run the following Quarkus command.
quarkus dev
The output should look like this.
 --/ __ \/ / / / _ | / _ \/ //_/ / / / __/
 -/ /_/ / /_/ / __ |/ , _/ ,< / /_/ /\ \
--\___\_\____/_/ |_/_/|_/_/|_|\____/___/

INFO  [io.quarkus] (Quarkus Main Thread) secured-apis-keycloak-quarkus 1.0.0-SNAPSHOT on JVM (powered by Quarkus xx.xx.xx.Final) started in 1.066s. Listening on: http://localhost:8080

INFO  [io.quarkus] (Quarkus Main Thread) Profile dev activated. Live Coding activated.
INFO  [io.quarkus] (Quarkus Main Thread) Installed features: [cdi, resteasy-reactive, smallrye-context-propagation, vertx]

--
Tests paused
Press [r] to resume testing, [o] Toggle test output, [:] for the terminal, [h] for more options>
Access a generated REST API using the curl command.
curl http://localhost:8080/hello
The output should look like this.
Hello from RESTEasy Reactive
Enable Keycloak Integration into Quarkus
Add the following 2 extensions to integrate the Keycloak server with OIDC authentication and enable swagger UI to access secured REST APIs.
quarkus ext add oidc smallrye-openapi
The output should look like this.
SUCCESS] ✅ Extension io.quarkus:quarkus-oidc has been installed
[SUCCESS] ✅ Extension io.quarkus:quarkus-smallrye-openapi has been installed
Here is another reason why you need Quarkus for the Keycloak integration. Quarkus Dev Services stands up the Keycloak container image based on Testcontainers automatically when you add the oidc extension to Quarkus dev mode as long as you’re running a container runtime locally such as Docker or Podman.
Press “c” on the terminal that you’re running Quarkus dev mode. Then, you can see the details of the Keycloak dev service.
== Dev Services

keycloak
  Container:        c09e6f966760/angry_jones  quay.io/keycloak/keycloak:21.0.2
  Network:          bridge - 0.0.0.0:64266->8080/tcp
  Exec command:     docker exec -it c09e6f966760 /bin/bash
  Injected config:  - client.quarkus.oidc.auth-server-url=http://localhost:64266/realms/quarkus
                    - keycloak.realms=quarkus
                    - keycloak.url=http://localhost:64266
                    - oidc.users=alice=alice,bob=bob
                    - quarkus.oidc.application-type=service
                    - quarkus.oidc.auth-server-url=http://localhost:64266/realms/quarkus
                    - quarkus.oidc.client-id=quarkus-app
                    - quarkus.oidc.credentials.secret=secret
You can also visit Quarkus Dev UI by pressing “d” on the terminal that you’re running Quarkus dev mode or access http://localhost:8080/q/dev-ui/dev-services directly.
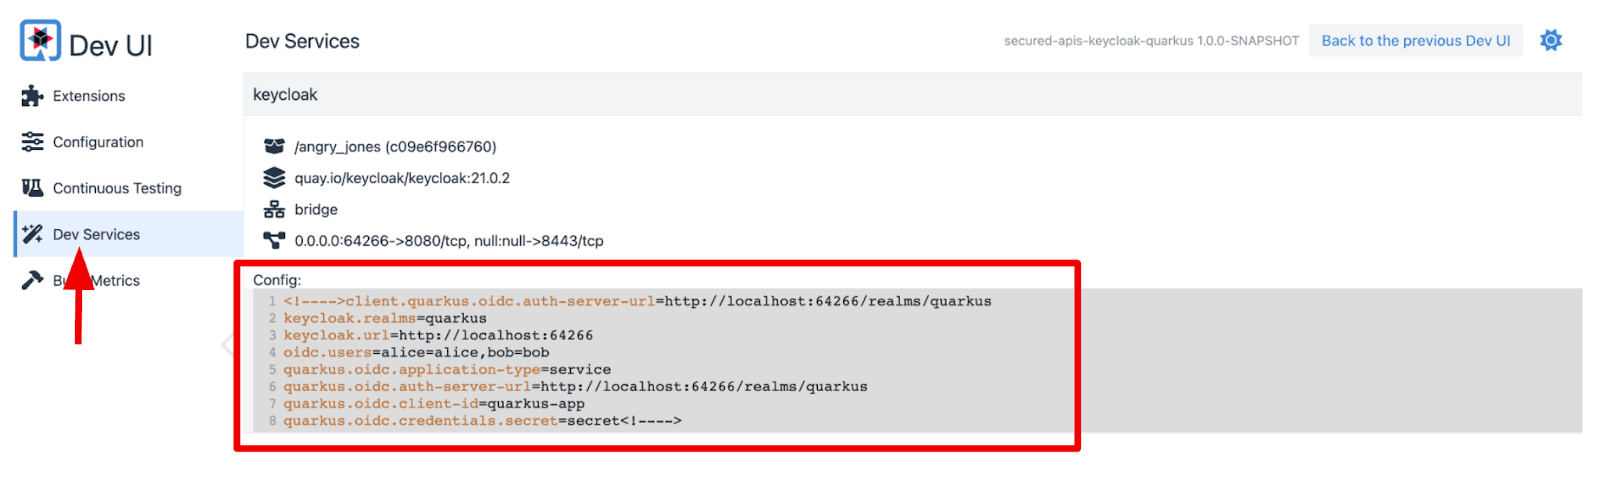
Developers don’t need to specify the keys and values for OIDC and Keycloak configurations manually. Instead, Quarkus Dev Service for Keycloak set them for developers automatically which can increase developer productivity.
Let’s explore the Keycloak server in terms of pre-defined Realms, Users, and Groups. Go back to the Quarkus Dev UI, then select “Back to the previous Dev UI” on the right top. You can also access http://localhost:8080/q/dev-v1/ directly.
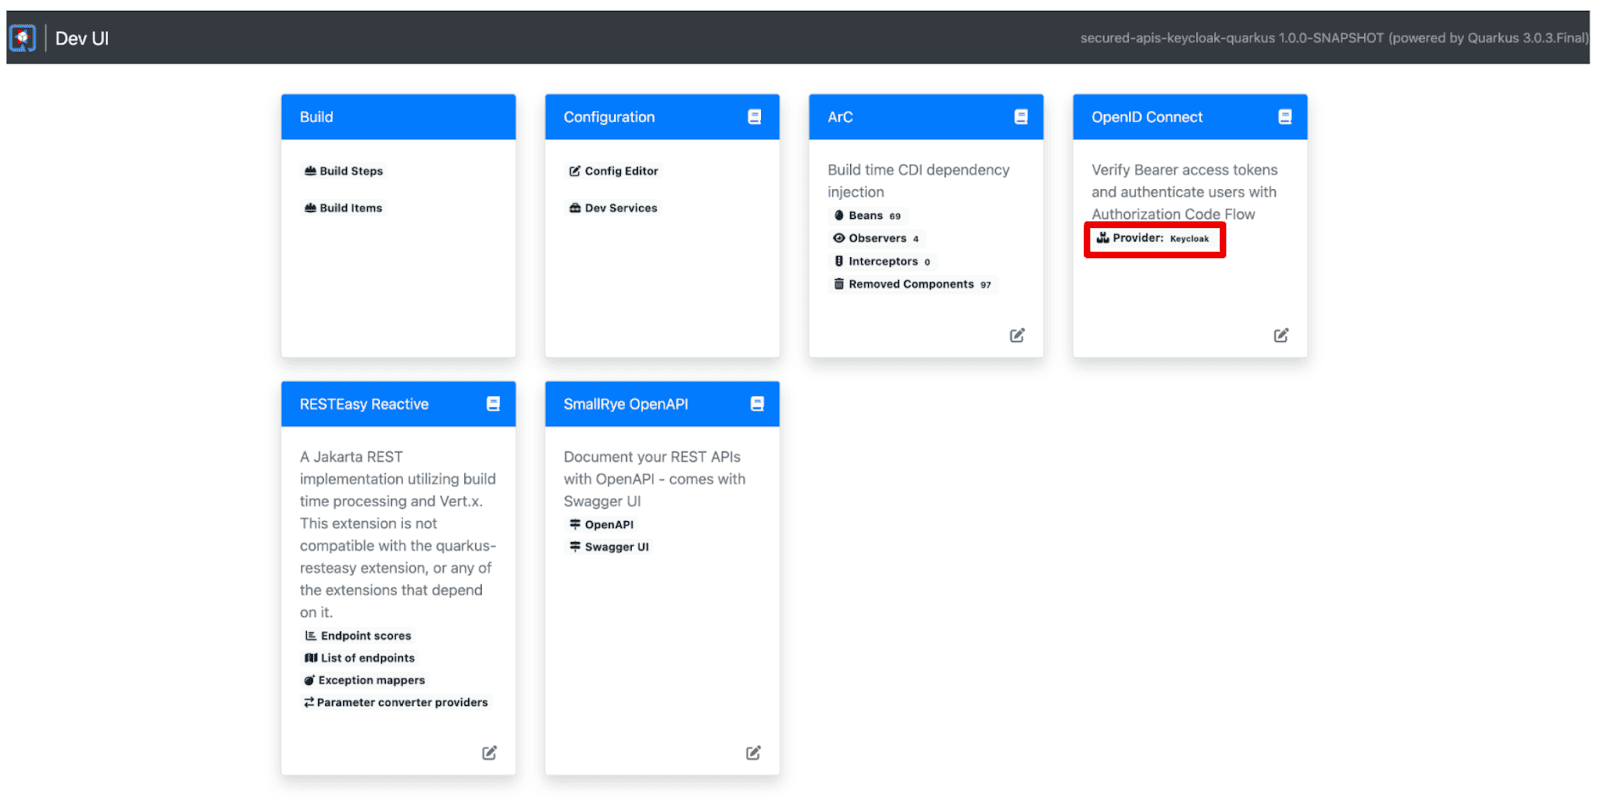
Select “Provider: keycloak” to access the Keycloak admin and single login page for the applications.
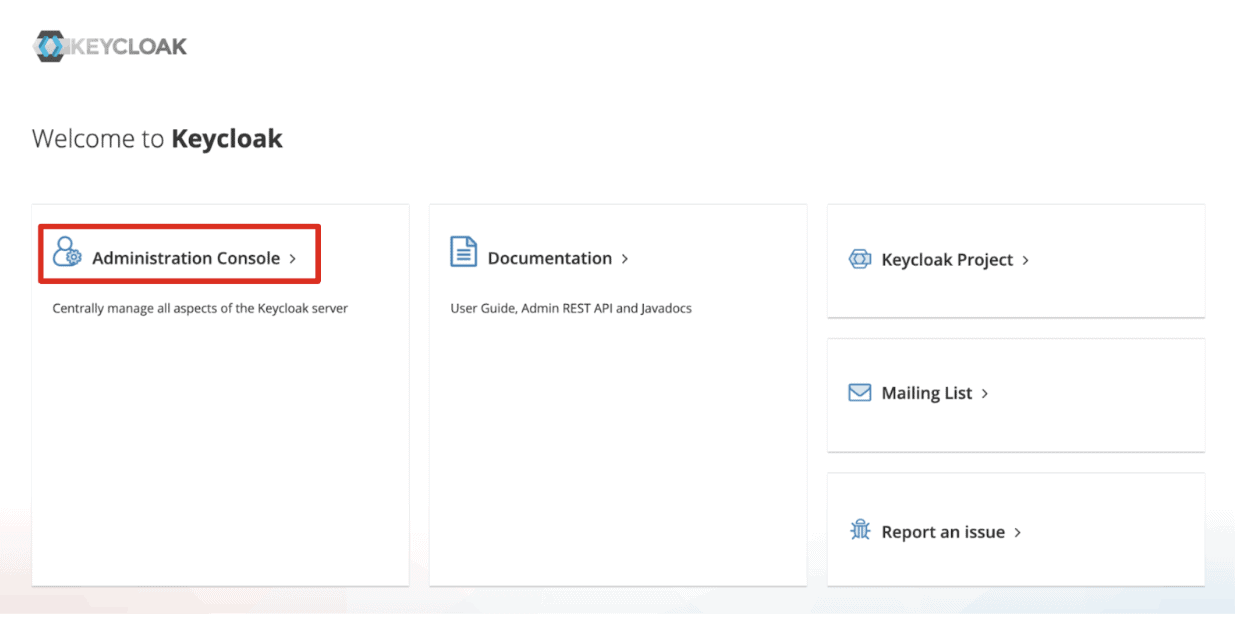
You will see the following page. Select “Keycloak Admin” on the right top. You can also access http://localhost:64266/ directly.

You will see the Keycloak Admin landing page. Select Administration Console or access http://localhost:64266/admin/master/console/ directly.
Key in the following credential.
- Username: admin
- Password: admin
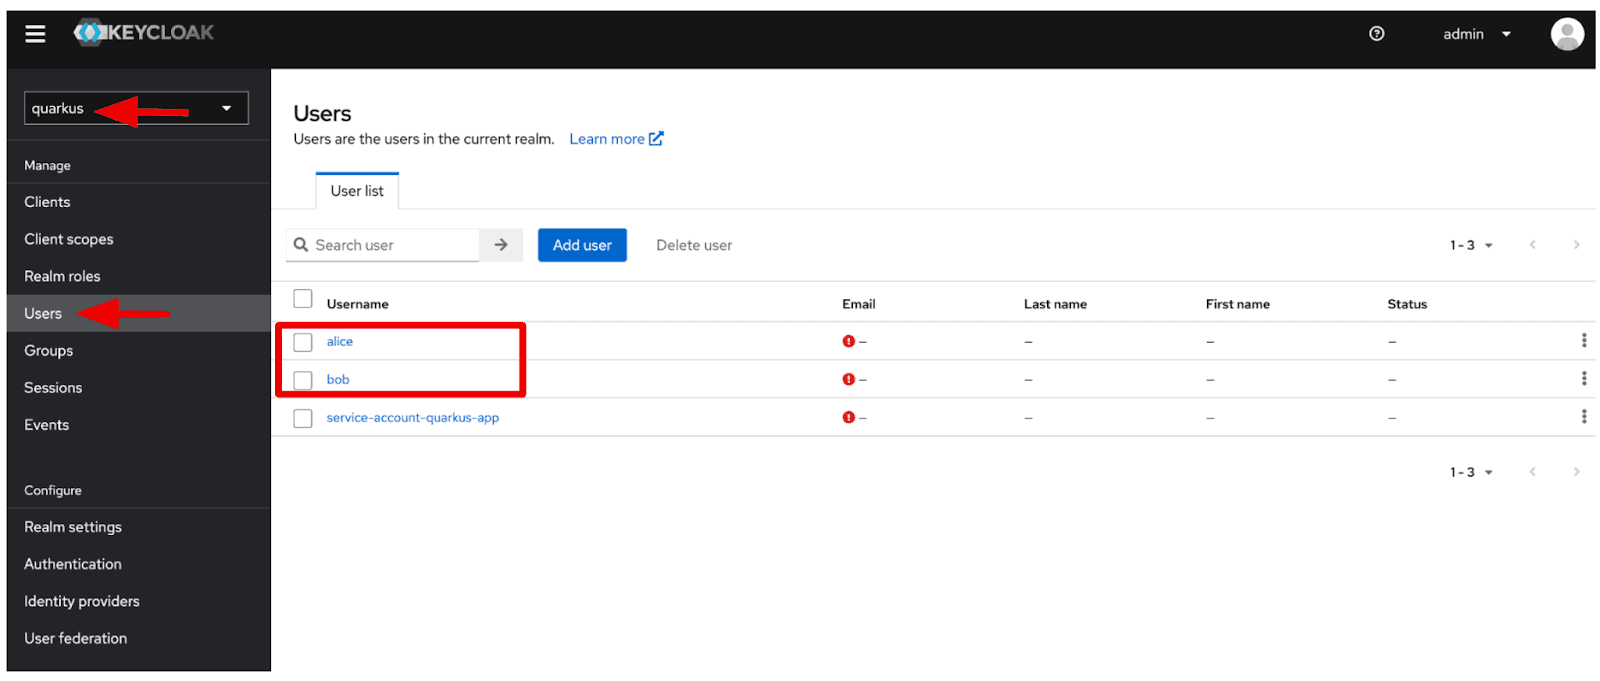
Select the “quarkus” realm on the left top. Then navigate to “Users” on the left menu. You should see “alice” and “bob” users.
When you select “alice”, you can see more information. For example, select the “Role mapping” tab menu, and you will see that “alice” belongs to 2 roles such as “admin” and “user”.
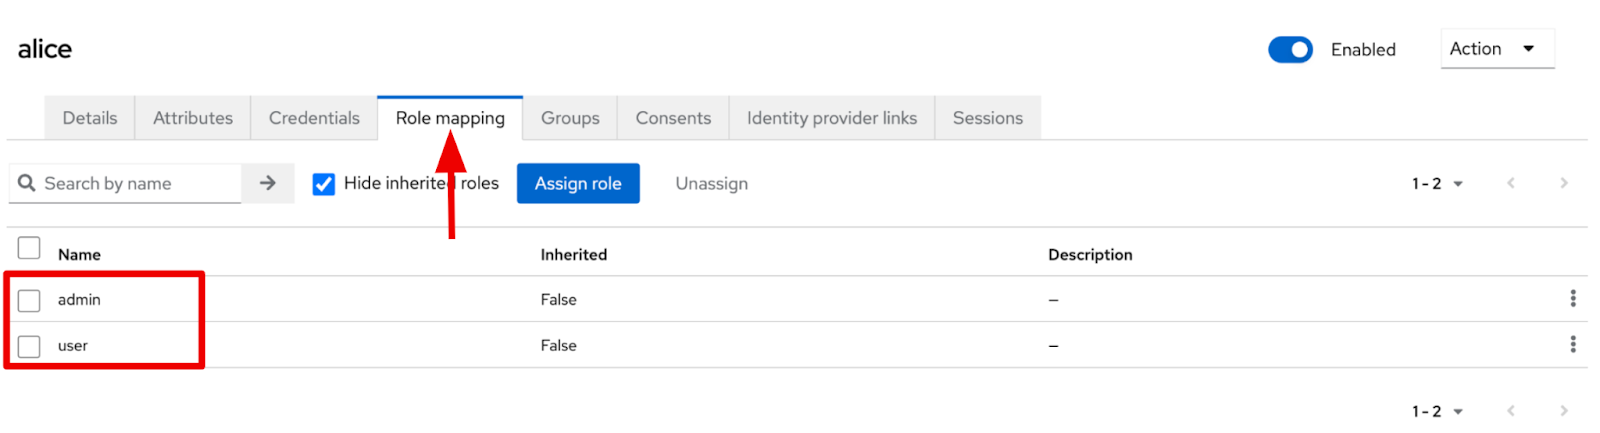
When you select “bob” user, you can see that only “user” role is allocated to the bob user.
Adding RBAC security to the REST APIs
Open the GreetingResource.java file in the src/main/java/org/acme directory. Replace the existing code with the following code.
package org.acme;

import org.eclipse.microprofile.config.inject.ConfigProperty;

import jakarta.annotation.security.RolesAllowed;
import jakarta.ws.rs.GET;
import jakarta.ws.rs.Path;
import jakarta.ws.rs.Produces;
import jakarta.ws.rs.core.MediaType;

@Path("/hello")
public class GreetingResource {

    @ConfigProperty(name = "db.username")
    String username;

    @ConfigProperty(name = "db.password")
    String password;

    @GET
    @Produces(MediaType.TEXT_PLAIN)
    @Path("db")
    @RolesAllowed("admin")
    public String db() {
        return "db.username: " + username + " / db.password: " + password;
    }

    @GET
    @Produces(MediaType.TEXT_PLAIN)
    @RolesAllowed("user")
    public String hello() {
        return "Getting started to secure Cloud Native Microservices with Role-Based Access Control using Keycloak!";
    }
}
Now, you have 2 REST services to get your database credentials (/hello/db) and a welcome message (/hello). Each endpoint is required to have different roles to access the resources. The “/hello/db” endpoint can only be accessed by an admin role but the other endpoint (“/hello”) can be accessed by the admin and user roles.
The second benefit of Quarkus: Enabling RBAC security on your Java applications. The @RolesAllowed annotation simplifies the role setting Keycloak manages on Java methods programmatically.
Testing the secured REST APIs
Let’s verify the REST APIs if they’re secured with the role-based access control using Keycloak. Open a new terminal and run the following curl command.
curl -v http://localhost:8080/hello
The output should look like this.
*   Trying 127.0.0.1:8080...
* Connected to localhost (127.0.0.1) port 8080 (#0)
> GET /hello HTTP/1.1
> Host: localhost:8080
> User-Agent: curl/7.87.0
> Accept: */*
>
* Mark bundle as not supporting multiuse
< HTTP/1.1 401 Unauthorized
< www-authenticate: Bearer
< content-length: 0
<
* Connection #0 to host localhost left intact
You should end up with a “401 Unauthorized” error message since you didn’t go through the valid authentication and authorization process. To get the right result, you should pass down a valid access token when you invoke the REST API. When you call the other REST API (/hello/db), you should the same authorization error message.
In general, you need to invoke a REST API to get a request token and retrieve an access token using the request token, as shown in Figure 1. This is a challenge for developers since they need to memorize the APIs and specifications. Quarkus provides a single page to verify the security of your applications.
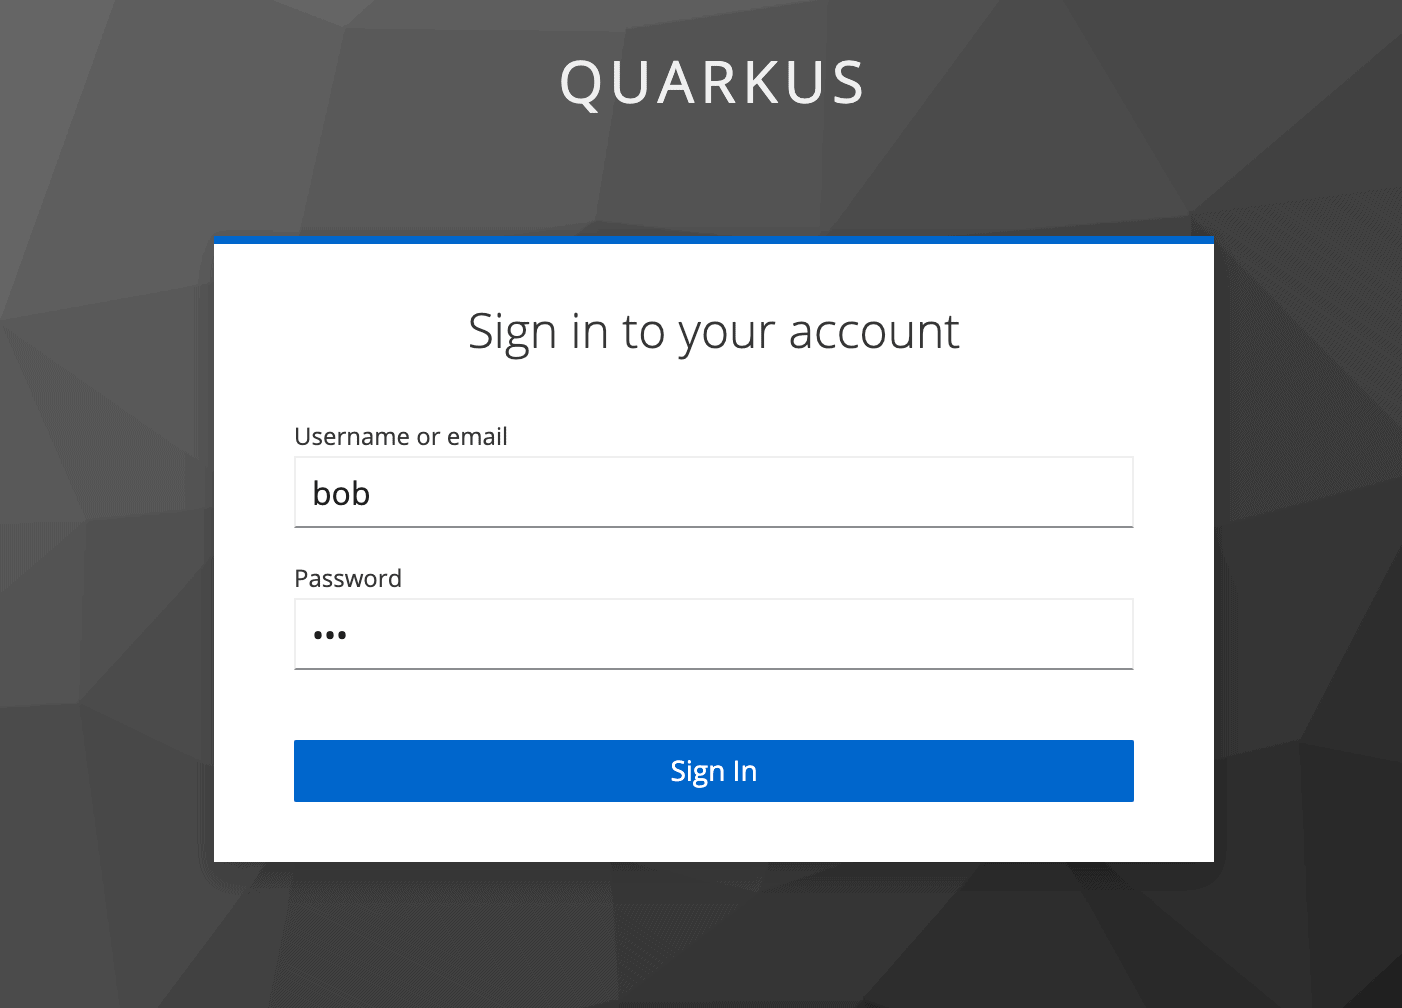
Go back to the Quarkus Dev UI. Then, select “Log into Single Page Application.”

Type the following credentials in the Keycloak login page.
- Username: bob
- Password: bob
When you select “View Access Token”, you can see the access token which means developers don’t need to memorize the API and specification as well as reading the Keycloak documentation.
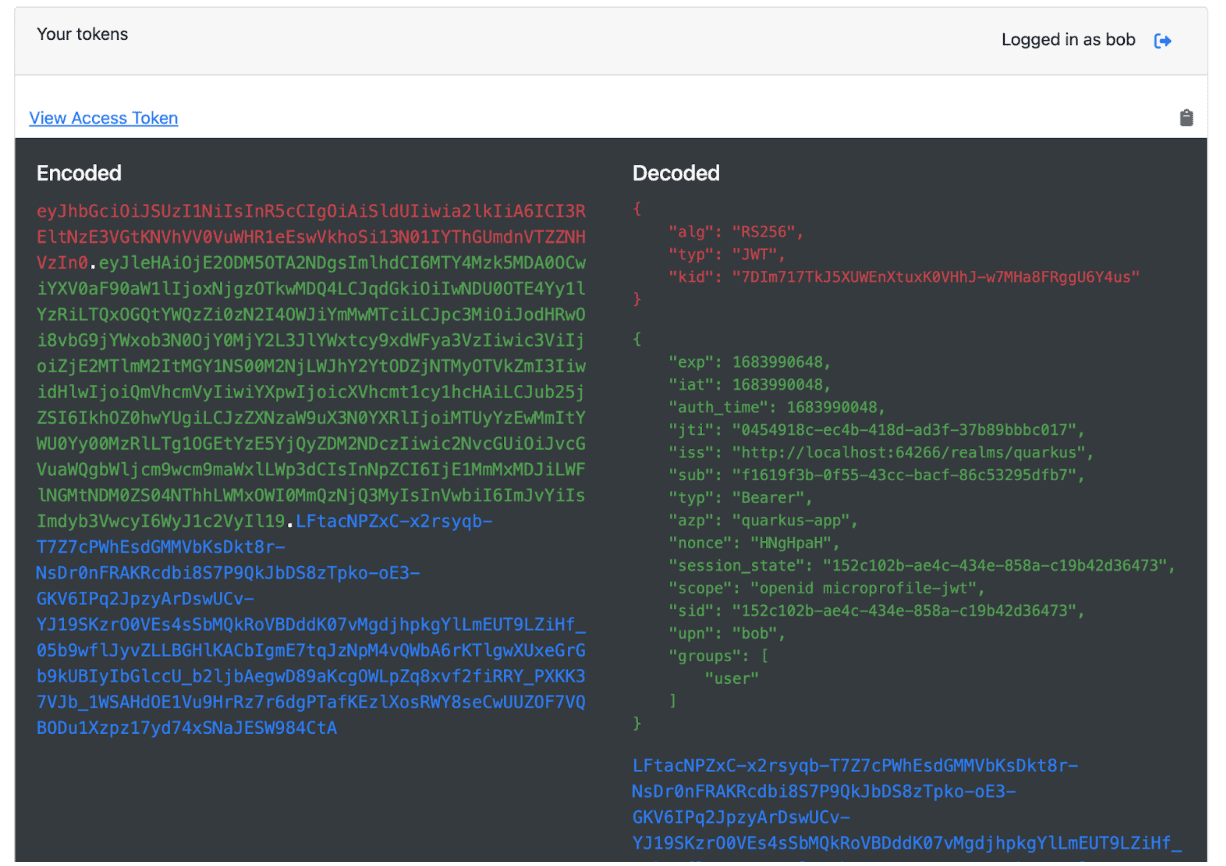
Next, verify the endpoints by typing the service path in. For example, when you type “/hello” in, you should see a “200” result. When you access “/hello/db”, the 403 result code should be shown since “bob” has no admin permission.
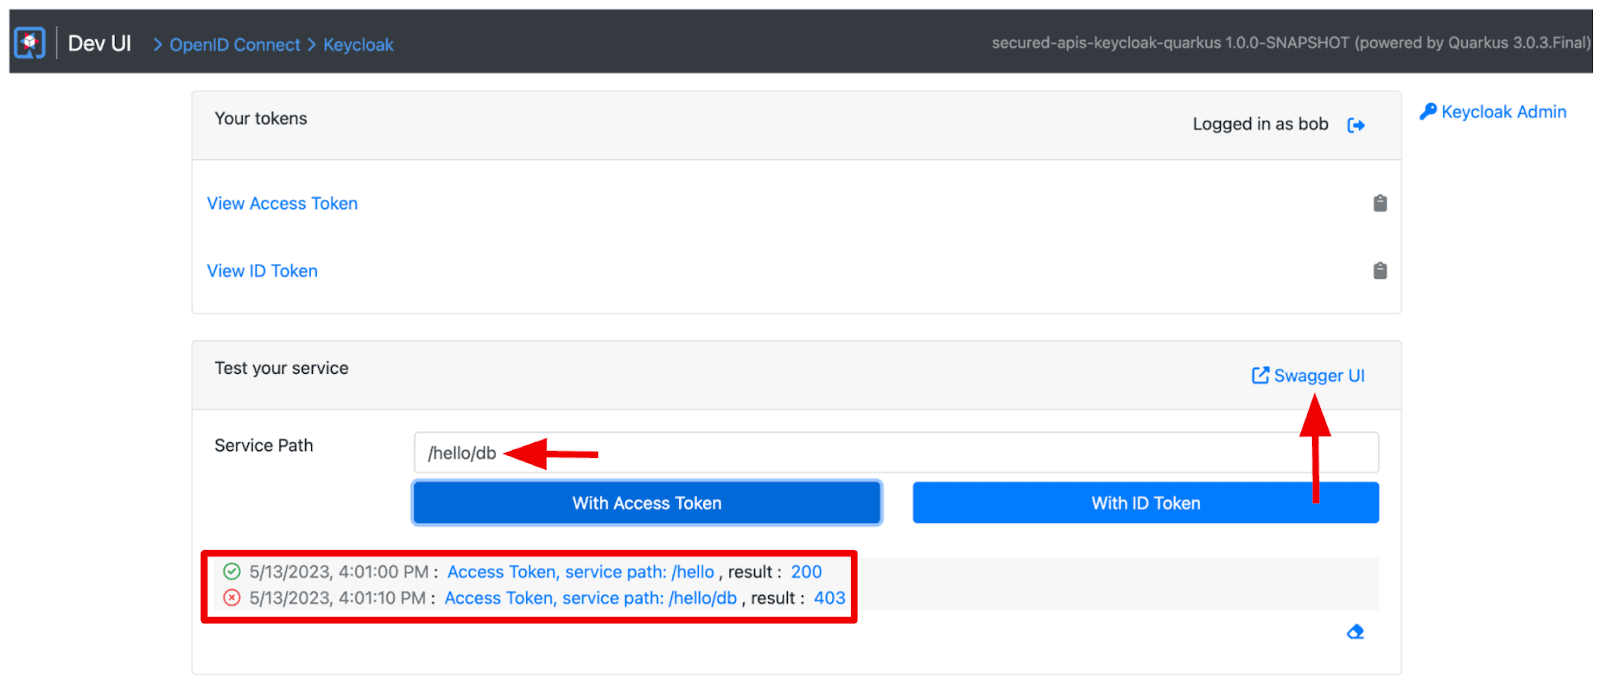
Let’s log out and in again with the “alice” user, you should see a “200” result for both endpoints.
However, you probably still wonder about the actual result when you invoke the REST endpoints with a valid access token.
Select “Swagger UI” on the page, and expand the “/hello/db” endpoint by selecting the down arrow. Select “Try it out > Execute”.
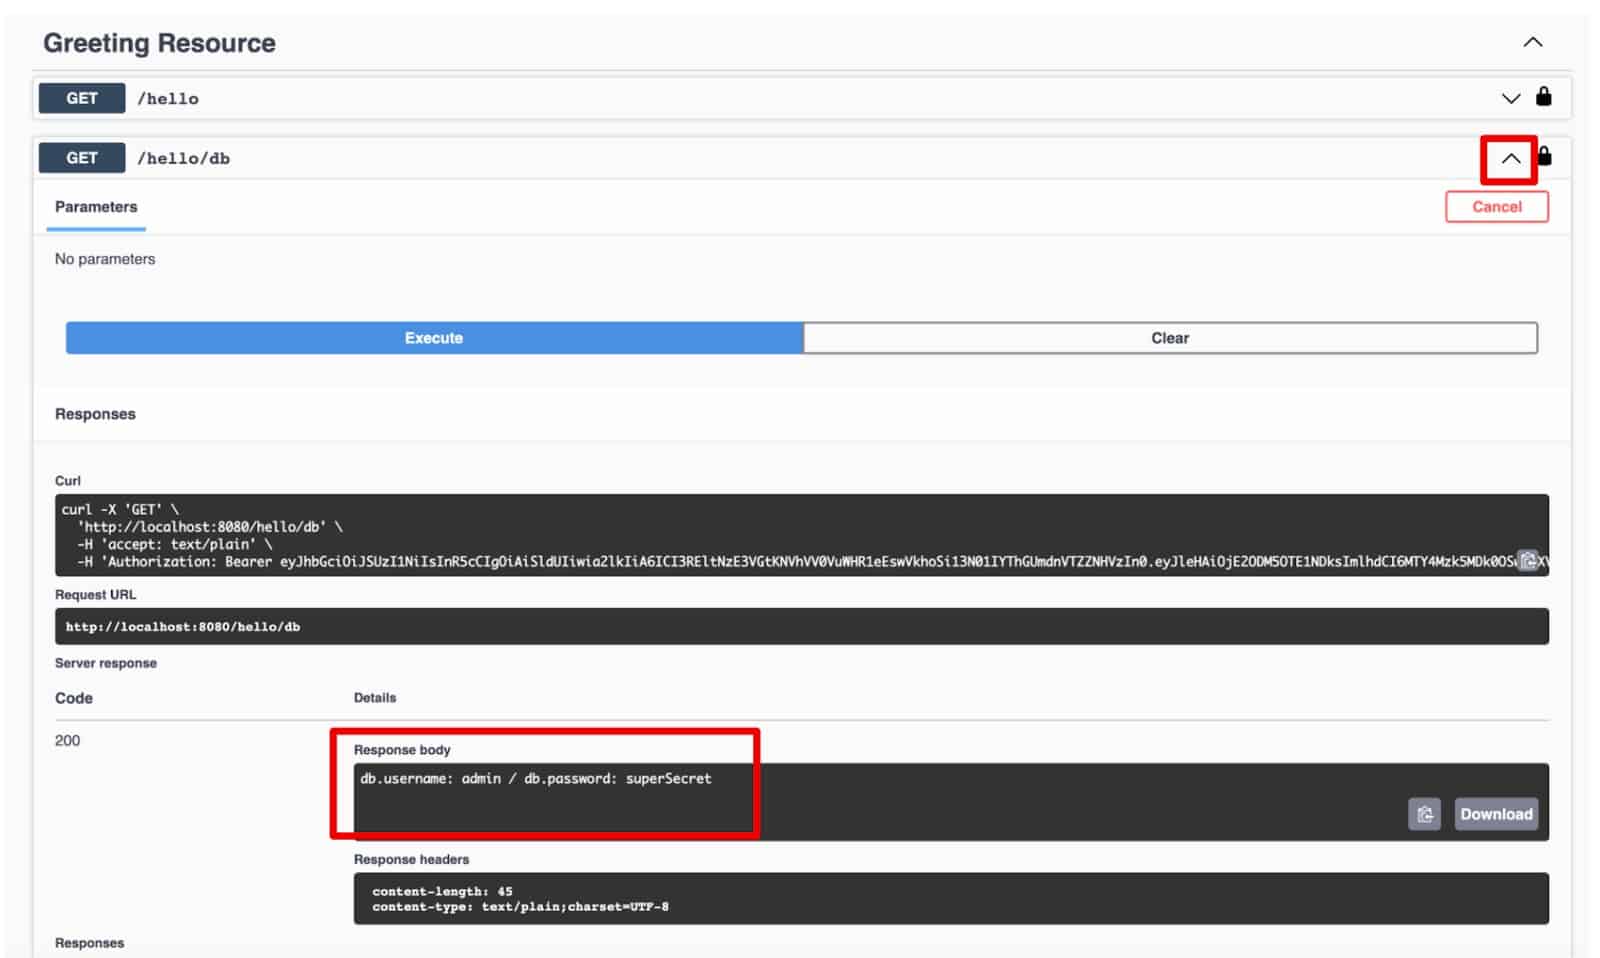
You should see the following result in the response body section.
db.username: admin / db.password: superSecretGreat job! You’ve verified the endpoints with valid access tokens that Keycloak issued.
Conclusion
You’ve learned how the Keycloak server enables developers to secure cloud-native microservices using role-based access control. You also understood how Quarkus allows developers to interact with the Keycloak server for authentication and authorization when they develop cloud-native applications locally. Enjoy your security journey with the new CNCF project, Keycloak.
Find more resources: