Guest post by Zhongpei Qiao of Alibaba and KubeVela
The continuous maturity of cloud native technology has allowed numerous infrastructure capabilities to be directly utilized by business applications. However, many developers have struggled with the high learning curve and cost of getting started, preventing them from deeply understanding the cloud native ecosystem’s toolset. Today, we will introduce you to a useful tool that can help you quickly install a Kubernetes cluster in an offline environment, easily deploy business applications with a low learning curve, and offer advanced capabilities like multi-cluster and cloud resources, all while only requiring a system environment capable of running Docker.
This tool is VelaD. It can help developers build a cloud-native application control plane based on K3s and KubeVela from scratch in just three minutes.
Prerequisites
- If you are using a Mac or Windows, you need to prepare a Docker environment. We recommend using Docker Desktop.
- If you are using Linux, no preparation is required.
Installing VelaD
Mac/Linux
curl -fsSl https://static.kubevela.net/script/install-velad.sh | bashWindows
Use Powershell to run
powershell -Command "iwr -useb https://static.kubevela.net/script/install-velad.ps1 | iex"During the installation, you need to enter the current user’s password to install it in the PATH. Use the following command to confirm that you have installed it successfully:
velad version

Core Version: v1.7.5
VelaD Version: v1.7.5
One-click installation of Kubernetes and KubeVela control plane
In the simplest case, to create a multi-cluster control plane with VelaD=id.4ekz59m, you only need one command:
velad installThe entire installation process is completed offline and takes only about 1 minute. In addition to Kubernetes, it also installs KubeVela, a modern cloud-native application delivery and management platform, to help you easily get started with deploying cloud-native applications. Not only that, but you can also add more nodes and databases to ensure higher availability of cluster data. Furthermore, the control plane created by the above command will not automatically expose the cluster to the public network. If you need to access the control plane you created on a remote server through the public network, see the remote access documentation.
The command is based on K3s/K3d technology, which creates a single-node Kubernetes cluster on your machine and installs KubeVela and its command-line tool, vela, in it. With this environment, you can immediately start delivering your business applications.
Out-of-the-box application delivery features
Enable VelaUX
As velad install is executed, the popular console plugin VelaUX is also ready on your machine. Note the prompts after velad install completes:
💡 To enable dashboard, run `vela addon enable /Users/qiaozp/.vela/addons/velaux`
🔑 To access the cluster, set KUBECONFIG:
export KUBECONFIG=$(velad kubeconfig –name default –host)
Copy the prompts after the installation is successful and execute the command to enable the VelaUX plugin. The path in the command may be different in your environment.
Linux/Mac
export KUBECONFIG=$(velad kubeconfig --name default --host)
vela addon enable $HOME/.vela/addons/velaux
Windows
$env:PATH += ";$HOME\.vela\bin;"
$env:KUBECONFIG = $(velad kubeconfig --host)
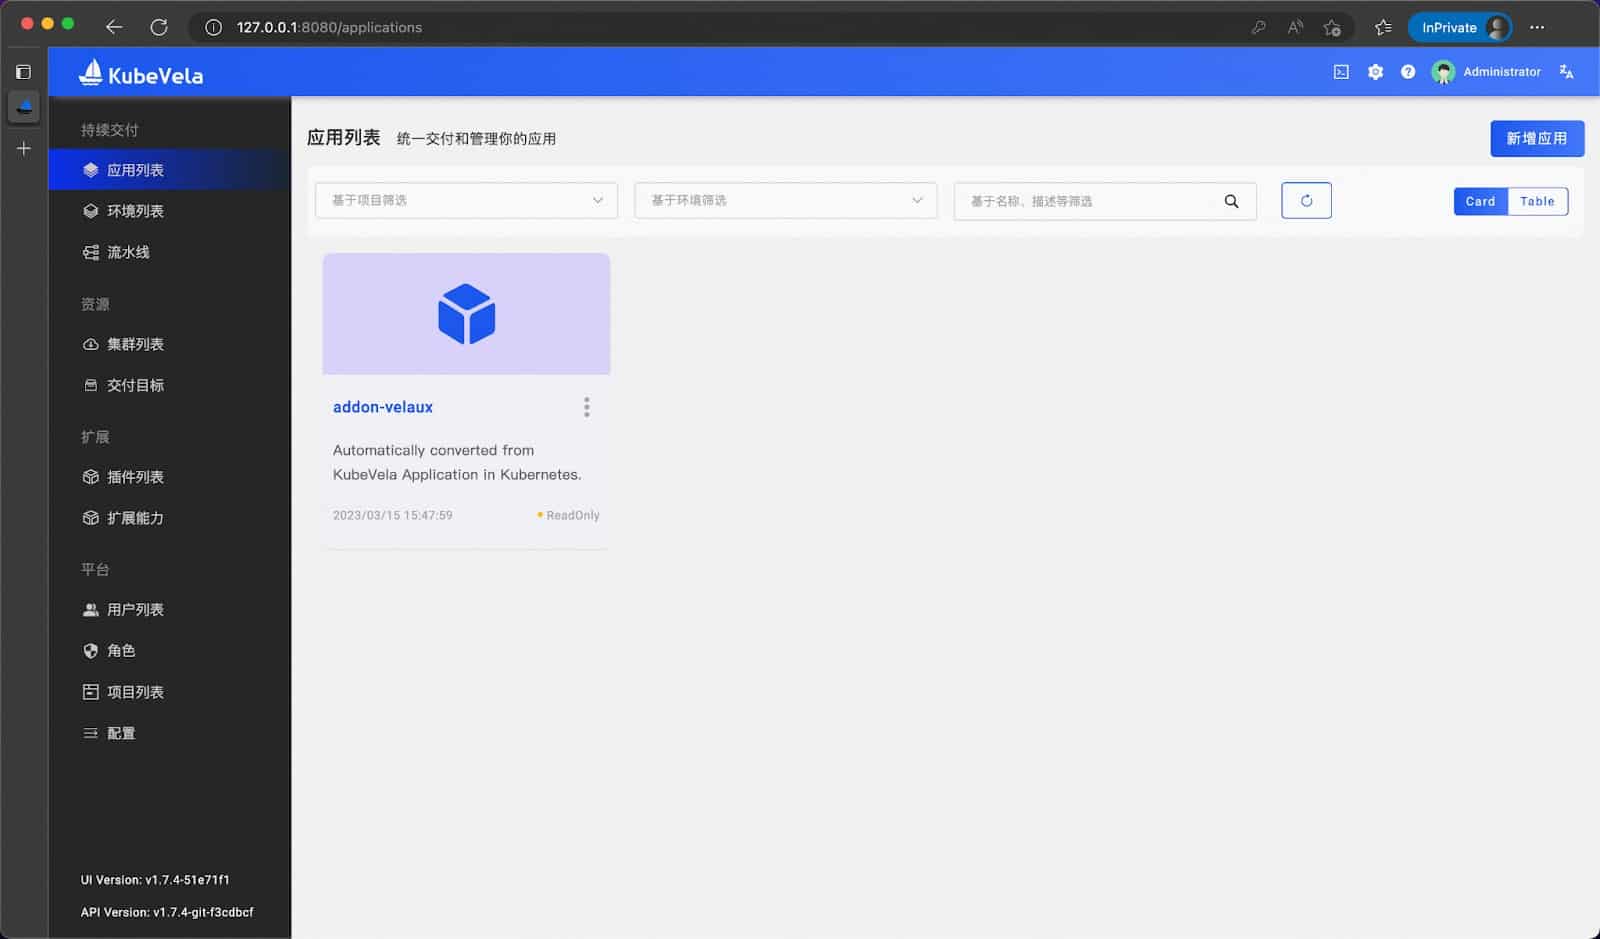
vela addon enable $HOME\.vela\addons\velauxVelaUX is an application running on the control plane, and you can access it through a browser. Forward VelaUX’s port to your local machine for access:
vela port-forward addon-velaux -n vela-system 8080:80Use the up and down arrow keys to select > local | velaux | velaux. Next, you can access it in your browser at: http://127.0.0.1:8080/The initial administrator username and password are admin and VelaUX12345, respectively. After logging in, you need to set up an email and password.
Deploy an application
Below, we will guide you through deploying a WordPress application in three steps using VelaUX. WordPress is a well-known blogging software that can be deployed using Helm Chart.
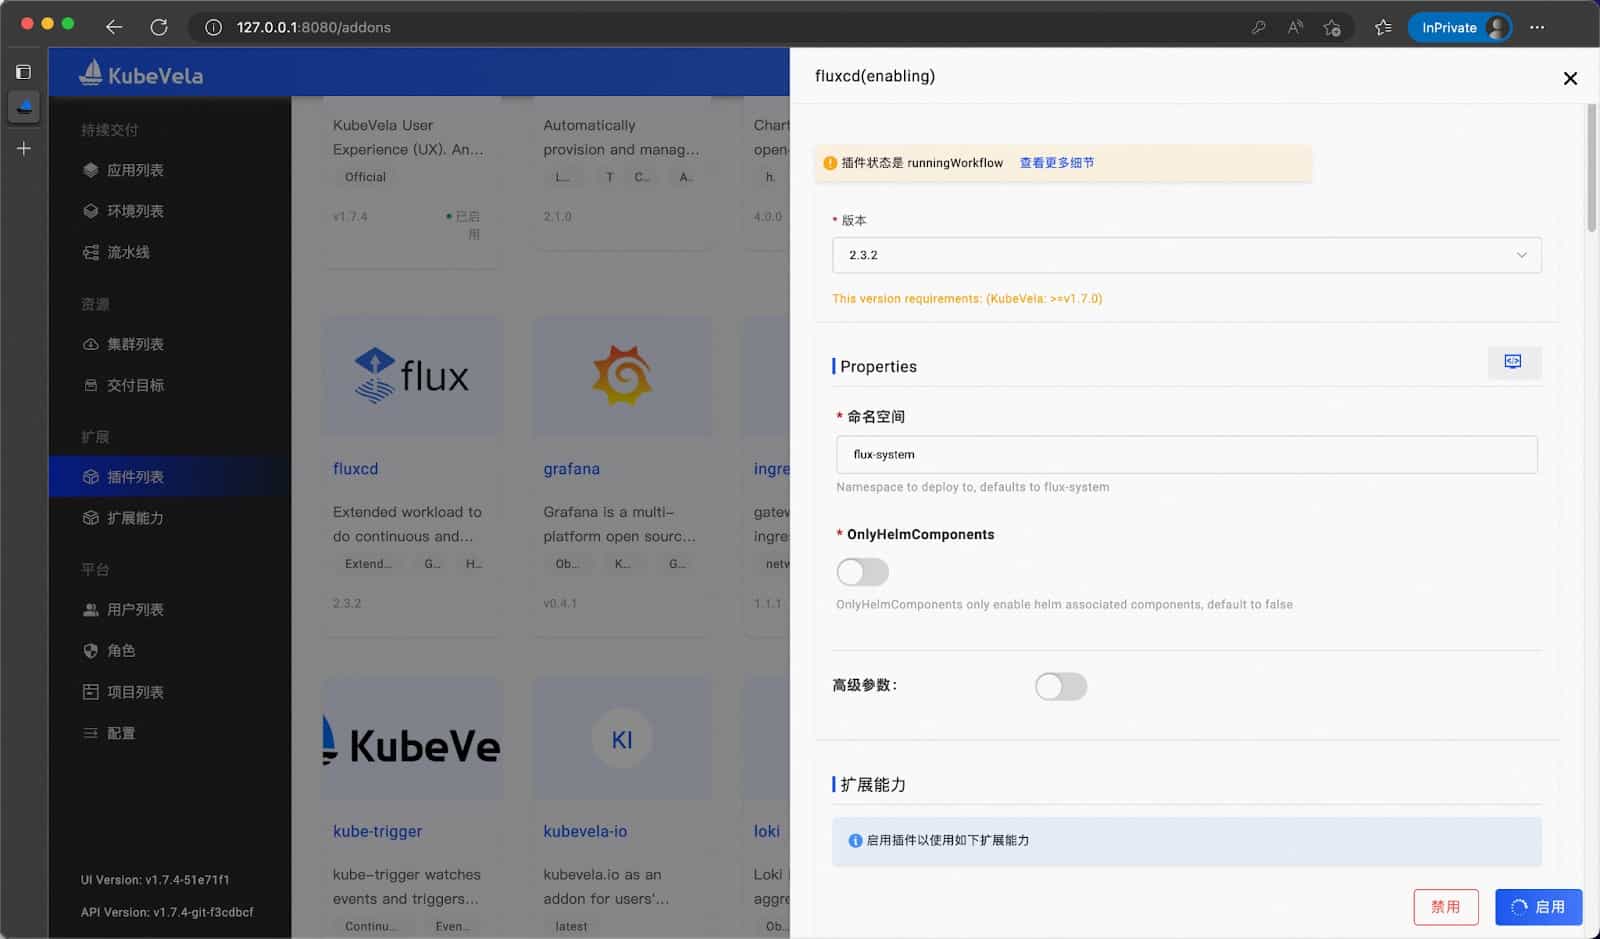
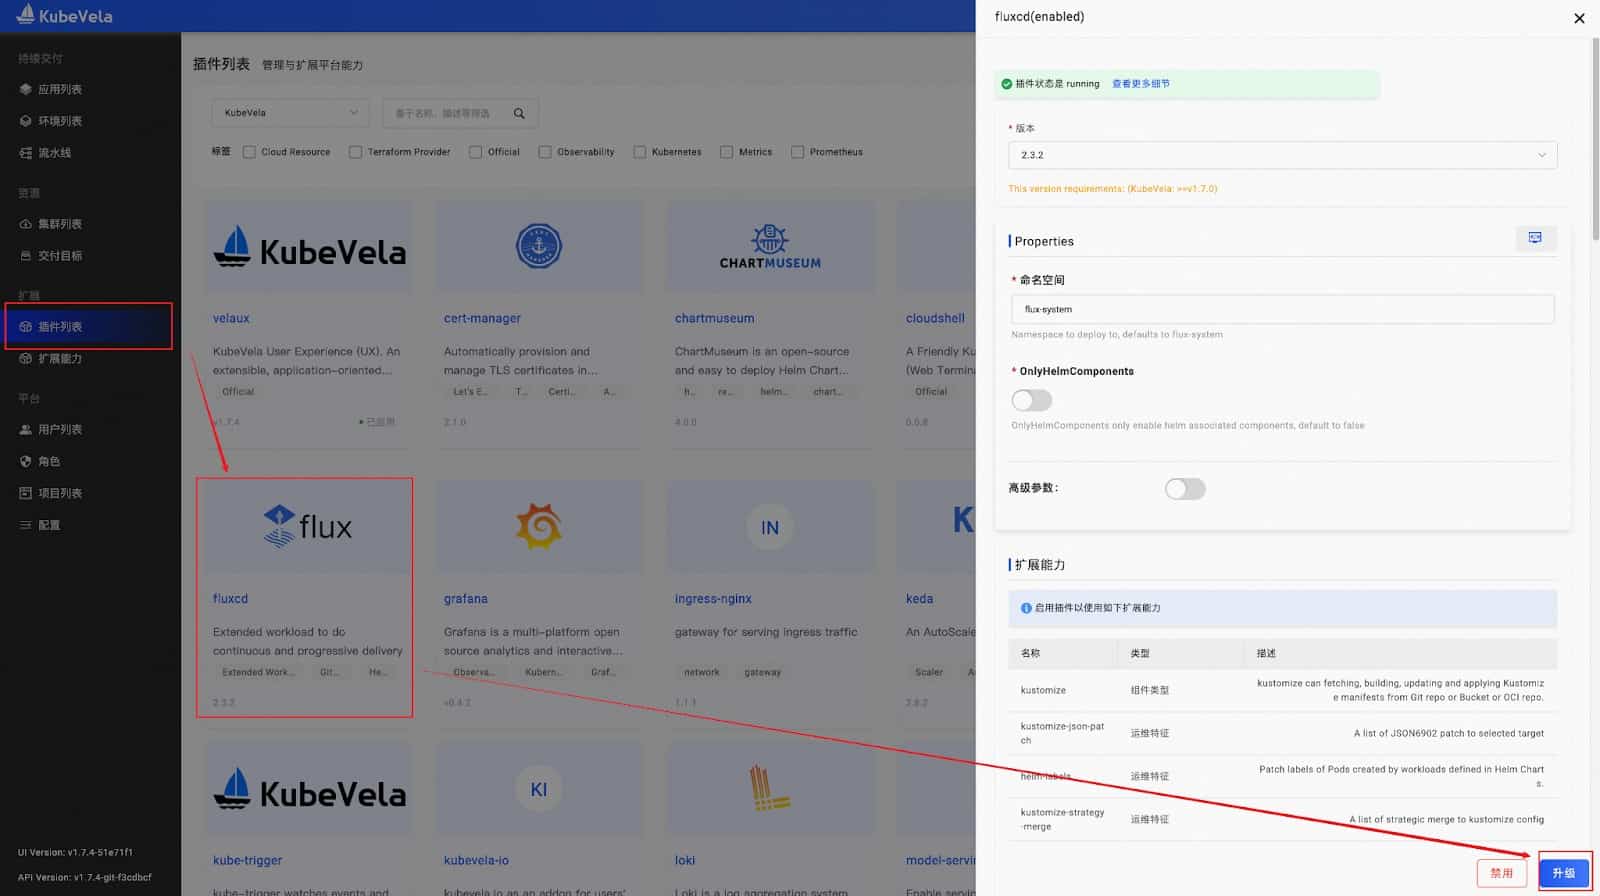
Step 1: Enable the FluxCD plugin in the plugin list. The FluxCD plugin provides KubeVela with the ability to deliver Helm Charts. Wait for the FluxCD plugin to be ready, and the status to change to running.
Tips: KubeVela’s microkernel design allows the system capabilities to be continuously expanded through the plugin system, allowing you to continuously adopt the latest practices in the cloud-native field. Currently, the official KubeVela plugin directory contains 40+ official plugins, 30+ experimental plugins, covering multiple fields such as workloads, cloud resources, observability, and rolling releases, and is still continuously expanding.

Step 2: Create an application, enter the name wordpress, select the main component type as helm, and bind to the default environment.
Tips: Environment is an important concept in VelaUX and can help users distinguish between environments such as development, testing, and production.
Click Next and fill in the following parameters:
Repository address: https://charts.bitnami.com/bitnami
Chart: wordpress
Enable advanced parameters and add four values to Values:
service.type: ClusterIP
wordpressUsername: admin
wordpressPassword: wordpress_password
mariadb.db.password: mariadb_password
Tips: The source of the parameters is wordpress/README.md. You can also choose other parameters you need. The above parameters ensure that we can complete the delivery.

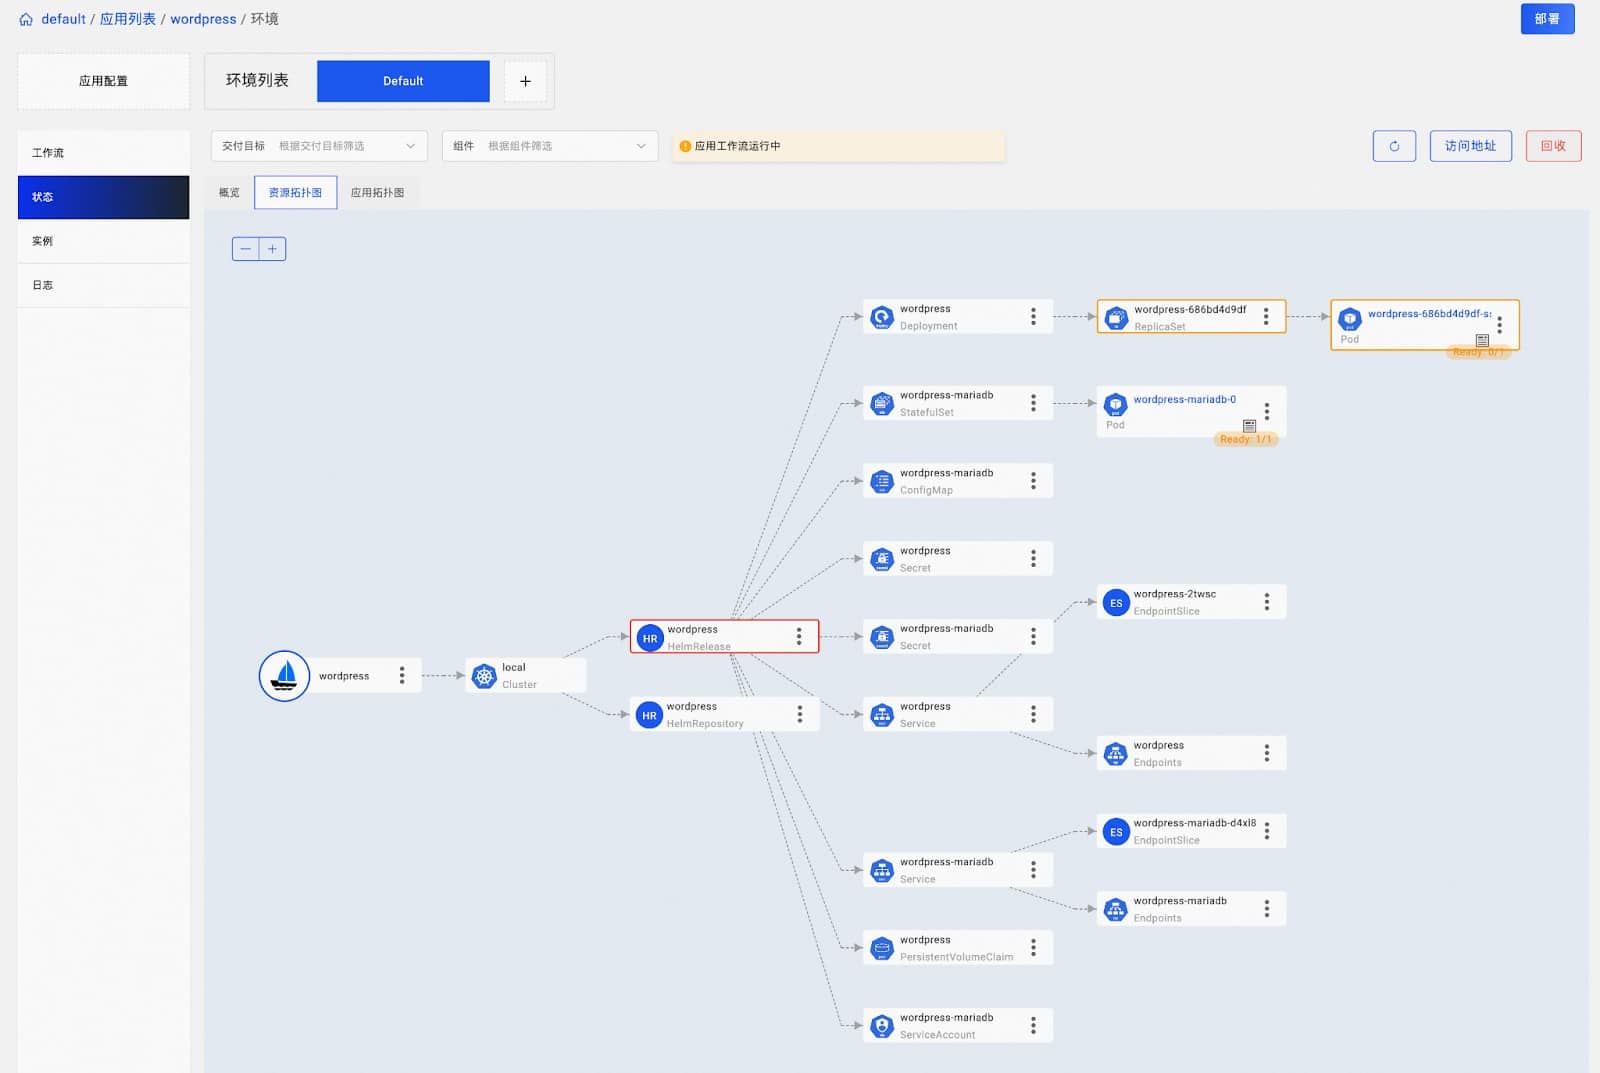
Step 3: Click “Deploy”, you can see the running workflow. Our application does not have any additional workflow configurations, so VelaUX will generate a default workflow. Click the status bar on the left to track the entire application topology. Wait until the workflow is complete and all resources in the resource topology map reach a healthy state.
Tips: In addition to observing the status of all underlying resources through the application topology, you can also view container status, events, logs, resource metrics, and other information in other Tabs. If you enable the cloudshell plugin, users can also enter the pod shell to execute commands. The entire process is strictly controlled by VelaUX’s multi-tenant permission system. You can learn more about permission management and SSO issues through KubeVela documentation.
Tips: The application workflow is a part of the application release process in KubeVela. It provides process-oriented flexibility, enabling complex operations such as conditional judgment, pause, state waiting, data flow transfer, and multi-environment grayscale.
Access the application
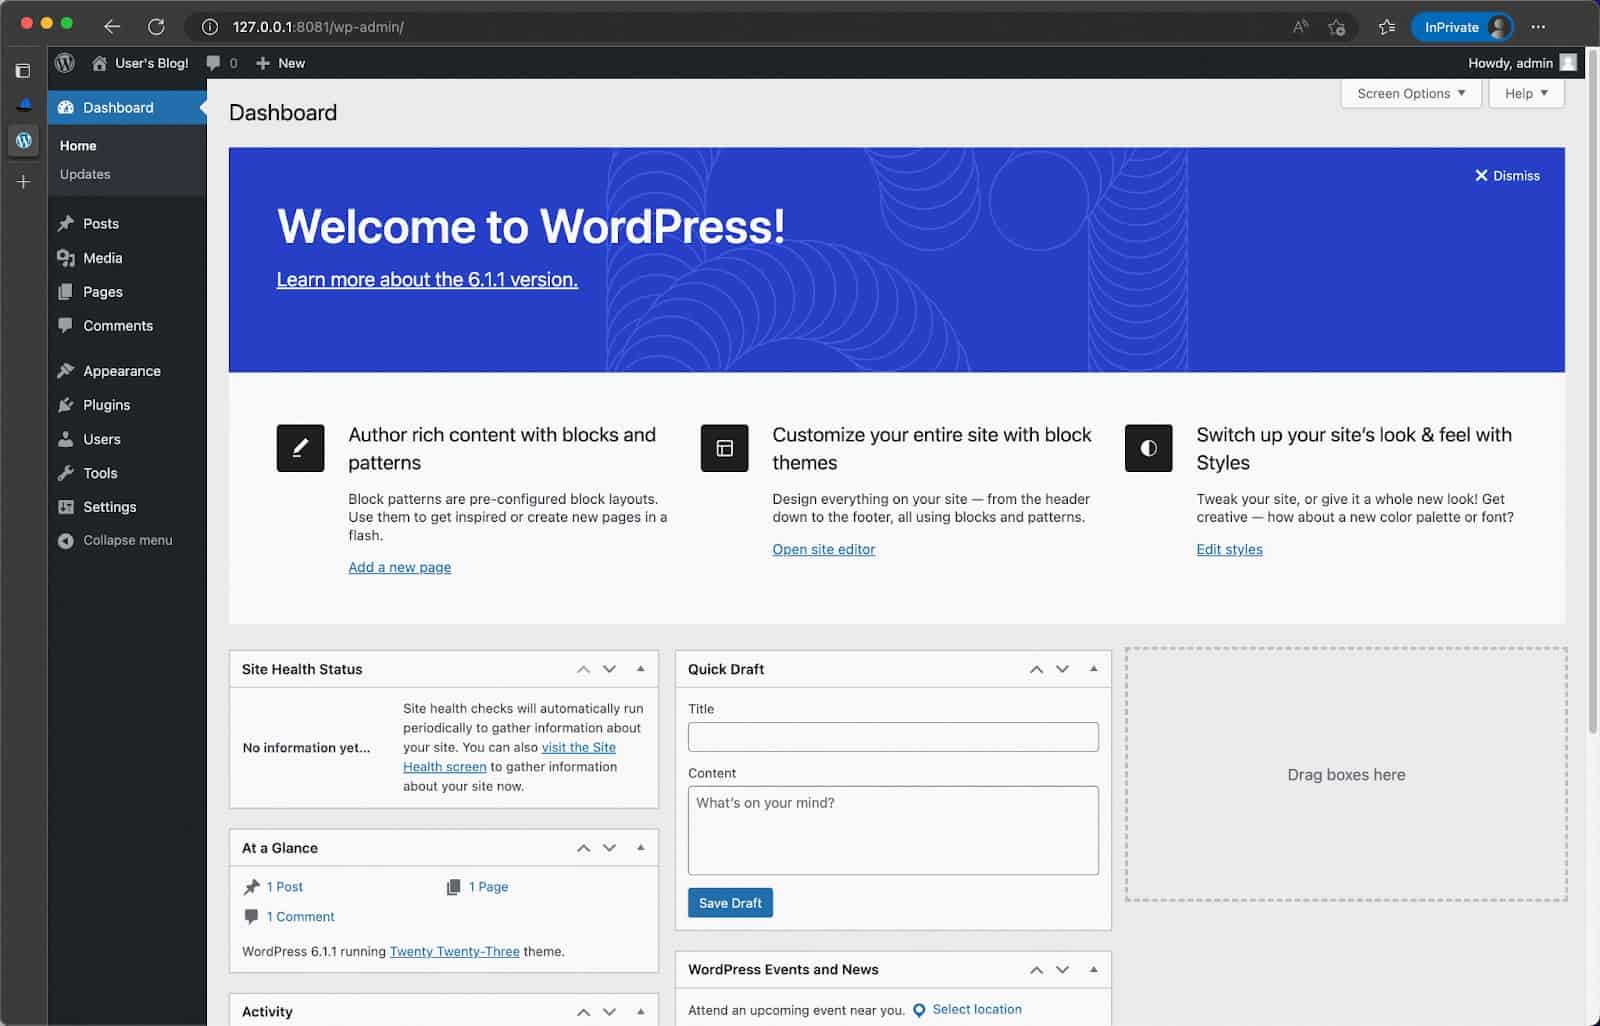
Next, you can access the newly deployed application! Run the following command to forward the WordPress port to your local machine. Use the up and down arrows and Enter to select local | wordpress | wordpress:80
vela port-forward wordpress 8081:80Use your browser to visit http://127.0.0.1:8081/login, and log in as an administrator with the username and password you just entered: admin/wordpress_password.
We have been using port forwarding to access the application, but in actual situations, you may use other more efficient and secure ways to expose services. However, in testing environments, port forwarding is already good enough. We will demonstrate how to deploy across different environments, and different environments can even be in different clusters in the advanced features! This is because multi-cluster application deployment in KubeVela is a first-class citizen.
Recycle the application
In the Default environment of the WordPress application, you can recycle the application by selecting the left sidebar. This operation will recycle the issued application and its workloads.
Add plugins to extend your application control plane
As we know from the above, KubeVela provides many features through plugins. VelaUX, FluxCD, and dex are all part of the excellent KubeVela plugin system. Plugins help us promote the “application-centric” concept. To enhance the application delivery and management capabilities of the control plane, you only need to enable different plugins.
- Need rapid iteration and control of release risks? The kruise-rollout plugin provides application grayscale publishing capabilities, supporting native Deployment/Helm Chart, see documentation.
- Need to improve team productivity and collaboration efficiency? The backstage plugin helps associate application information with the developer portal, see demo.
- Need higher resource elasticity and availability? The terraform plugin empowers the platform to deliver cloud resources, helping you complete the application build with the cloud resources you need. See documentation.
- Need to master the application running status? A set of observable plugins integrates observable projects, including Prometheus, Loki, and Grafana, providing full-stack declarative observability capabilities, helping business developers flexibly customize and easily gain insights into various complex cloud-native workloads.
The KubeVela plugin repository also contains plugins in the fields of workflow, gateway, big data, security, and mixed deployment. More best practices from the community are being precipitated in the form of plugins.
Advanced Features
Add Nodes – Scale the Cluster
This feature requires VelaD control plane to be installed on Linux
If you want to use VelaD as a lightweight control plane, a single node may reach its computational resource limit when adding more addons or deploying too many applications on the control plane. In this case, you can add worker nodes to the original control plane to scale the cluster.
- On the first node where you have already run `velad install`, run `velad token` to obtain the registration Token for the cluster.
velad token- On the second node, join the new worker node to the control plane by running the following command, forming a multi-node control plane.
velad join --master-ip <master-ip> --token <token> --worker-name <worker-name>where
<master-ip>: The IP address of the first node of the VelaD control plane. As long as the worker node can access this IP address, such as both being in the same intranet environment. When the worker needs to access the first node through the public network, please refer to the remote access documentation to create the first node. (Required parameter)
<token>: The result of the command in the first step: VelaD control plane Token. (Required parameter)
<worker-name>: The name of the new worker node. (Optional parameter)
- Confirm that the node has joined by running the following command on any node, and two entries indicate a successful join.
kubectl get node- When you need to uninstall a node, simply run `velad uninstall` on the node to be uninstalled.
Add Clusters – Deploy Applications Across Multi-Cluster Environments
As mentioned earlier, VelaD can serve as a multi-cluster control plane, but so far, you might be wondering where are the multiple clusters? The following will introduce how to use KubeVela to deploy applications across cluster environments. We will continue to use VelaUX as a demonstration platform.This time our goal is to deploy WordPress across clusters and environments and make some customizations in the production environment, specifically:
- Publish a test version in the local cluster, manually confirm that it is correct, and then publish the application to the production cluster.
- In the production cluster, increase the number of WordPress container replicas to 2 to improve availability.
Prepare the cluster
We need a sub-cluster (relative to the KubeVela control cluster) as the production cluster. If you don’t have another available cluster, you can easily create another cluster on a single MacOS or Windows machine using VelaD by running the following command:
What about the Linux platform? VelaD does not support creating multiple clusters on a single Linux machine. If you are using Linux and trying VelaD as a multi-cluster control plane, you can create clusters on other Linux machines and continue. See the remote access documentation for how to expose the sub-cluster to other machines.
velad install --name cluster-worker --cluster-onlyCompared to the previous installation command, this command adds a name parameter (default is default). Since this cluster will serve as a sub-cluster, we use the `–cluster-only` flag to skip installing KubeVela. Use the following command to check the status of both clusters:
velad statusExpected output:
Checking cluster status…
K3d images status:
✔ image rancher/k3s:v1.24.8-k3s1 ready
✔ image ghcr.io/k3d-io/k3d-tools:latest ready
✔ image ghcr.io/k3d-io/k3d-proxy:5.4.6 ready
Cluster(K3d) status:
✔ cluster [cluster-worker] ready
➤ kubevela status: not installed
✔ cluster [default] ready
✔ kubevela status: deployed
Checking KubeVela status…
Vela status:
✔ Vela CLI installed
✔ Vela CLI path: /usr/local/bin/vela
✔ VelaUX addon dir ready
✔ VelaUX addon dir path: /Users/qiaozp/.vela/addons/velaux
Tips: The second cluster created by VelaD is used to simulate the actual production cluster, which is still running in the local Docker environment’s container.
Add sub-cluster to control plane management
Use the vela command line tool that comes with the installation to add the sub-cluster to the control plane management.Linux/Mac
WORKER_KUBECONFIG=$(velad kubeconfig --name cluster-worker --internal)
vela cluster join $WORKER_KUBECONFIG --name=cluster-worker
Windows
$WORKER_KUBECONFIG = $(velad kubeconfig --name cluster-worker --internal)
vela cluster join $WORKER_KUBECONFIG --name=cluster-worker
expected output
I0316 15:37:50.867738 92684 virtual_cluster.go:337] joining cluster cluster-worker with version: v1.24.8+k3s1

Successfully add cluster cluster-worker, endpoint: https://172.19.0.5:644
After the sub-cluster is added, you can use vela cluster list to view all the managed clusters. You can also view the newly added cluster in VelaUX. The local cluster is the default name of the control plane cluster where KubeVela is located, which is the first cluster you created.
vela cluster listexpected output
CLUSTER ALIAS TYPE ENDPOINT     ACCEPTED LABELS

local Internal -     true

cluster-worker X509Certificate https://172.19.0.5:6443    true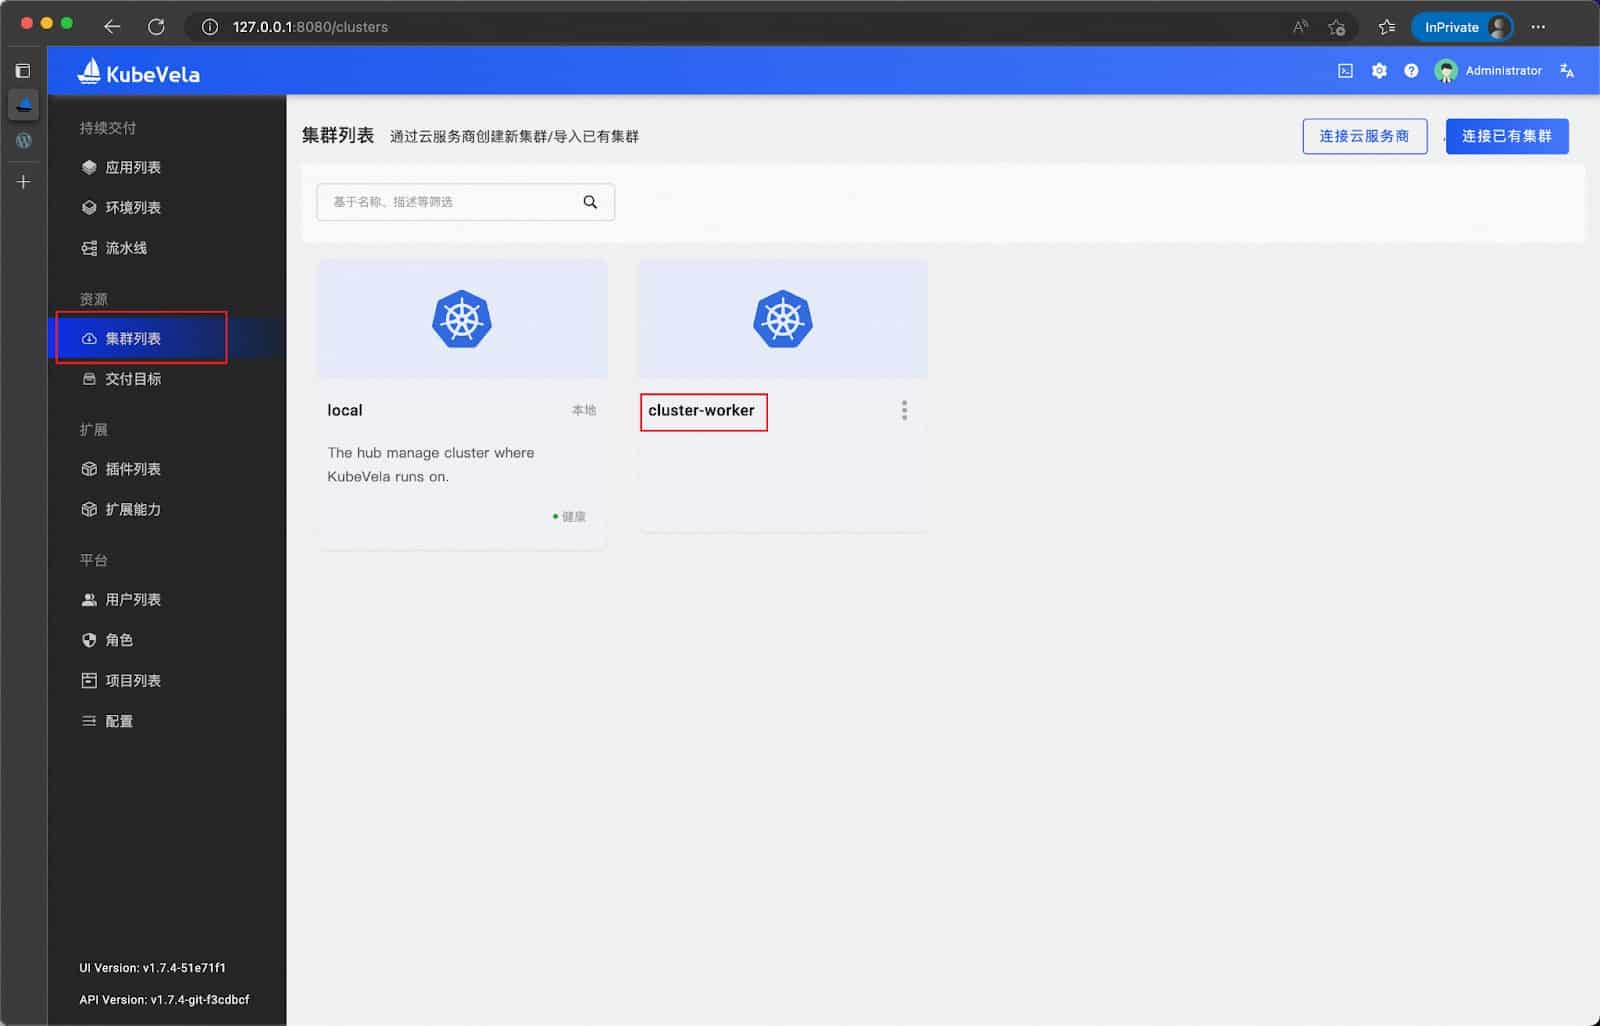
Upgrade addon
After the new cluster is added, we need to go back to the addon page to upgrade the FluxCD addon to make it effective in the new cluster.
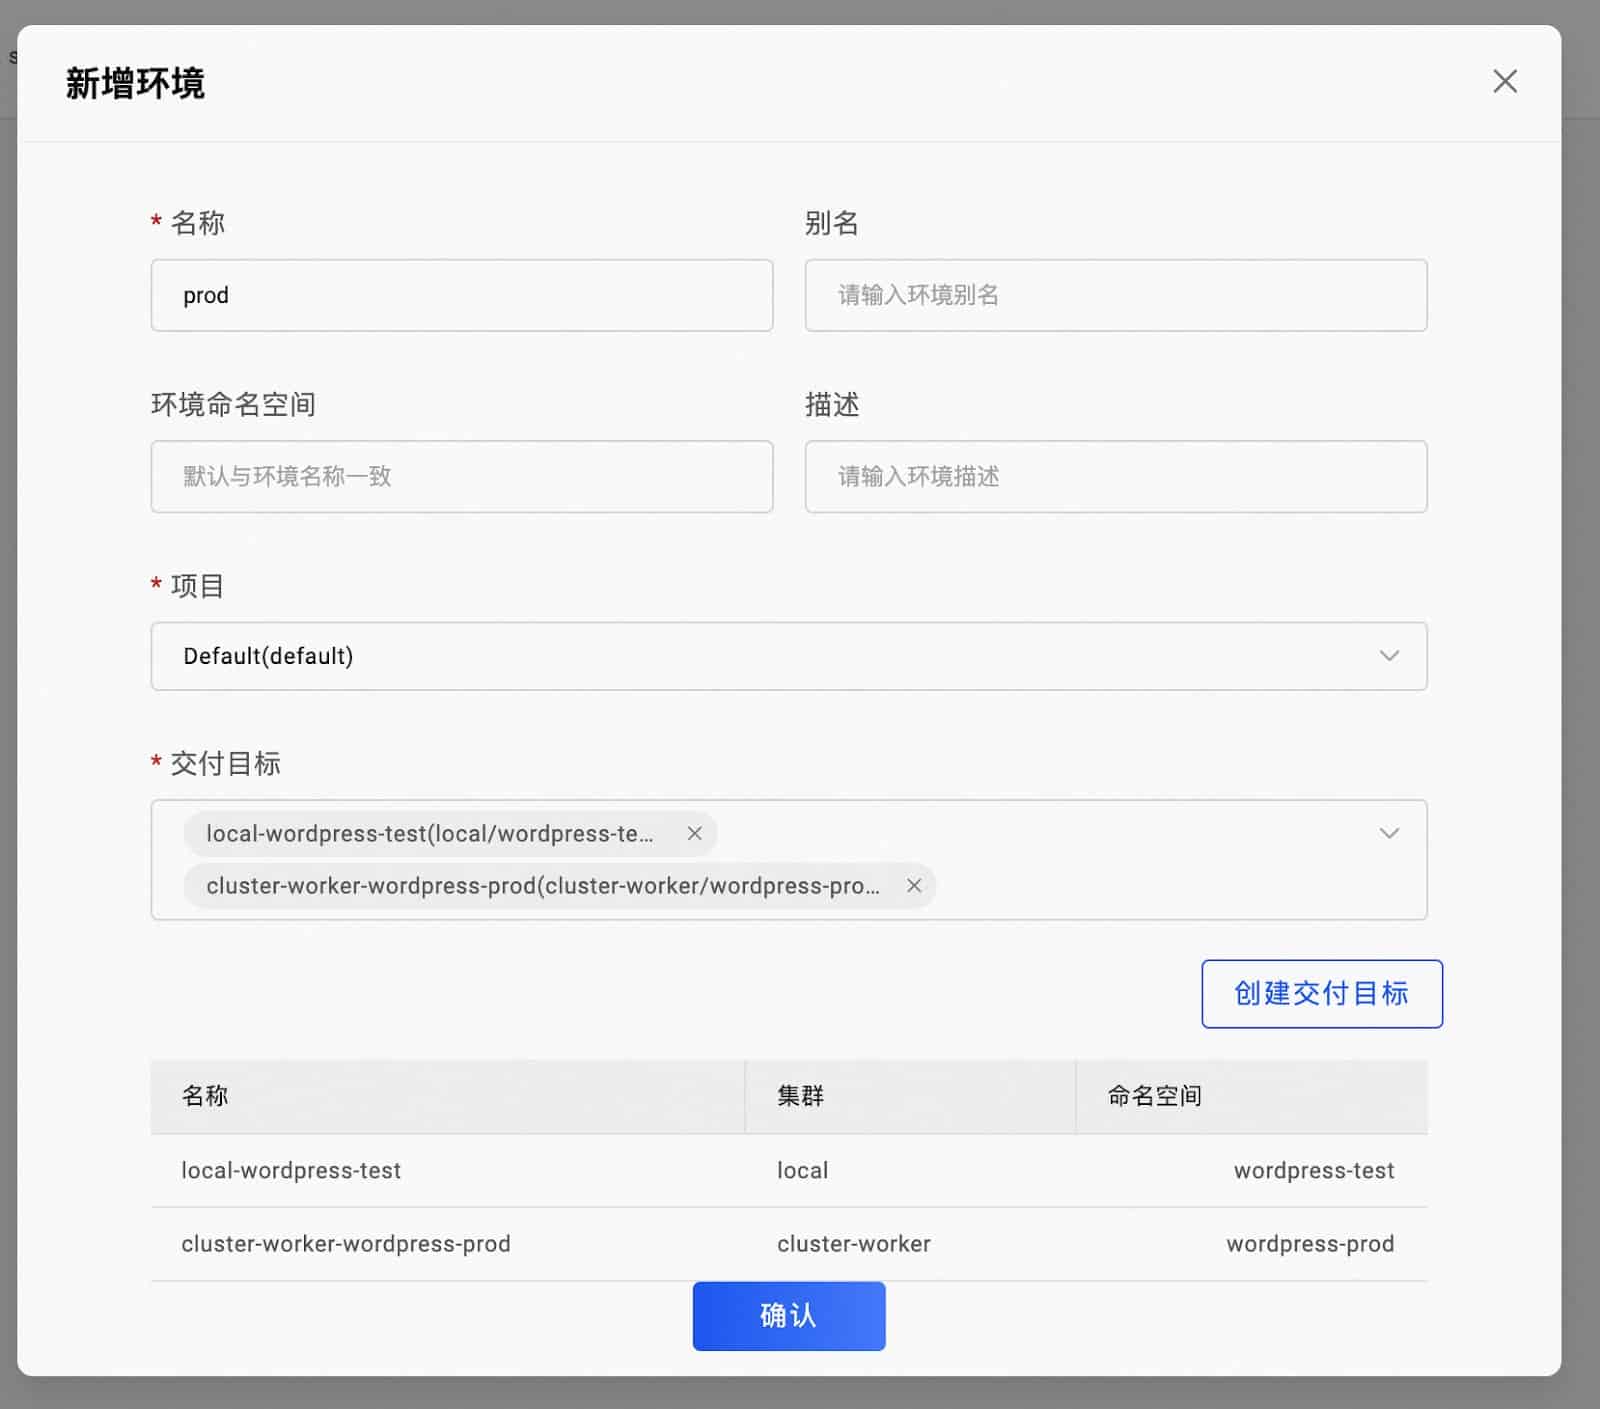
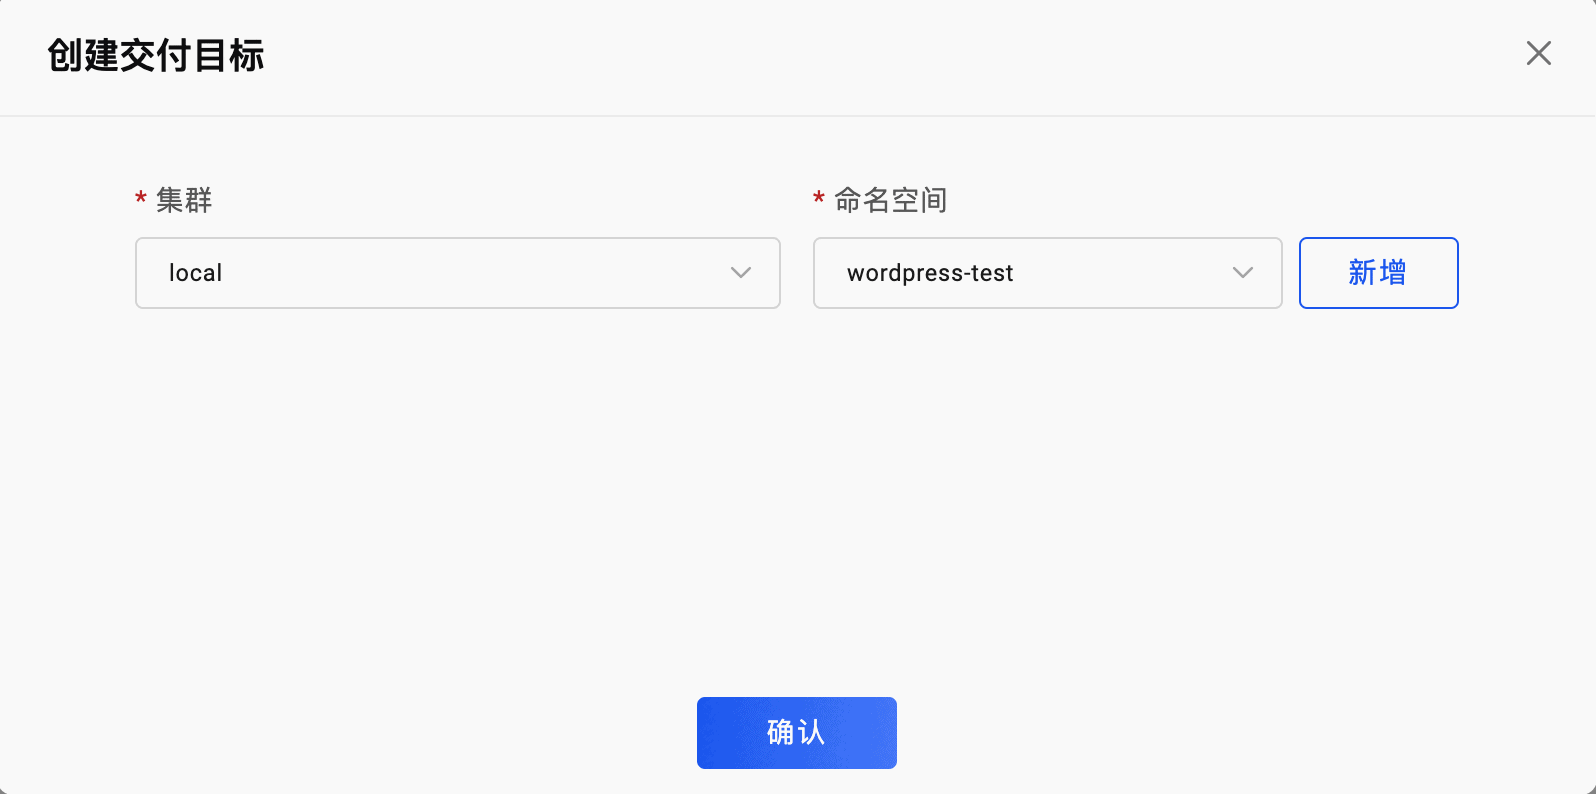
Add new environment and delivery targets
Add a prod environment to the left environment list, create and add two delivery targets in sequence,
- local cluster, wordpress-test namespace
- cluster-worker cluster, wordpress-prod namespace
Deploying the Application
In the WordPress application configuration:
- Bind the prod environment
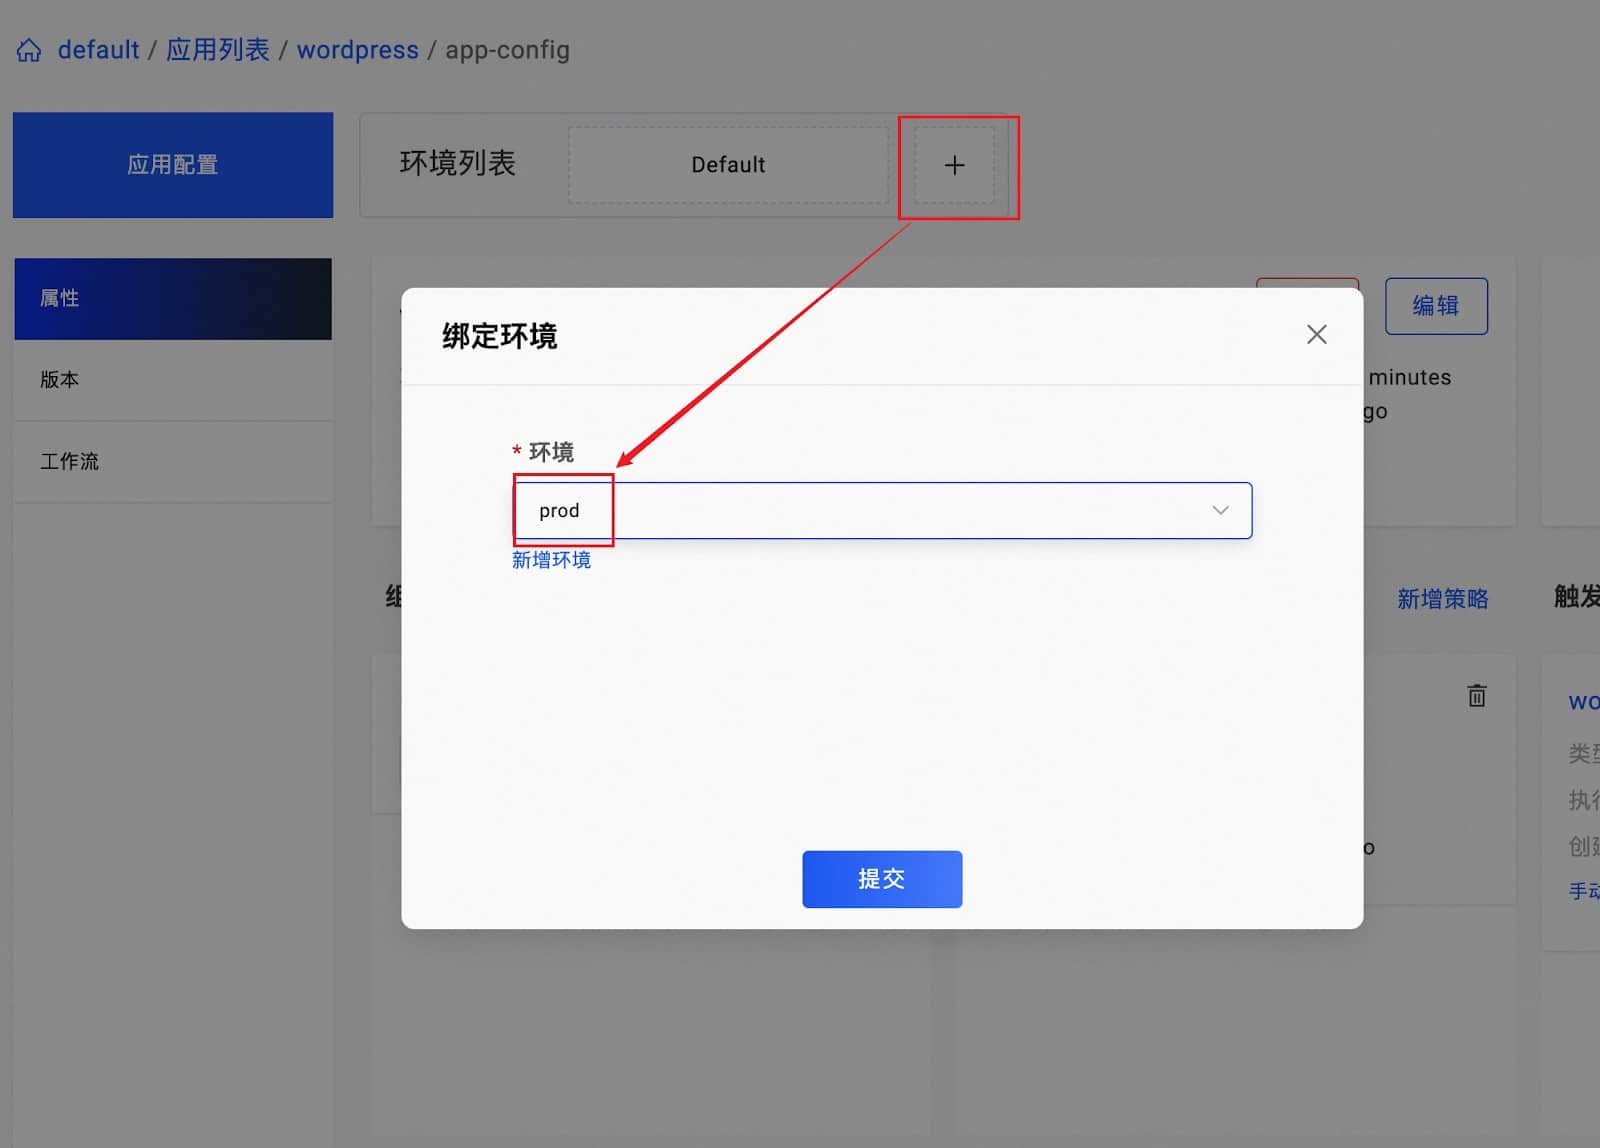
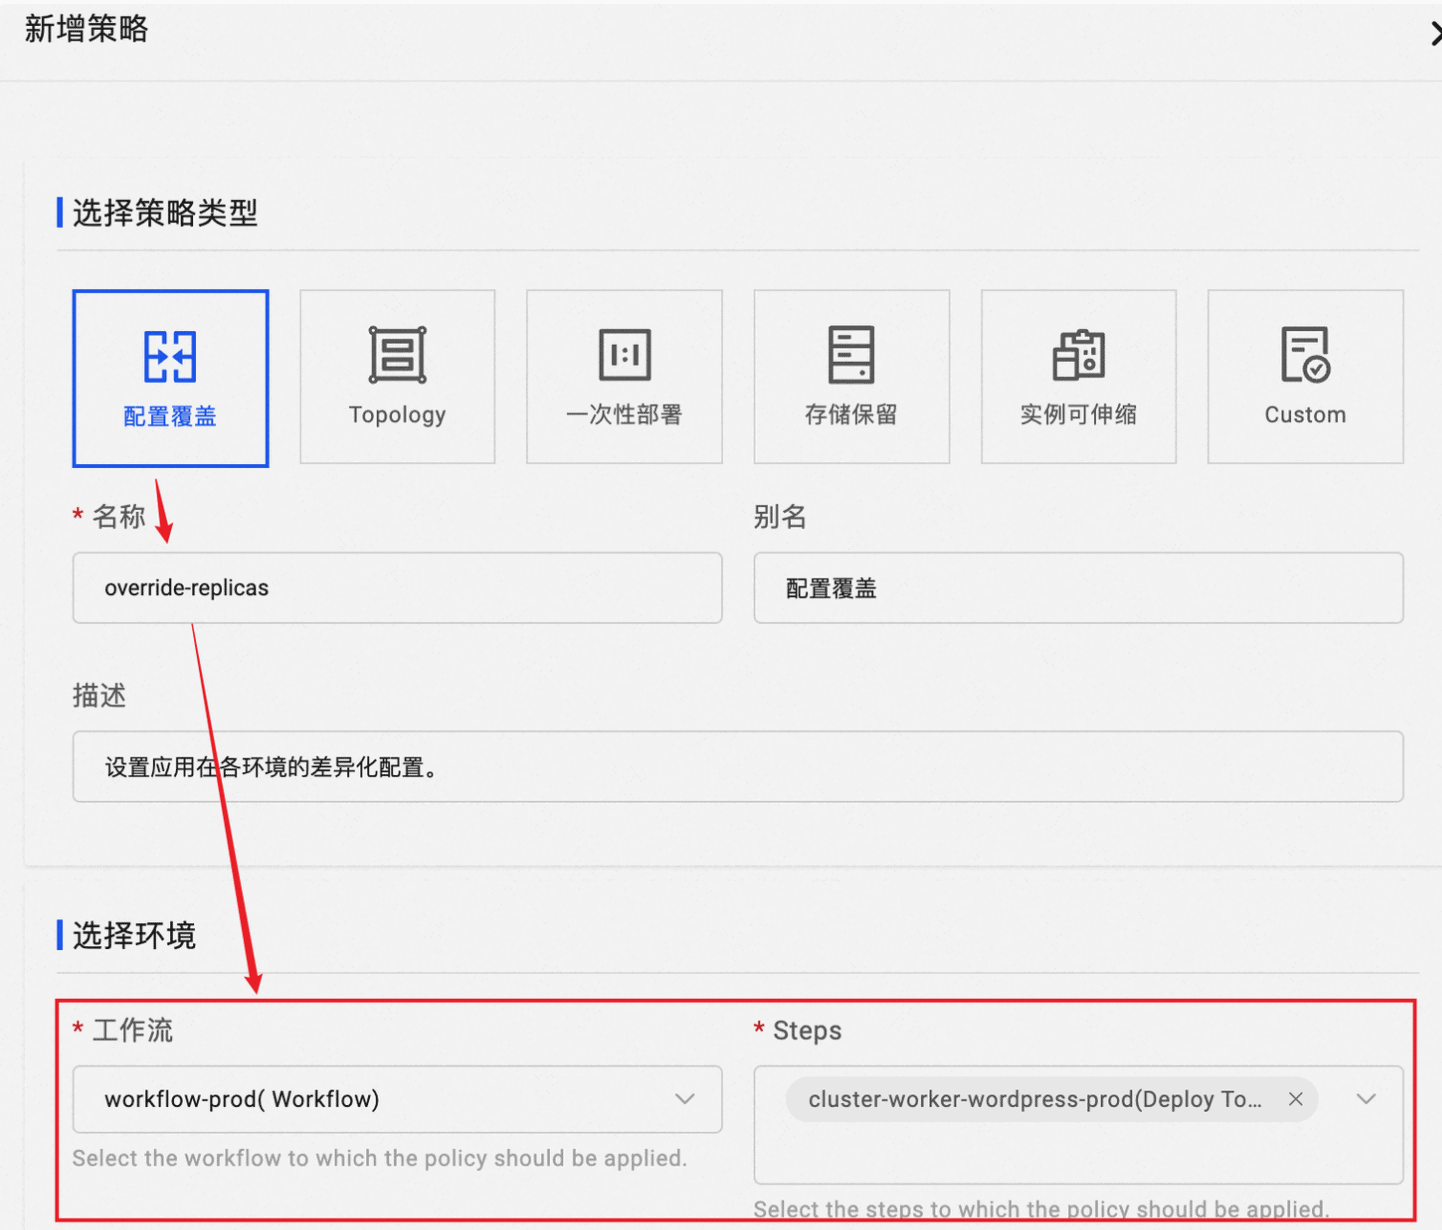
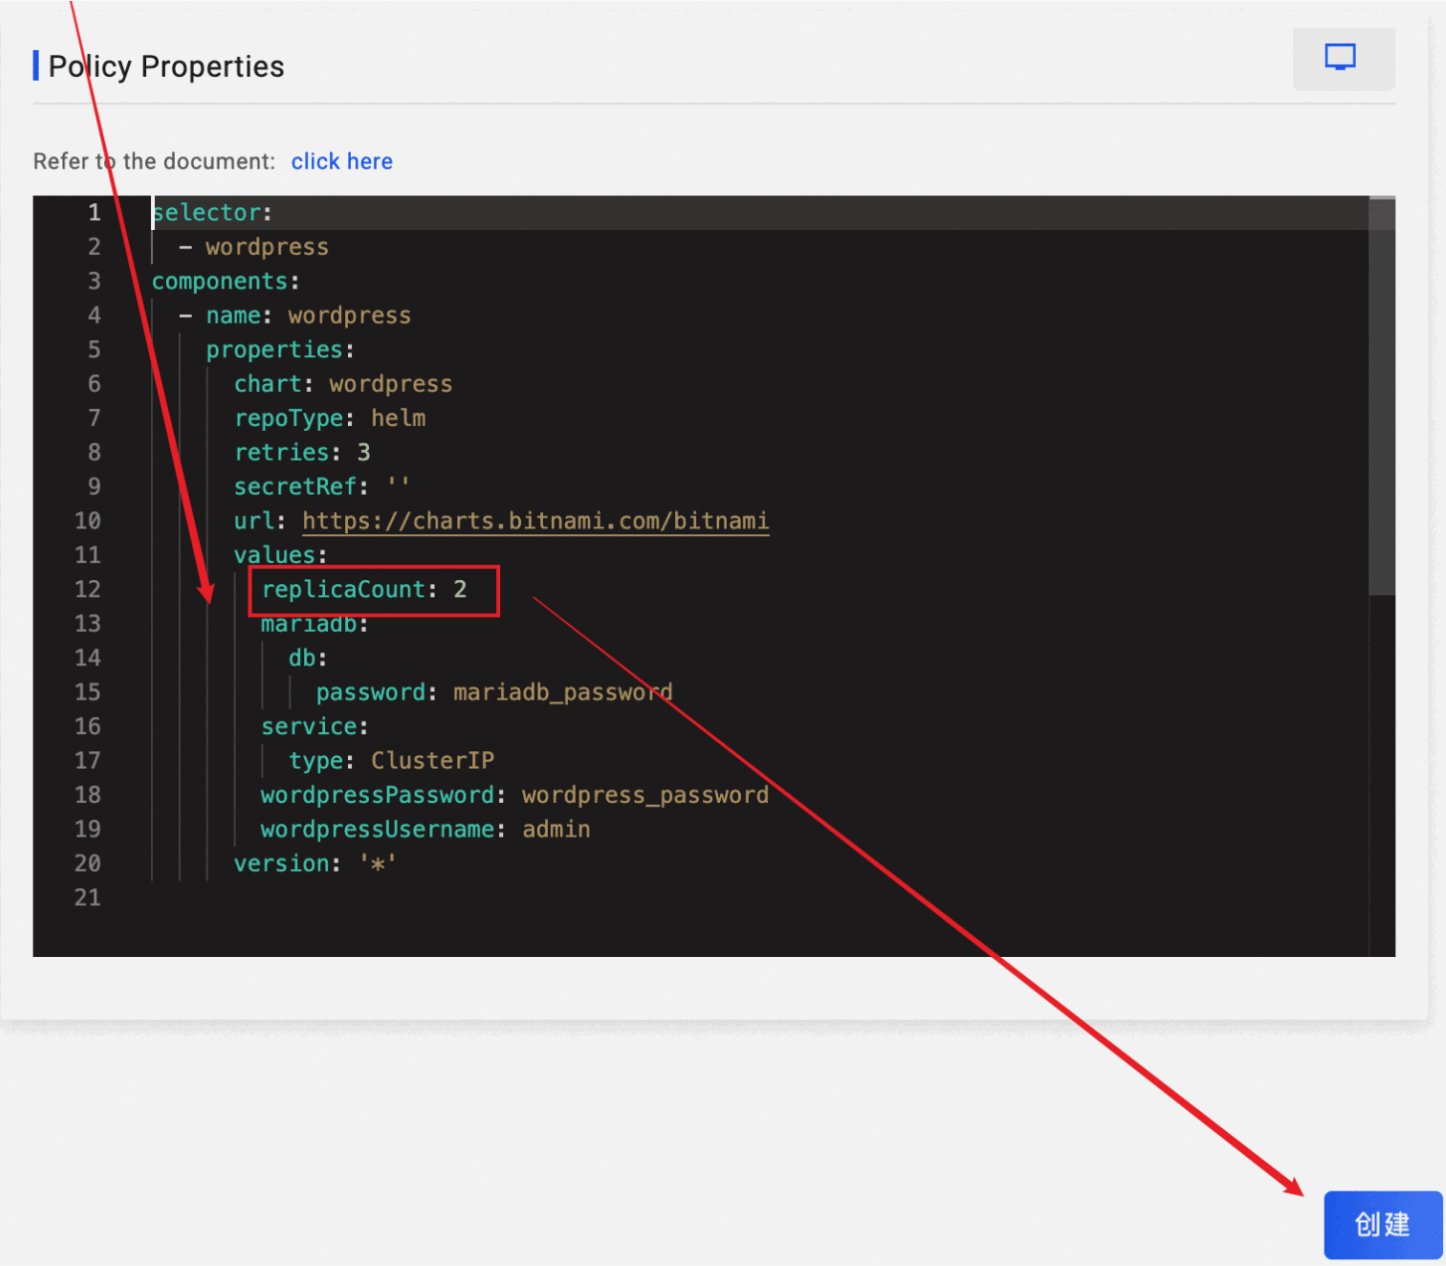
- Add a new policy to set the replica count to 2 in the production environment. The policy to be added here is configuration override. First, select the workflow and step to apply, then choose the component.

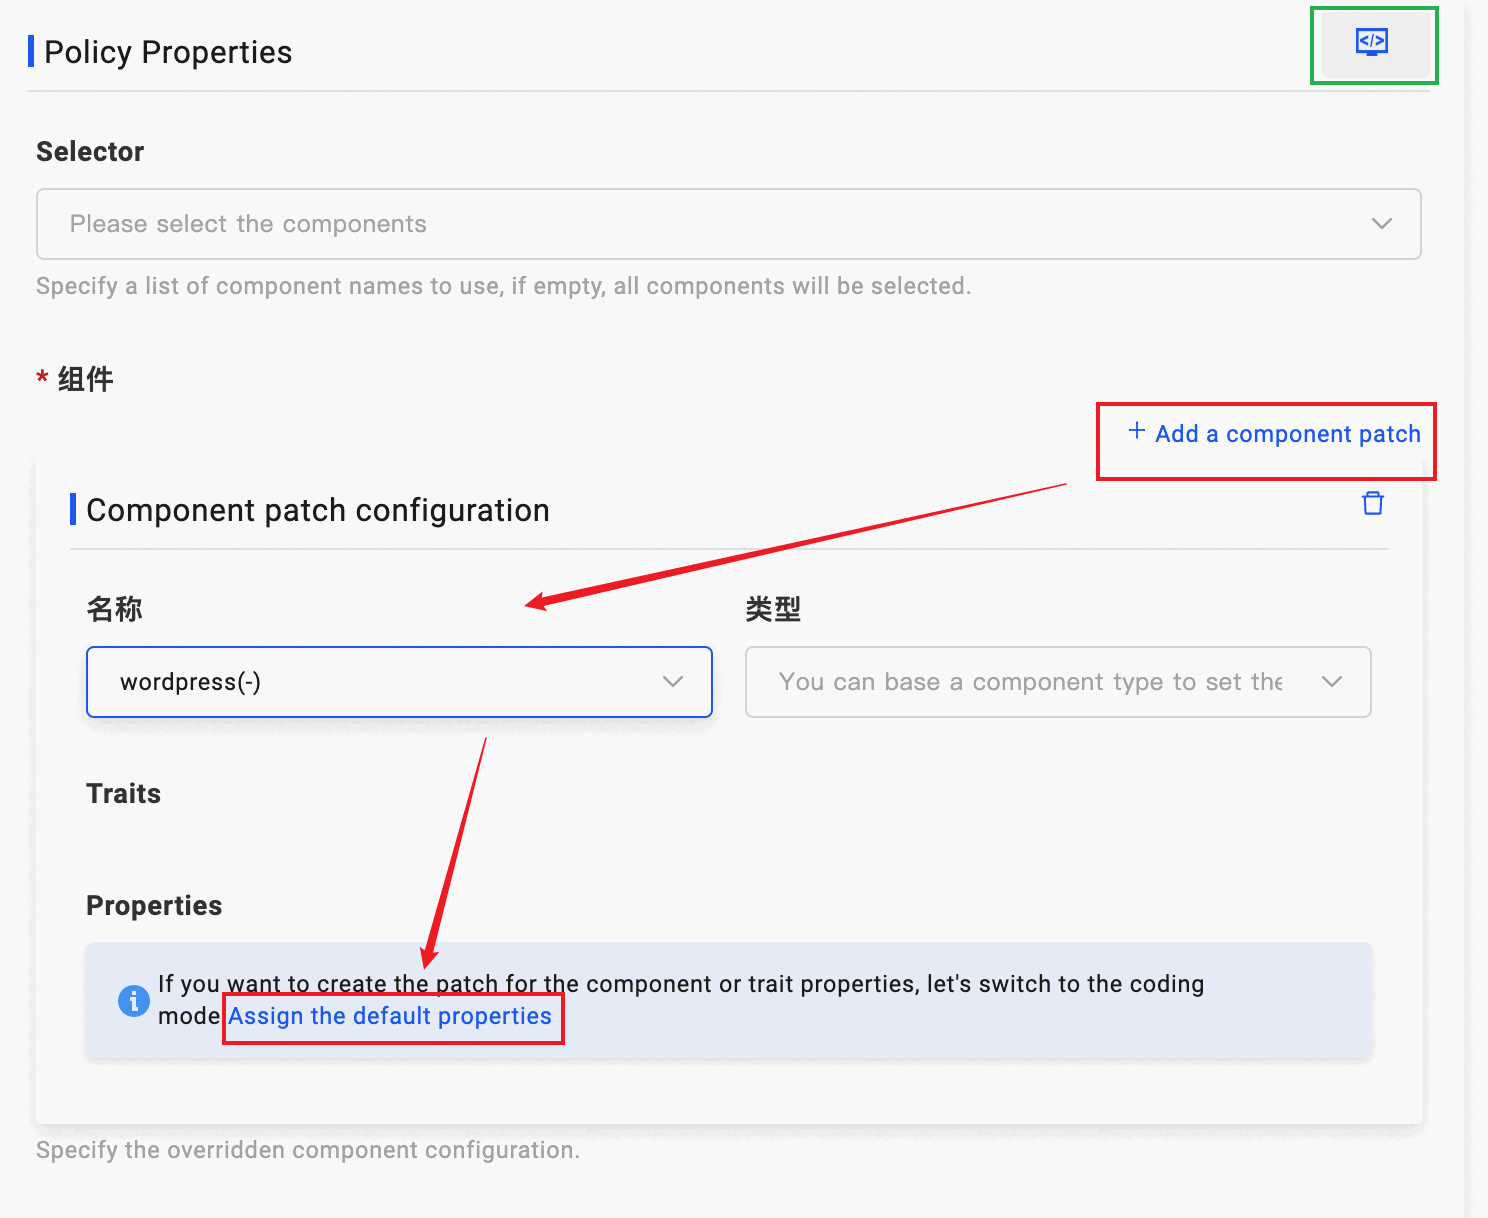
Select Add a component patch to add a Patch, and choose the WordPress component. Since the Properties patch is very flexible, VelaUX provides a dark screen for writing YAML to open this interface. Choose Assign the default properties and click on the “switch to dark screen” icon in the top right green box. In the value field as shown in the image, add the line replicaCount: 2 and finally create the policy.
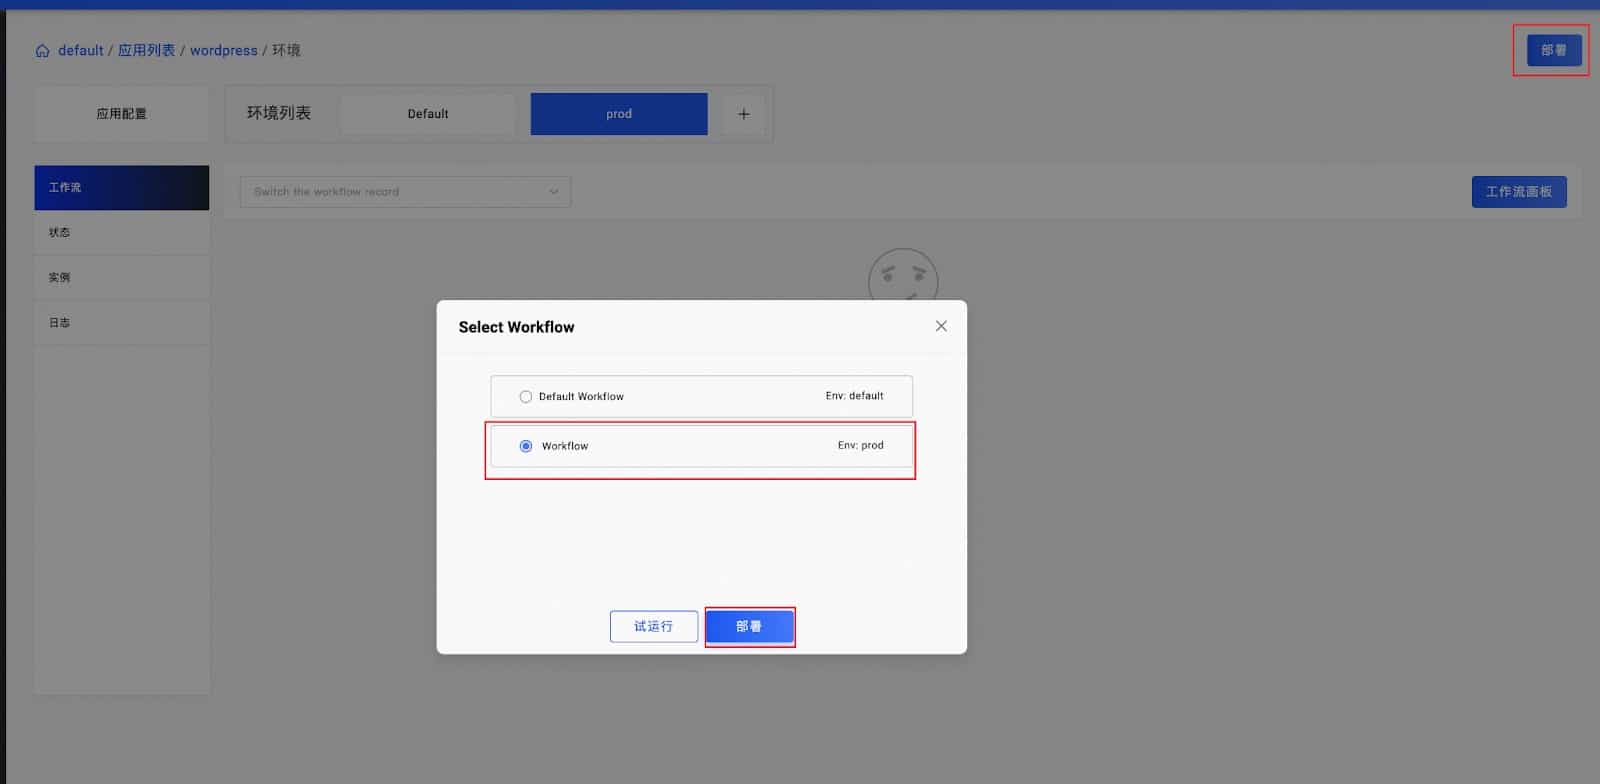
Click on the prod environment above, and VelaUX will visually edit the application workflow. Select Workflow Canvas, add a suspend step between the two steps, and save. This allows us to pause and check the application status in the test environment during the workflow, and manually confirm to continue the workflow to complete the deployment to the production environment.Click Deploy and select the prod environment workflow and deployment.

Since we added the suspend step, after the local/wordpress-test deployment is successful, we will see the SUSPENDING status next to it prompting us whether to continue the workflow. Assuming that at this point we access the test environment:
- Confirm that the application is working properly, and approve to continue execution.
- Or find that the application in the test environment is not working properly, choose to stop the deployment workflow for troubleshooting.
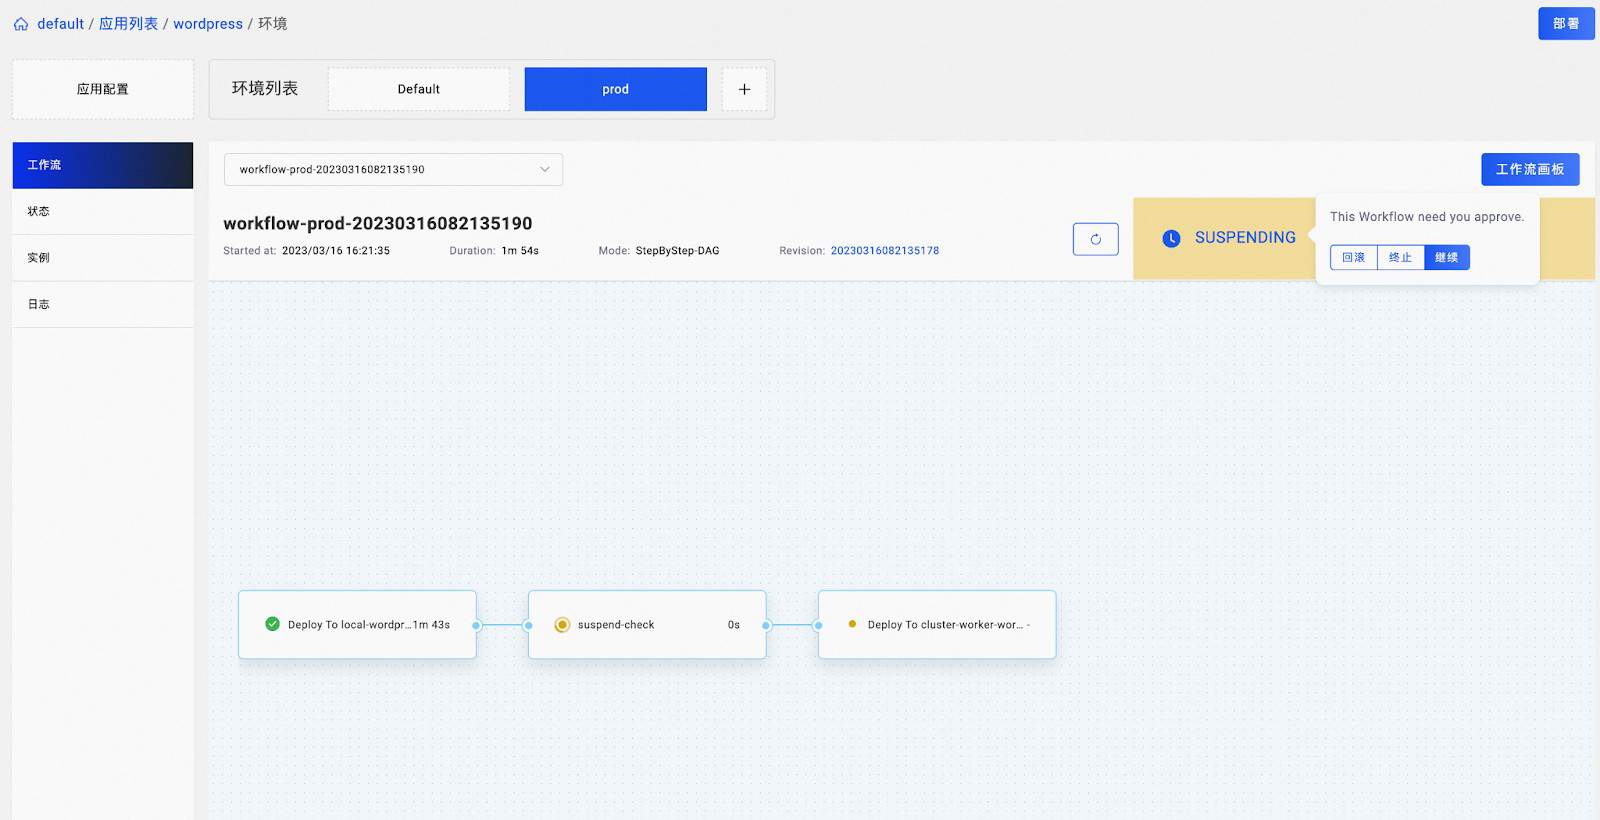
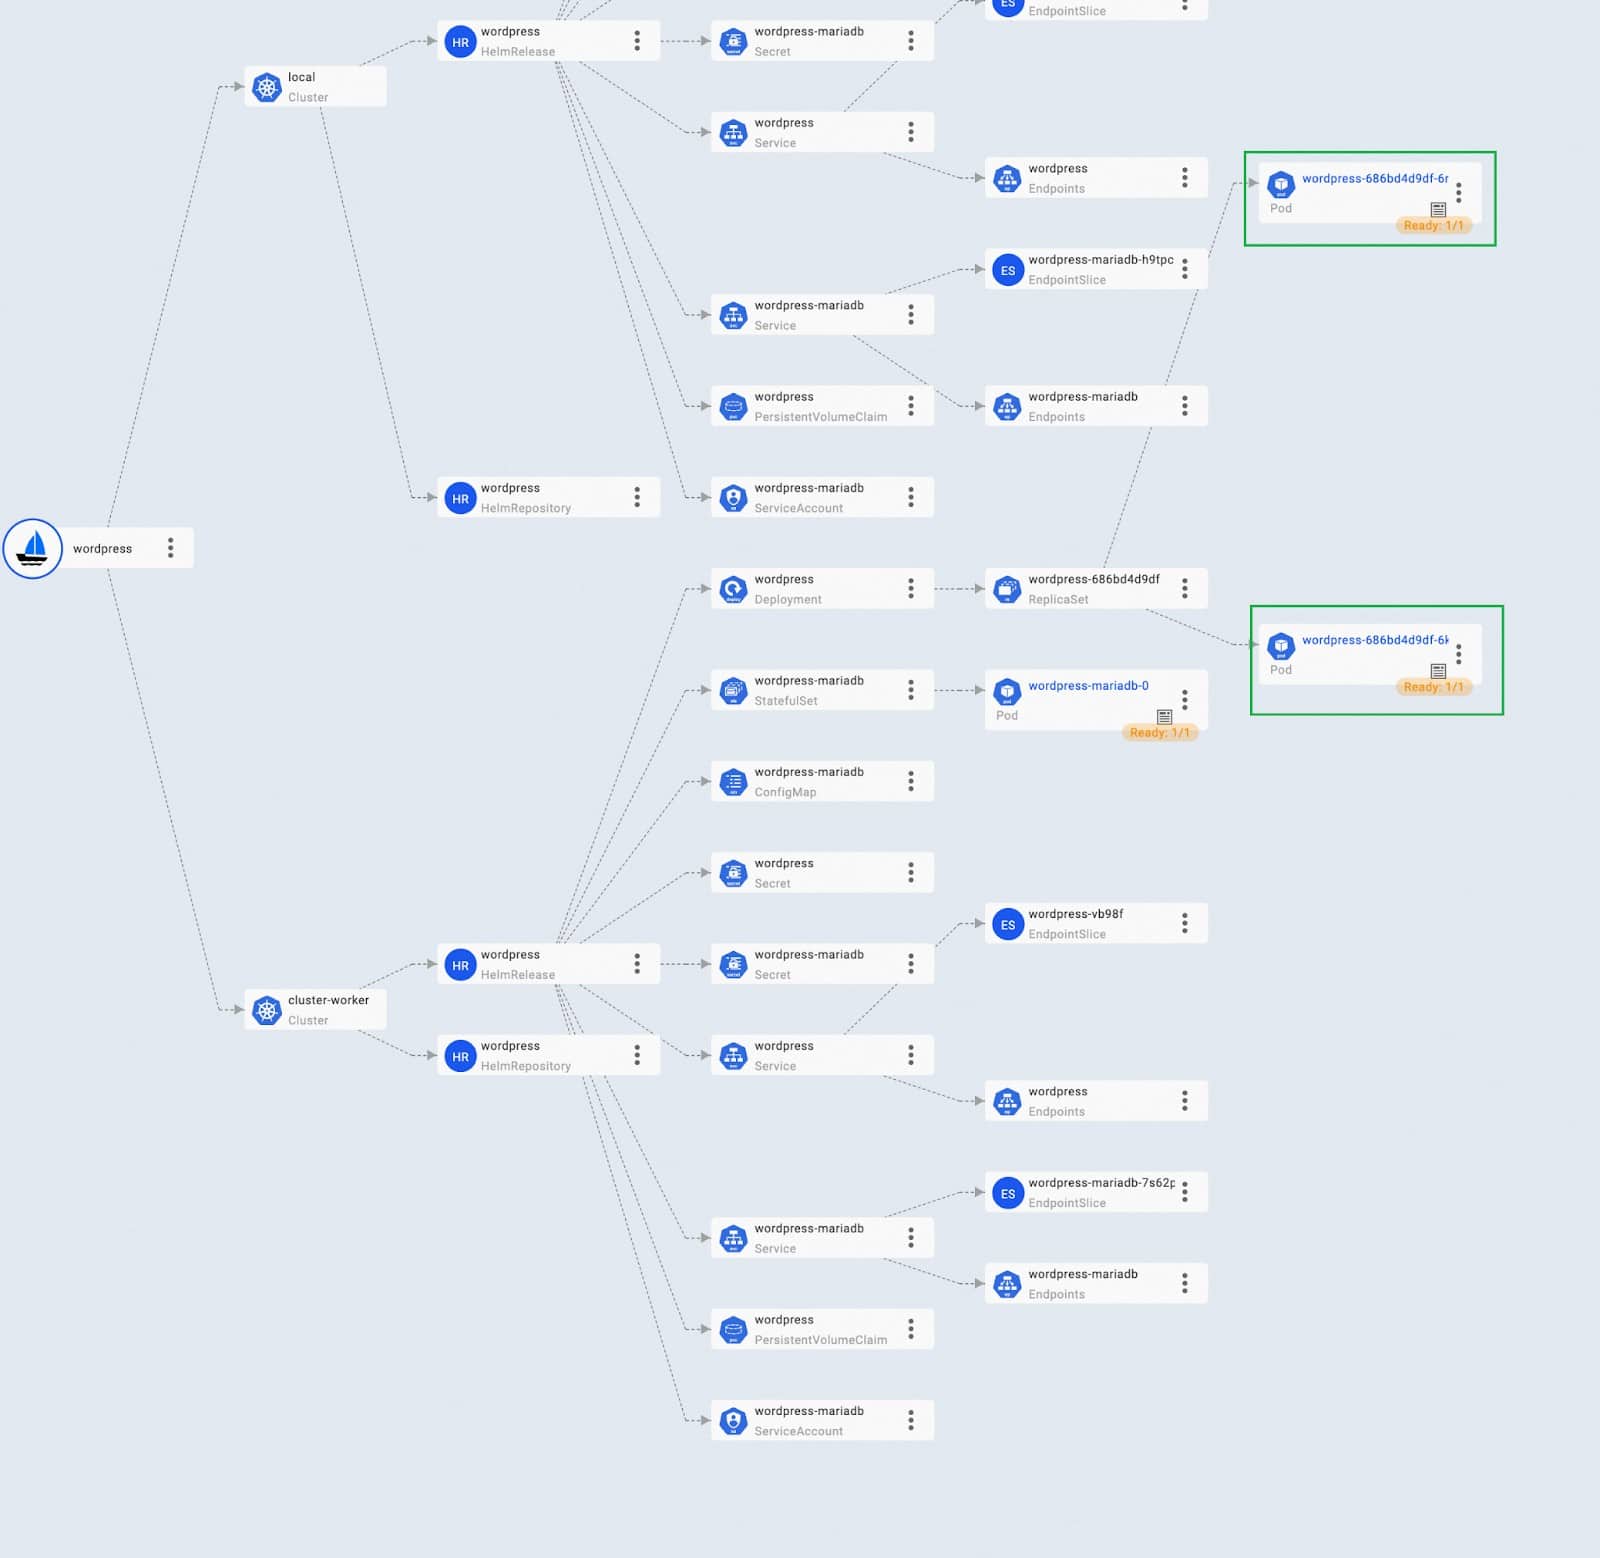
Here we continue the workflow. After the successful execution of the workflow, you can see through the Status bar that there are two running Pod replicas of wordpress-prod in our production environment’s cluster-worker sub-cluster. This verifies our application policy settings.Of course, KubeVela has more capabilities for multi-cluster management. You can find more usage in the KubeVela documentation.
Highly Available Control Plane
The control plane with a single master node meets some usage requirements, but for users who require higher stability of the control plane, VelaD can also help build a multi-cluster control plane with higher availability. It consists of the following parts:
- Two or more server nodes
- An external database
- A load balancer

Note: The requirements for these components: server and load balancer nodes require Linux systems, and the external database can use cloud services or self-built databases.
VelaD tries to make the entire setup process simple and handy. To set up a highly available control plane, you only need to run a few commands:
- Run the following command on the first server node:
velad install --bind-ip=<LB_IP> --database-endpoint=<DB_ENNDPOINT> --token=<TOKEN> --node-ip=<IP>Where <LB_IP> is the IP address of the load balancer node. <DB_ENNDPOINT> is the connection string for the external database, the format of which can be found in the database format documentation.
- Run almost the same command on the other server nodes, with the additional –cluster-only parameter, which means to only join the node as a master in the cluster and skip installing KubeVela, as KubeVela has already been installed when running the command on the first server node.
velad install --bind-ip=<LB_IP> --database-endpoint=<DB_ENNDPOINT>\
              --token=<TOKEN> \
              --cluster-only
--node-ip=<IP>- Run the load balancer configuration wizard on any node to get the load balancer configuration command.
velad load-balancer wizardTo setup load-balancer, run the following command on node acts as load-balancer:
velad load-balancer install --http-port 32196 --https-port 30297 --host=<IP1>,<IP2>- On the load balancer node, copy and run the second line of the wizard output.
velad load-balancer install --http-port 32355 --https-port 30421 --host=172.19.0.5Tips: Where IP1 and the others are the IP addresses of the server nodes, the load-balancer install command helps users set up an Nginx service forwarding to the Server.
- Print the kubeconfig location on any server node and copy the file to any location that can access the load balancer node (e.g., your laptop). The –external flag indicates that this kubeconfig is required for external access to the cluster.
velad kubeconfig --externalBoom! You can now access and manage this control plane with this kubeconfig! The failure of any server node will not affect the availability of the control plane.
Summary
That’s all for this time, thank you for reading and trying. The gradual maturity of cloud-native has brought about a large number of out-of-the-box ecosystem features, but the complex ecosystem landscape of cloud-native often discourages the majority of developers. Today, we introduced the VelaD project, aiming to help you get started with cloud-native and start delivering applications as quickly and simply as possible. As your needs grow, VelaD can continuously improve the capacity and availability of the control plane. You can also deploy applications to more locations you need by registering sub-clusters with the control plane.
The underlying KubeVela project continuously brings you the best practices in the cloud-native field in the form of addons, based on the out-of-the-box application delivery features, allowing you to enhance your application delivery process faster and more easily. The official addon repository already has 70+ addons covering various domains such as variant workloads, cloud resources, observability, and rolling releases. The addon ecosystem of KubeVela is still growing rapidly, and you are welcome to raise requirements or make contributions in the community.
KubeVela is soon to release its v1.8 version, which will introduce a one-click cluster resource management feature to help you seamlessly migrate legacy systems. It also provides stress test reports for large-scale application scenarios, performance optimization, and controller sharding solutions to help you easily face the challenges of growing business scale.
In Conclusion
Do you have any needs or questions about VelaD or KubeVela? You are welcome to learn more about the project details of VelaD and KubeVela through the following materials:
- VelaD code repository https://github.com/kubevela/velad Welcome to Star/Watch/Fork!
- KubeVela code repository https://github.com/kubevela/kubevela Welcome to Star/Watch/Fork!
- Project official homepage and documentation kubevela.io
- Project DingTalk group: 23310022; Slack: CNCF #kubevela Channel
- To join the WeChat group: please add the following maintainer’s WeChat ID and indicate that you want to join the KubeVela user group: