Guest post originally published on the Miraxia blog by Takuma Kawai
In the previous post, I wrote how we can develop our own scheduler with kube-scheduler-simulator. If you could implemented your new scheduler, you may want to try it in a real cluster.
In this article, I describe how to port a scheduler implementation, which is designed to work with kube-scheduler-simulator, into a real cluster, and a way to demonstrate the difference between the new scheduler and the default one by using the frontend part of kube-scheduler-simulator.
How to deploy your scheduler into a real cluster?
An official document “Configure Multiple Schedulers” contains an explanation of how to deploy a scheduler to a cluster. What we can learn from this article is that even considering schedulers, that sounds special, but nothing is different than other controllers. The most important fact in this context is: a scheduler is an executable command.
If you developed a new scheduler in kube-scheduler-simulator tree, as I described in the previous post, it must be a golang package. Now, to evaluate the scheduler in a real cluser, you have to wrap it by main().
Build minisched as a executable command
As a funny example, I choose minisched (initial-random-scheduler version) again. It provides us a clear result of this experiment, in other words, its behavior is totally different than the default scheduler.
Here is a simple example of main() for minisched.
package main

import (
	"context"
	"flag"
	"k8s.io/apiserver/pkg/server"
	"k8s.io/client-go/informers"
	"k8s.io/client-go/kubernetes"
	"k8s.io/client-go/tools/clientcmd"
	"k8s.io/klog/v2"
	"example.com/kube-random-scheduler/minisched"
)

func main() {
	kubeconfig := flag.String("kubeconfig", "", "kubeconfig config file")
	flag.Parse()

	config, err := clientcmd.BuildConfigFromFlags("", *kubeconfig)
	if err != nil {
		klog.Fatalf("Error building kubeconfig: %s", err.Error())
	}

	clientset, err := kubernetes.NewForConfig(config)
	if err != nil {
		klog.Fatalf("Error building example clientset: %s", err.Error())
	}

	ctx, cancel := context.WithCancel(context.Background())
	defer cancel()
	go func() {
		stopCh := server.SetupSignalHandler()
		<-stopCh
		cancel()
	}()
	informerFactory := informers.NewSharedInformerFactory(clientset, 0)
	sched := minisched.New(clientset, informerFactory)
	informerFactory.Start(ctx.Done())
	informerFactory.WaitForCacheSync(ctx.Done())
	sched.Run(ctx)
}
To build this, you need the following file structure.
kube-random-scheduler
├── main.go
└── minisched
minisched in this tree should be copied from mini-kube-scheduler, and you may need to modify import urls in minisched/initialize.go as follows.
Patch license: MIT (same as mini-kube-scheduler)

--- a/minisched/initialize.go
+++ b/minisched/initialize.go
@@ -1,7 +1,7 @@
 package minisched

 import (
-       "github.com/sanposhiho/mini-kube-scheduler/minisched/queue"
+       "example.com/kube-random-scheduler/minisched/queue"
        "k8s.io/client-go/informers"
        clientset "k8s.io/client-go/kubernetes"
 )
Now you can build this by following commands.
$ go mod init example.com/kube-random-scheduler
$ go mod tidy
$ CGO_ENABLED=0 go build -v -o kube-random-scheduler main.go
Once you have built an executable file, you can deploy it by following the instructions in the official document, Configure Multiple Schedulers. Note that you should remove livenessProbe and readinessProbe in the example manifest because the above main() doesn’t have a healthz implementation.
Visualize scheduler behavior by kube-scheduler-simulator
I’ve been wanted to visualize the low level behavior of my scheduler implementation. Since the Dashboard is not sufficient for that purpose, I decided to use the frontend part of kube-scheduler-simulator.
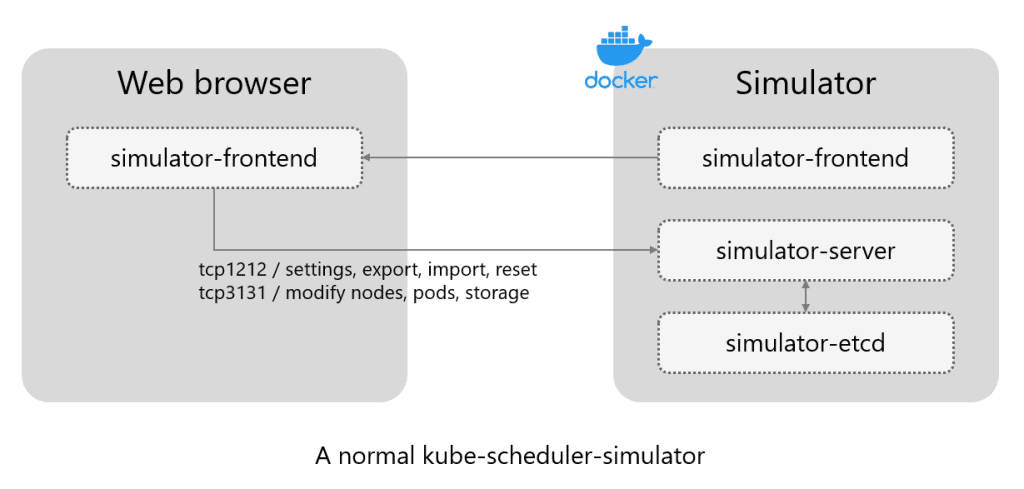
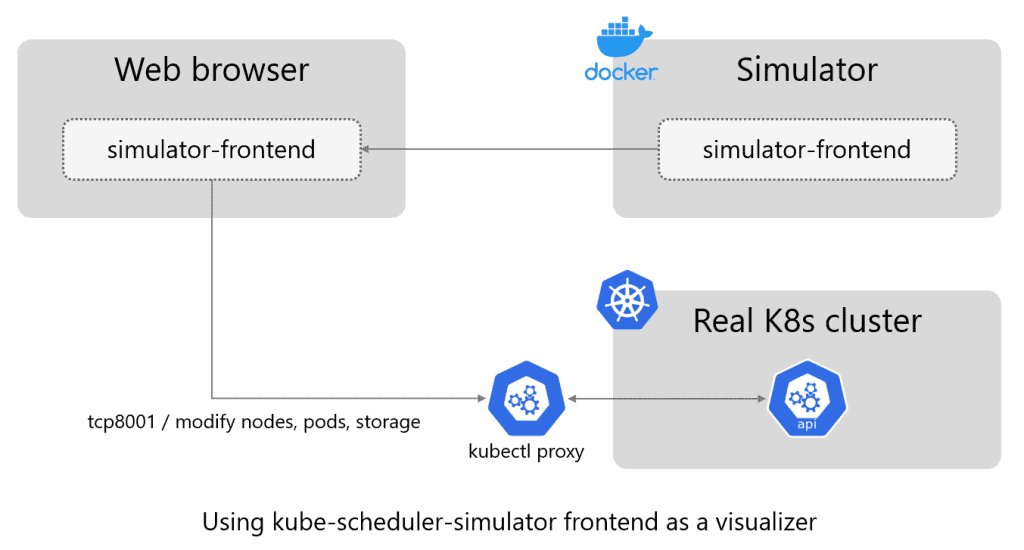
kube-scheduler-simulator is consists of three containers, simulator-server, simulator-etcd and simulator-frontend. The simulator-frontend is a Nuxt.js app communicating with simulator-server by REST APIs. These APIs are compatible to the original K8s implementation, so we can connect the simulator-frontend to the kube-apiserver in a real cluseter. This enables us to visualize the low level behavior of schedulers in a real cluster.
Firstly, you need to add a --cors-allowed-origins option for kube-apiserver of your cluster.
--- kube-apiserver.yaml.orig    2022-09-01 18:06:34.983636661 +0900
+++ kube-apiserver.yaml 2022-09-01 18:06:12.459666678 +0900
@@ -13,6 +13,7 @@
   containers:
   - command:
     - kube-apiserver
+    - --cors-allowed-origins=http://*
     - --advertise-address=192.168.1.51
     - --allow-privileged=true
     - --anonymous-auth=True
Then, start kubectl proxy on the same host running kube-scheduler-simulator.
simulator-pc$ docker-compose up -d simulator-frontend
simulator-pc$ kubectl proxy
Finally, create tunnel to kube-scheduler-simulator and kubectl proxy on the host your web browser is running.
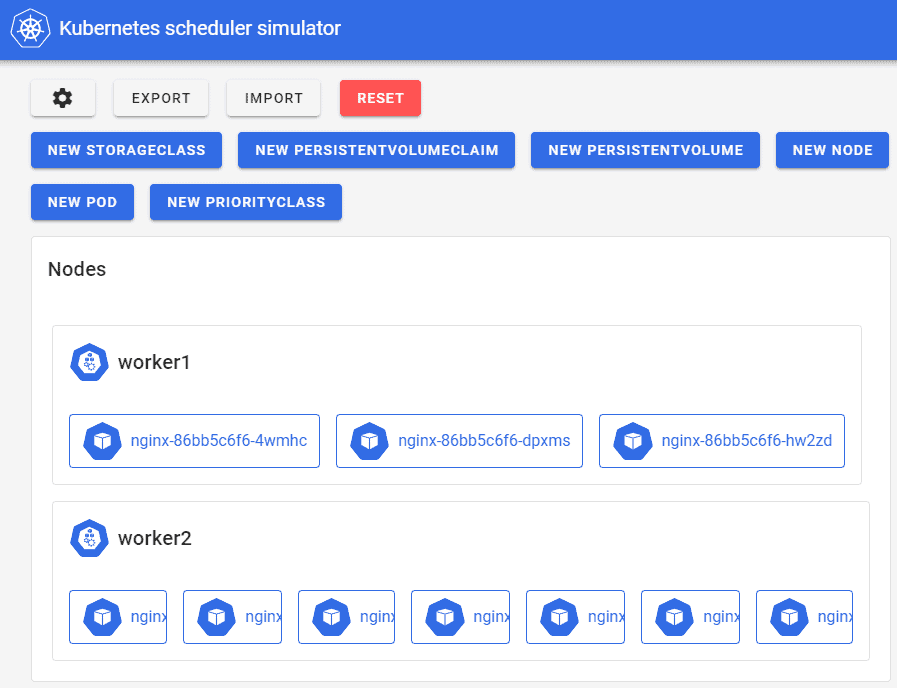
frontend-pc$ ssh -L 3000:localhost:3000 -L 3131:localhost:8001 simulator-pcIf you successfully done, you can view funny results of the random scheduler in browser, pods are randomly assigned to nodes.
Conclusion
- Schedulers should be developed in the form of single executable command
- You can use kube-scheduler-simulator as a visualizer for a real cluster