Guest post originally published on the Chronosphere blog by Chris Ward
The discussions on what represents negative, biased, and diverse language continue in many open source communities, often sparking heated and strongly opinionated debate. Setting those discussions aside, say you have decided what language you want to increase, decrease, or change in your community. How do you enforce and track those changes?
This post and accompanying video based on a talk from All Things Open in 2021 looks at how to use an open-source tool to check text (in supported locations and formats) for rules and styles you define.
Examples of language
To summarize, the kind of language to identify could include the following:
- Patronising: Language that can make a reader feel stupid or ignorant for not understanding something the writer makes sound obvious.
- Rude: Language that explicitly uses offensive words or demeaning terms.
- Overly negative: Language that uses overly negative connotations can make the reader feel that a task is hard for them to accomplish or make them tire of reading the text.
- Biased: Language that unnecessarily uses terms that preference or prejudice one group over another.
- Out-dated: Language that uses terminology widely considered old-fashioned or inappropriate by large communities of people.
- Unhelpful: Language that adds nothing to text, or worse case, makes the text fall into one of the other categories in this list.
An introduction to linting
You have probably used a spell checker before, as they’re included in many applications at a system or application level. An increasing amount of tools add a grammar checker, and more recently, some tools now have a form of style checker. If a tool allows you to customize that style checker, then you can use it to look for certain issues important to you, including negative and biased language.
Some of these tools use natural language processing and machine learning to analyze text and make suggestions. Others use a concept familiar to programmers called “linting” to look for patterns in the text (code is fundamentally text).
To quote Wikipedia, a linter is:
“…a static code analysis tool used to flag programming errors, bugs, stylistic errors and suspicious constructs.”
Which sounds appropriate for the task, after all, style issues and potential issues with text may not necessarily be wrong, but are more something to look at.
Some examples of tools that “lint” (while not all are actually linters) text include:
- Grammarly
- Commercial in-built (Google docs etc)
- Acrolinx
- Text lint
- “One use” tools (Alex, Write good, Job lint, etc)
- LanguageTool
- Vale (my choice)
An introduction to Vale
Vale is an open-source tool that you host, run, and configure yourself. This can mean a more complex setup but offers a lot of flexibility and control over what has access to your content. Vale has integrations with text editors often used by developers and technical writers, and you can run it from the command line, which means you can make Vale part of any automated testing processes you have for content. With the additional $30 (for now) Vale Server, you can also use Vale with less developer-focussed tools such as Google Docs or text fields on web pages.
Finally, it already replicates the functionality of the “one use” tools mentioned above other tools (Write good, Alex, Job Lint, LanguageTool)
Install
As there are multiple options for installation and setup, this article focuses on using Vale with Visual Studio Code running on macOS.
Install using Homebrew:
brew install vale
Or download a pre-built binary from the Vale website.
Configure
To check text, Vale needs two main components.
- A collection of styles which define the “rules” against which to check text. There are a number of pre-built styles, but you can also create your own.
- A .vale.ini configuration file that at minimum defines the location of your styles and which styles to enable.
For example, the configuration below sets a path to a styles directory and overrides some of the rules in certain styles.
StylesPath = vale-styles

[*]
write-good.Passive = warning
write-good.TooWordy = warning
write-good.So = warning
write-good.Weasel = warning
write-good.ThereIs = suggestion
Openly.UnclearAntecedent = warning
Openly.FutureTense = warning
Openly.Spelling = error
Openly.Quotes = warning
Openly.Readability = warning
Vale starts looking for configuration files in the same directory as the file(s) you are linting. If it can’t find one, it searches 6 levels up the file tree until it finds one, and if not, looks for one in the current user’s home folder. This means you can have a global configuration as well as configuration for individual projects.
Running Vale
Without installing any integration options, you run Vale from the command line with the following command:
vale {file_name}
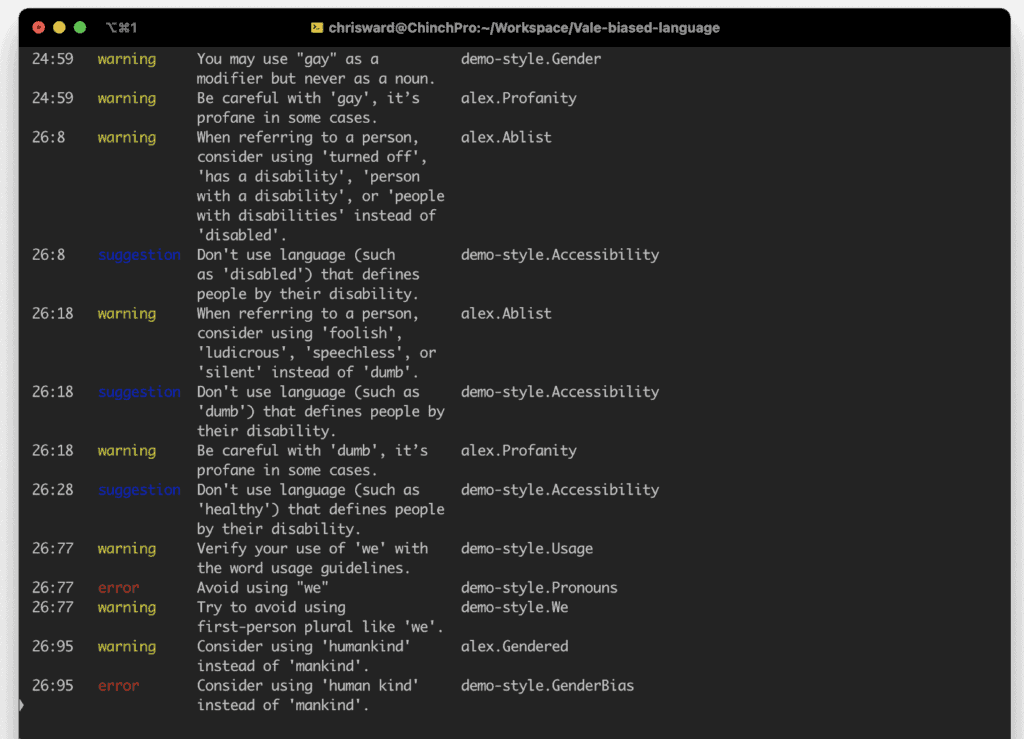
Which outputs the linting results to the console line by line with details of the line number, the rule violated, and the severity of the violation.
Using Vale with other tools
Running Vale via the command line is ideal for checking text when you’ve finished writing but not ideal for checking text as you write.
Fortunately, there are extensions available for most popular text editors including Sublime text, Emacs, Visual Studio Code, and Vim. There is a commercial version of Vale called Vale Server that supports less technical tools such as Google Docs and Chrome. Vale Server will soon be free and open source.
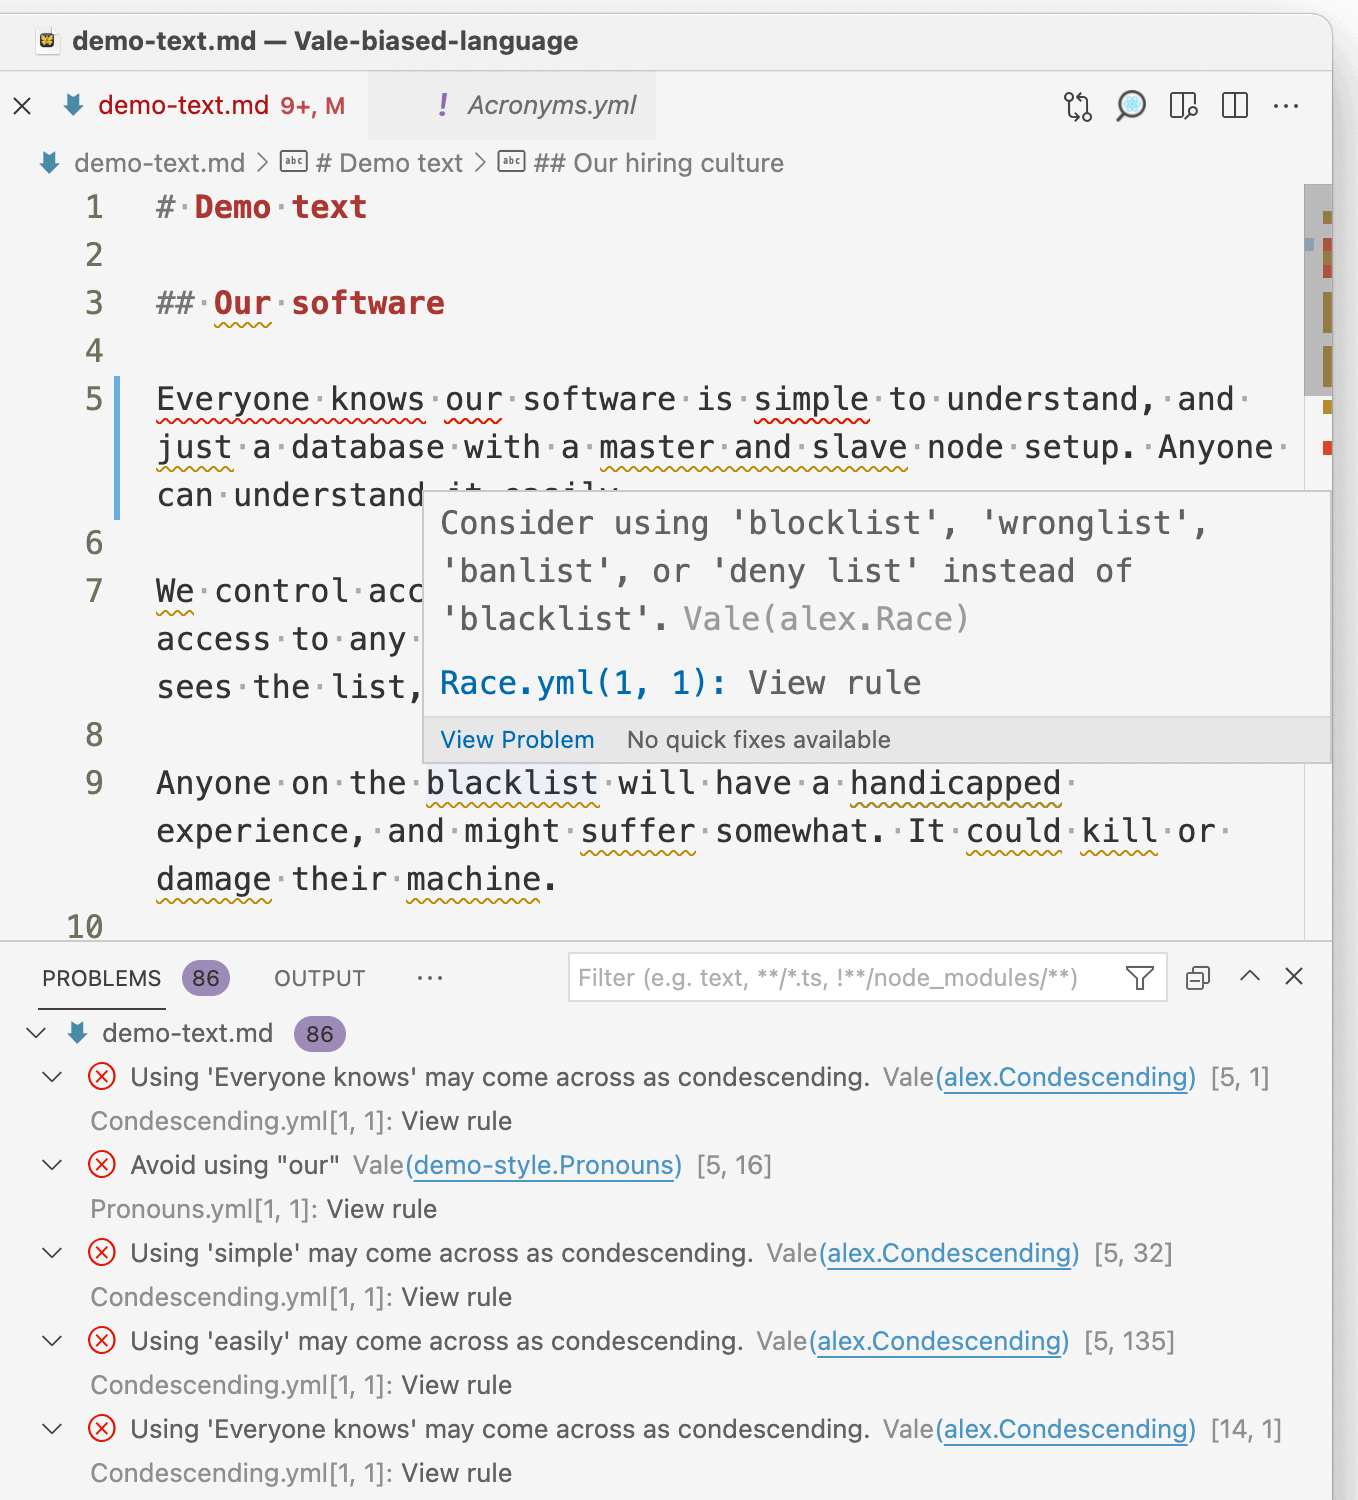
These extensions show you errors in a more presentable format, inline with the text, and sometimes, offer fixes to them.
Styles and Rules
The real power of Vale comes from its styles and rules, and this is how Vale becomes useful for identifying problematic language. Styles consist of a set of YAML files, which are the individual rules, and use one of a number of “extension points”.
The YAML files consist of regular expressions (RegEx) and some configuration depending on the rule. RegEx is powerful but complex, and while Vale tries to abstract that complexity and make it more “user friendly,” it can still take time to understand. Fortunately, there are dozens of existing rules to base yours on.
To show how some of the extension points work, you can find a series of pre-built styles for this post in this GitHub repository.
Warning: To highlight examples of problematic text, this post needs to show some problematic text. This is purely for illustrative purposes.
Gendered language
Consider the following text:
Previous experience as a policewoman, saleswoman, or waitress.
For this example, you might want to suggest gender-neutral alternatives. This is what the “subsitution” extension point handles, suggesting the text on the right when it encounters the text on the left.
extends: substitution
message: "Consider using '%s' instead of '%s'."
ignorecase: true
level: error
swap:
  police(?:m[ae]n|wom[ae]n):   police officer(s)
  sales(?:m[ae]n|wom[ae]n):    salesperson or sales people
  waitress:                    waiter
Another example might be highlighting “guys” by using the “existence” extension point, which triggers when Vale finds a token in the text.
extends: existence
message: "Avoid using '%s'"
description: "Use of '%s' could indicate that you're discriminating in favor of a certain gender."
ignorecase: true
level: error
tokens:
  - 'guys?'
Patronizing language
Consider the following text:
Everyone knows our software is simple to understand, and just a database. Anyone can understand it easily.
Again, this is an example of an “existence” extension point, but this time highlighting words such as “everyone knows”, “simple”, and “easily”.
Next steps
Configuring the rules and styles for Vale takes some time, but building on top of what others have already created gets you a long way. There is a repository that accompanies this post to get you started, and the community around Vale is another good source for questions. There’s a lot the tool can do, and this post only scratched the surface.