

Guest post originally published on Sighup’s blog by Alessandro Lo Manto

In late 2020, the Kubernetes team deprecated Docker and announced that support will be completely removed at the end of 2021. This deprecation has brought multiple changes, creating a little confusion because of using Docker as the CRI instead of Docker as the OCI.
Then, why all this fuss? Should we continue writing Dockerfiles?
In today’s world, it’s still difficult to understand what Docker is. It seems there’s no difference between the company, the containers, the images and the tools that are used by developers. To date, for many there’s just the only one word called “DOCKER” to refer to all this.
Mystery inside Docker
Docker is an open platform for developing, shipping, and running applications. Docker enables you to separate your applications from your infrastructure so you can deliver software quickly.
Official Docker Documentation in Docker overview
Docker makes use of the Linux kernel and functions of the kernel. It is important to segregate methods because of running processes independently.
Docker used Linux Containers (LXC) because of the runtime backend. As the mission evolved, LXC was changed to containerd.
A current Docker set-up is split into: containerd, for managing containers, and dockerd, a persistent process daemon that provides information from the Docker host machine.
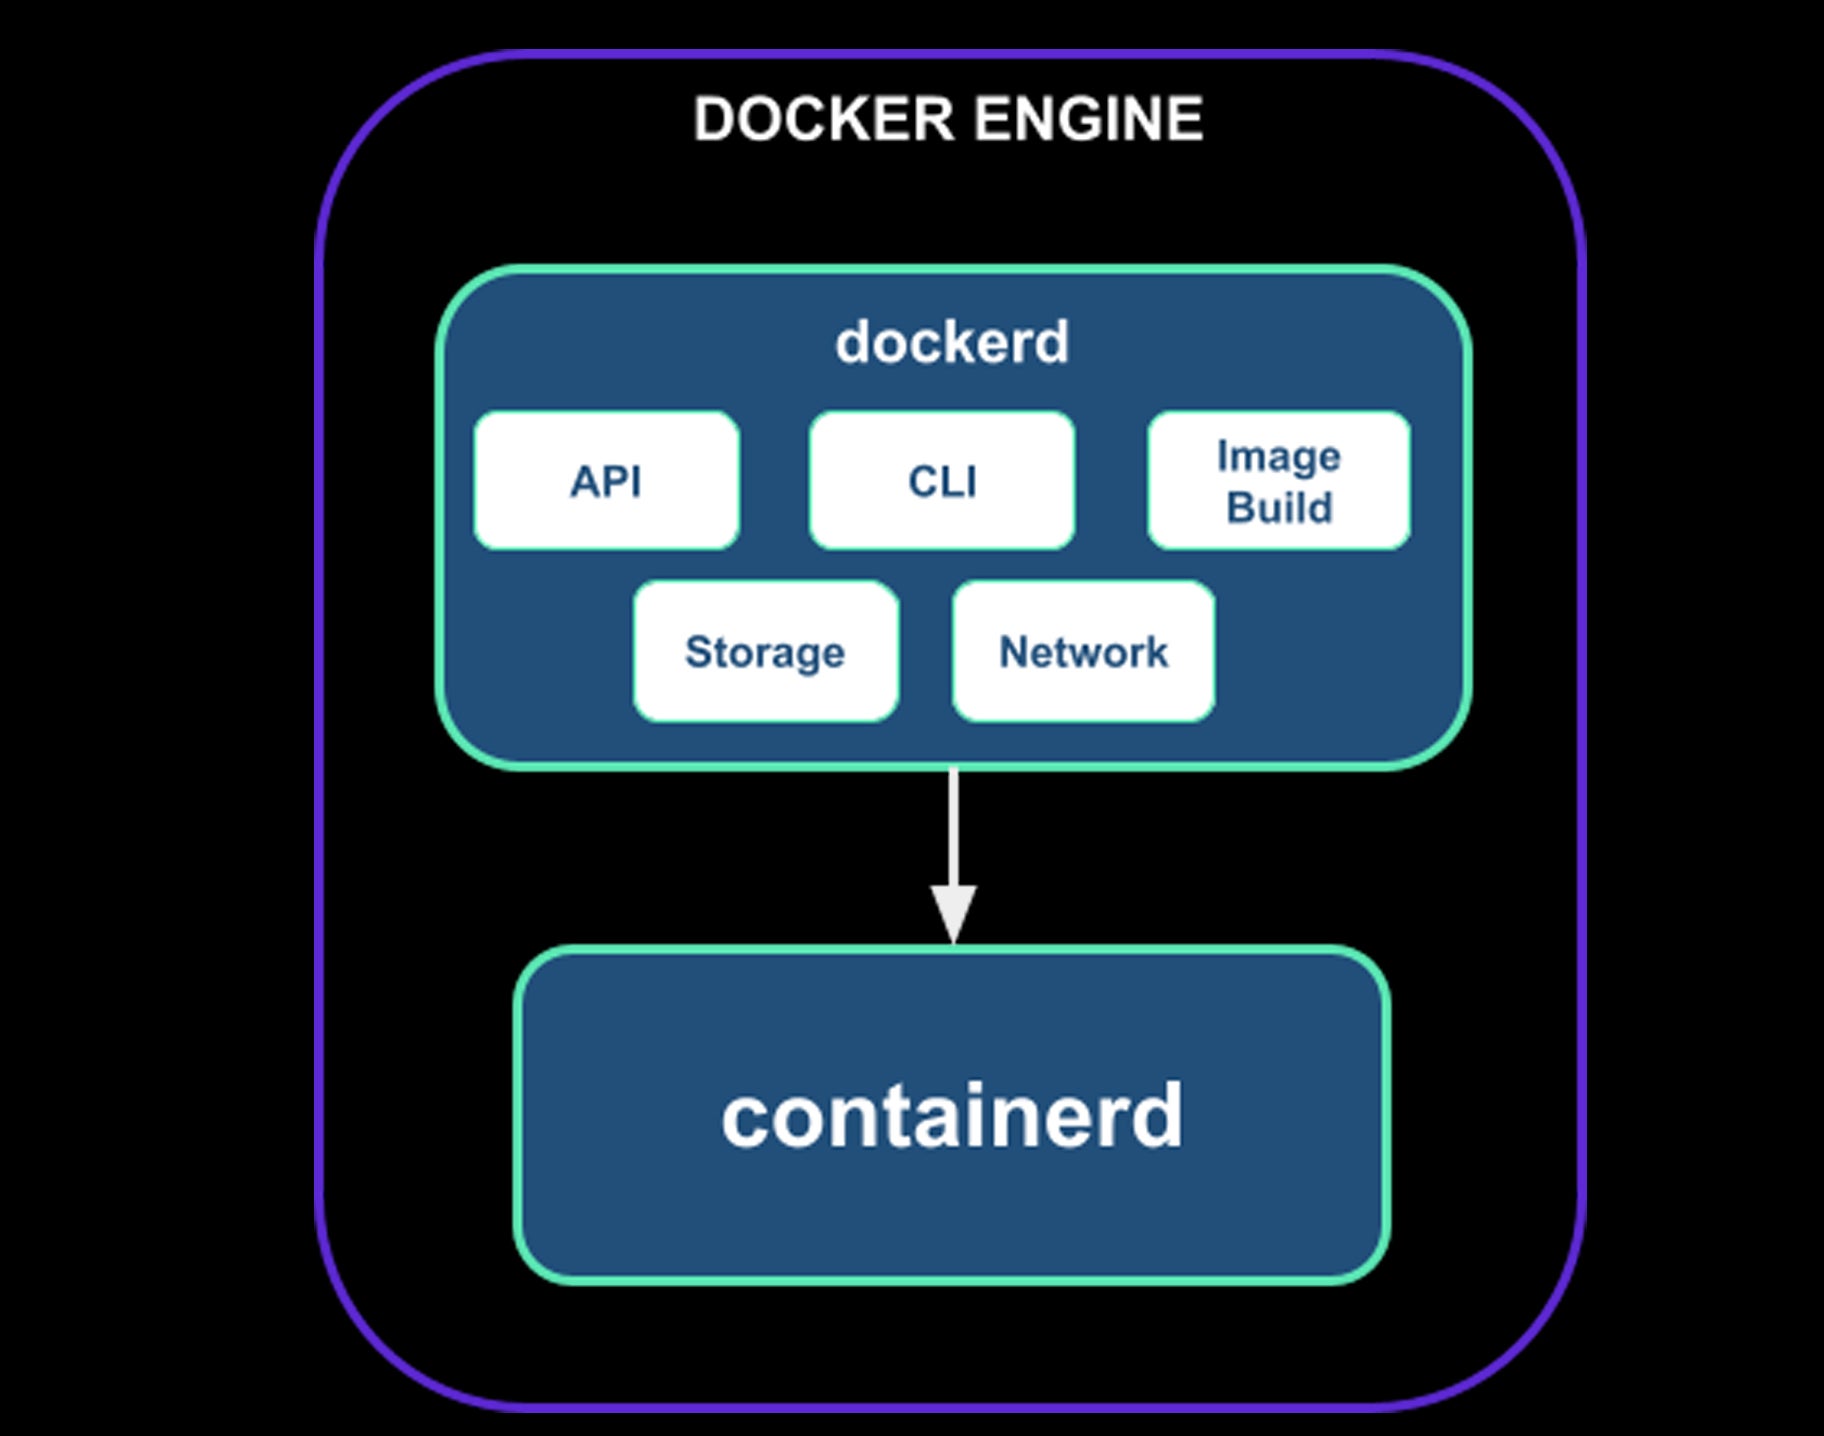
Docker, defined as a “container”, is nothing more than a user-friendly tool for interacting with containers. It was created in such a way that everyone can install it, build container images, pull them from registries, and create, start, and manage containers. That was why Docker became so popularly known as a “container”.
Kubernetes? What does it have to do with all this?
In order to understand why Kubernetes and Docker became famous together, let’s understand how Docker is integrated within Kubernetes and what Open Container Initiative (OCI) and Container Runtime Interface (CRI) mean.
What is OCI?
Kubernetes takes the idea of containers and instead of running containerized applications on one server, distributes them across a cluster.
Due to the popularity of containers, there was a need for an open image standard. Docker Inc and CoreOS created the Open Container Initiative with the mission of producing standard formats. They have introduced two specific standards:
- The requirements for the image in the binary format.
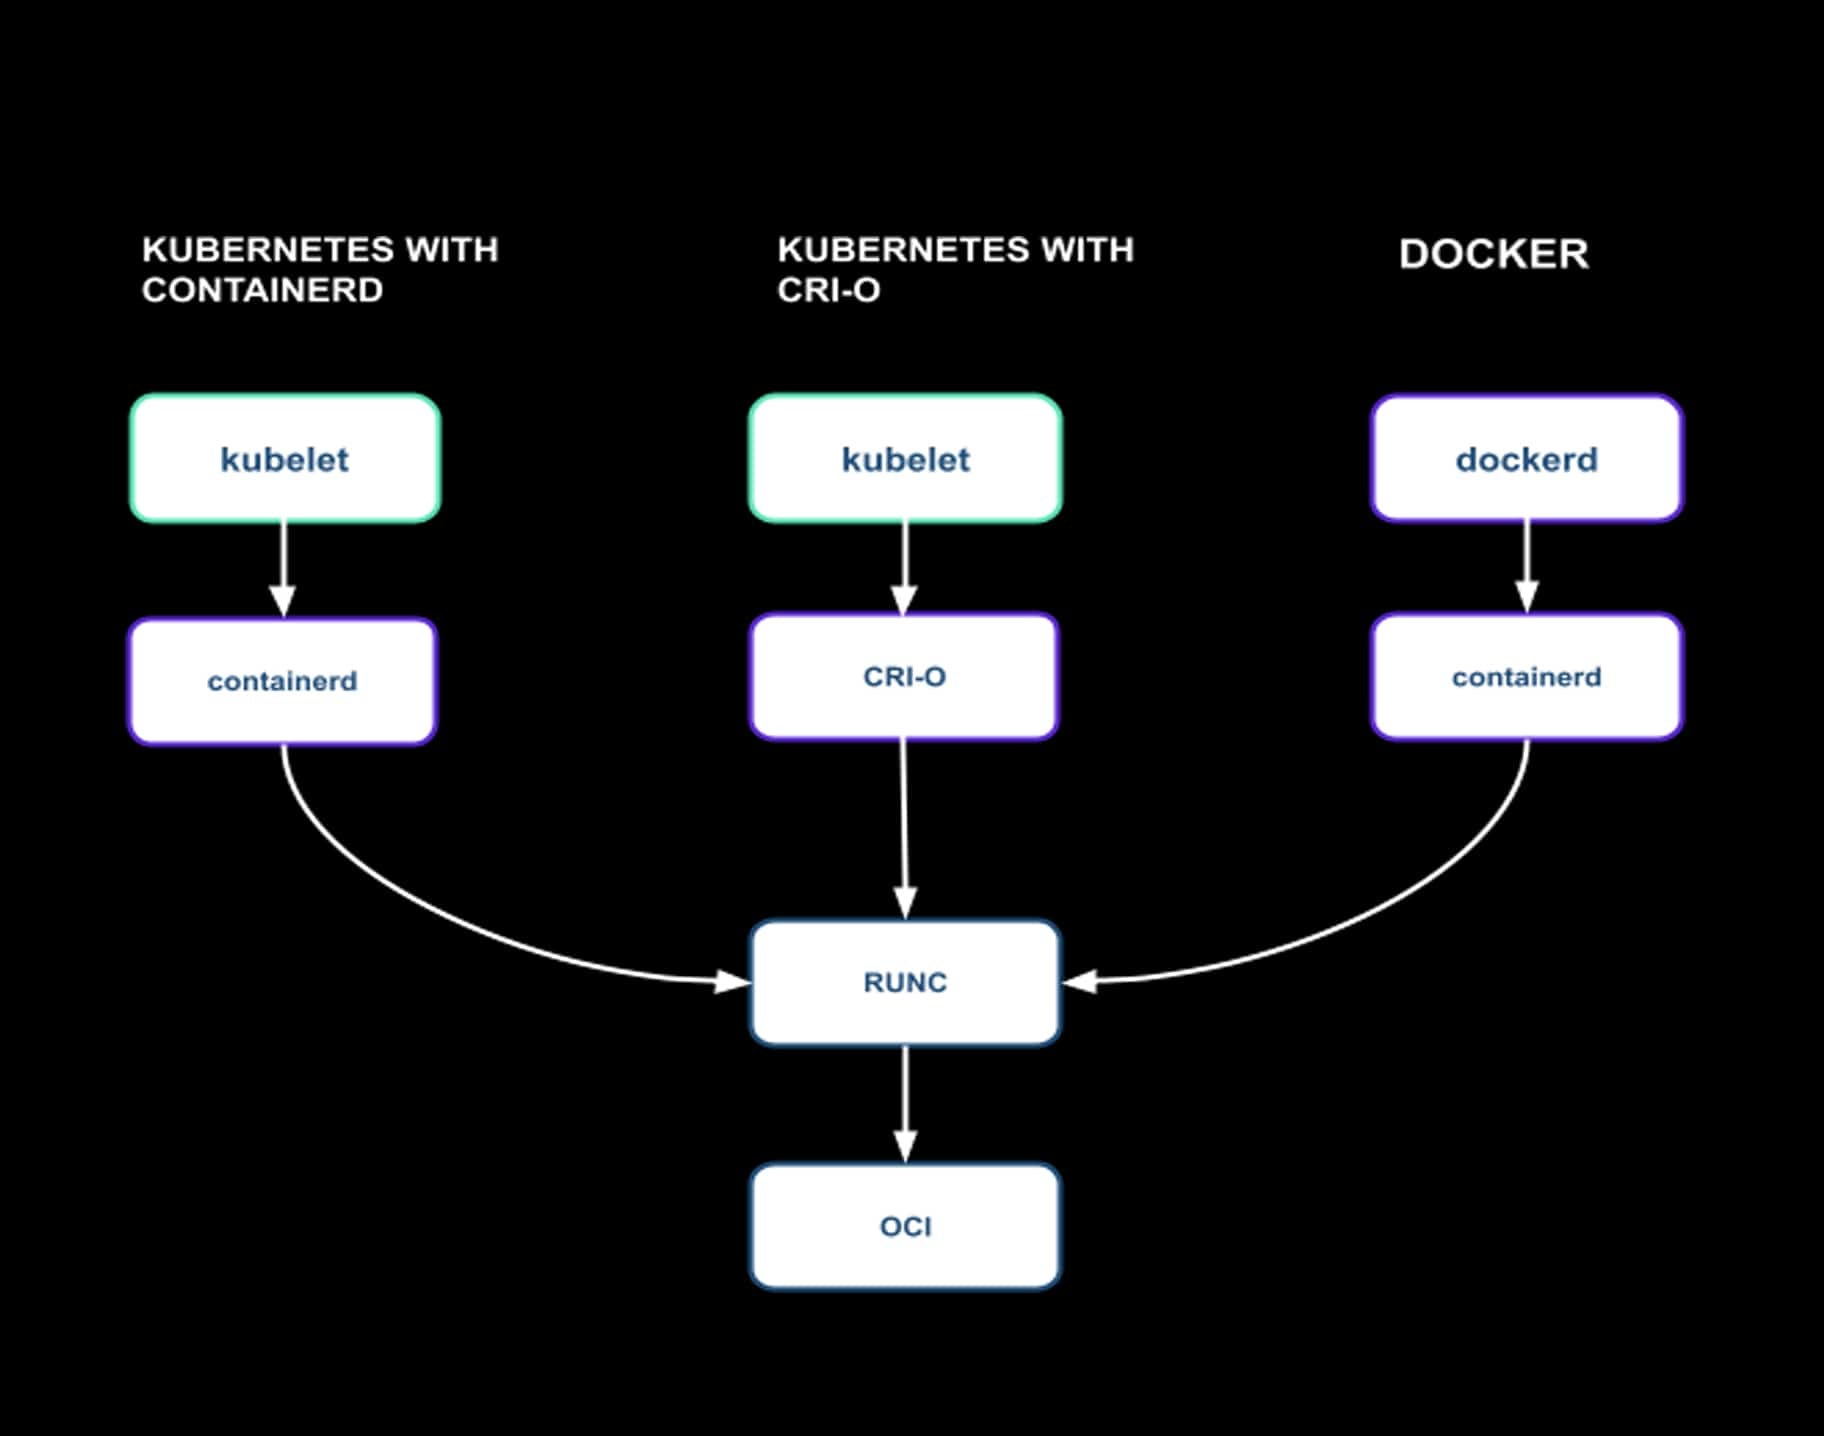
- A specification that describes how to interact and run a container. OCI maintains a reference implementation called runc, and containerd uses runc in the background to interact with containers.
The OCI added interoperability among different container runtime solutions. As a result, an image can run in any other system that respects this standard.
What is CRI?
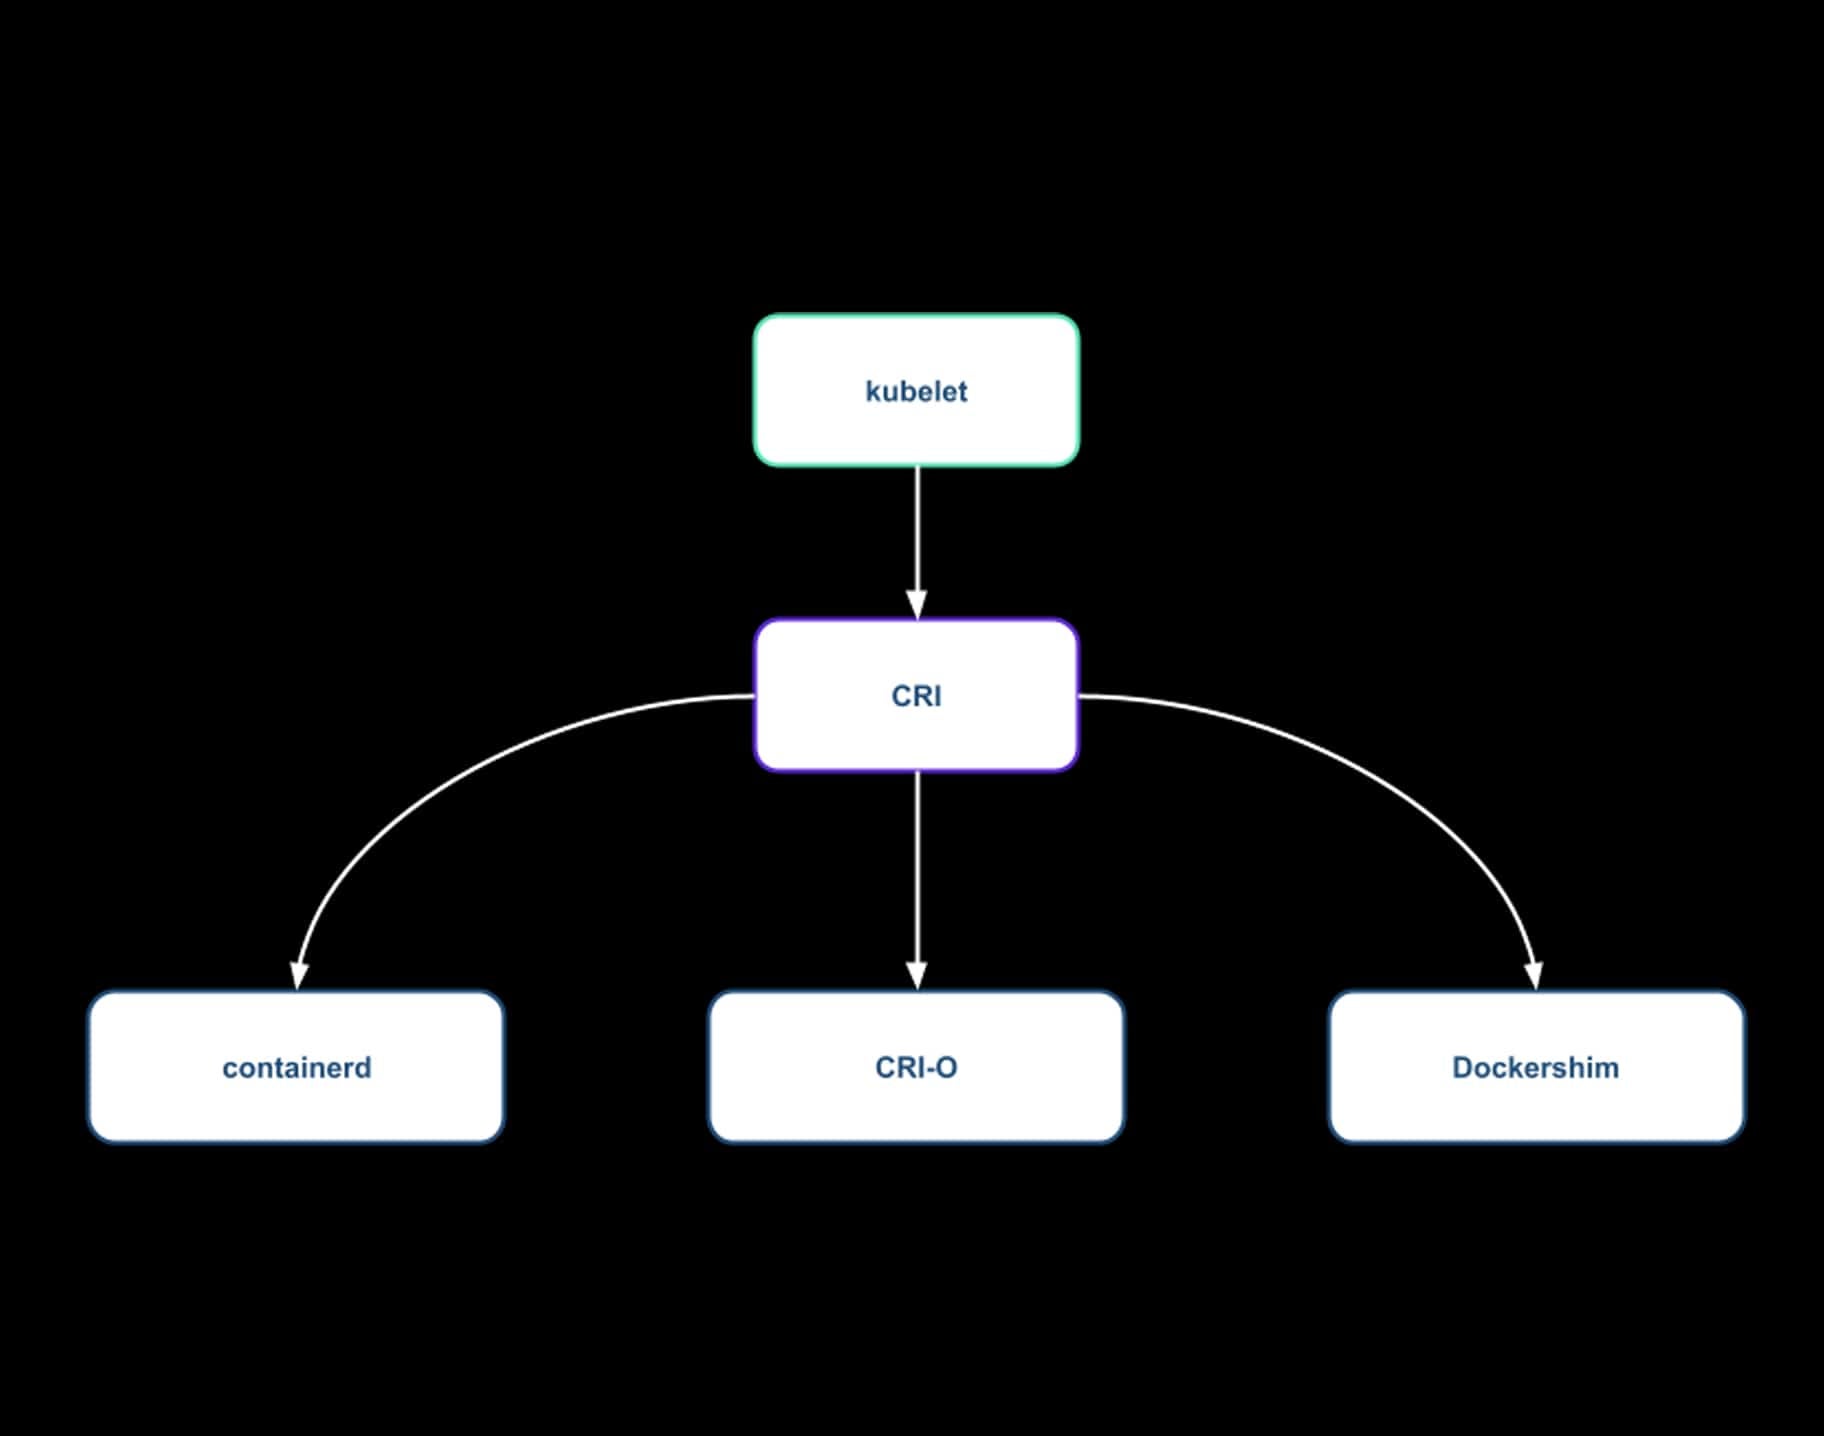
To work, Kubernetes has needed a container runtime that is supported by CRI.
CRI is a Kubernetes API that defines the way that Kubernetes interacts with different container runtimes. Because it’s standardized in a spec, you can choose which CRI implementation you want to use or write your own.
Why doesn’t Kubernetes need Docker as the container runtime?
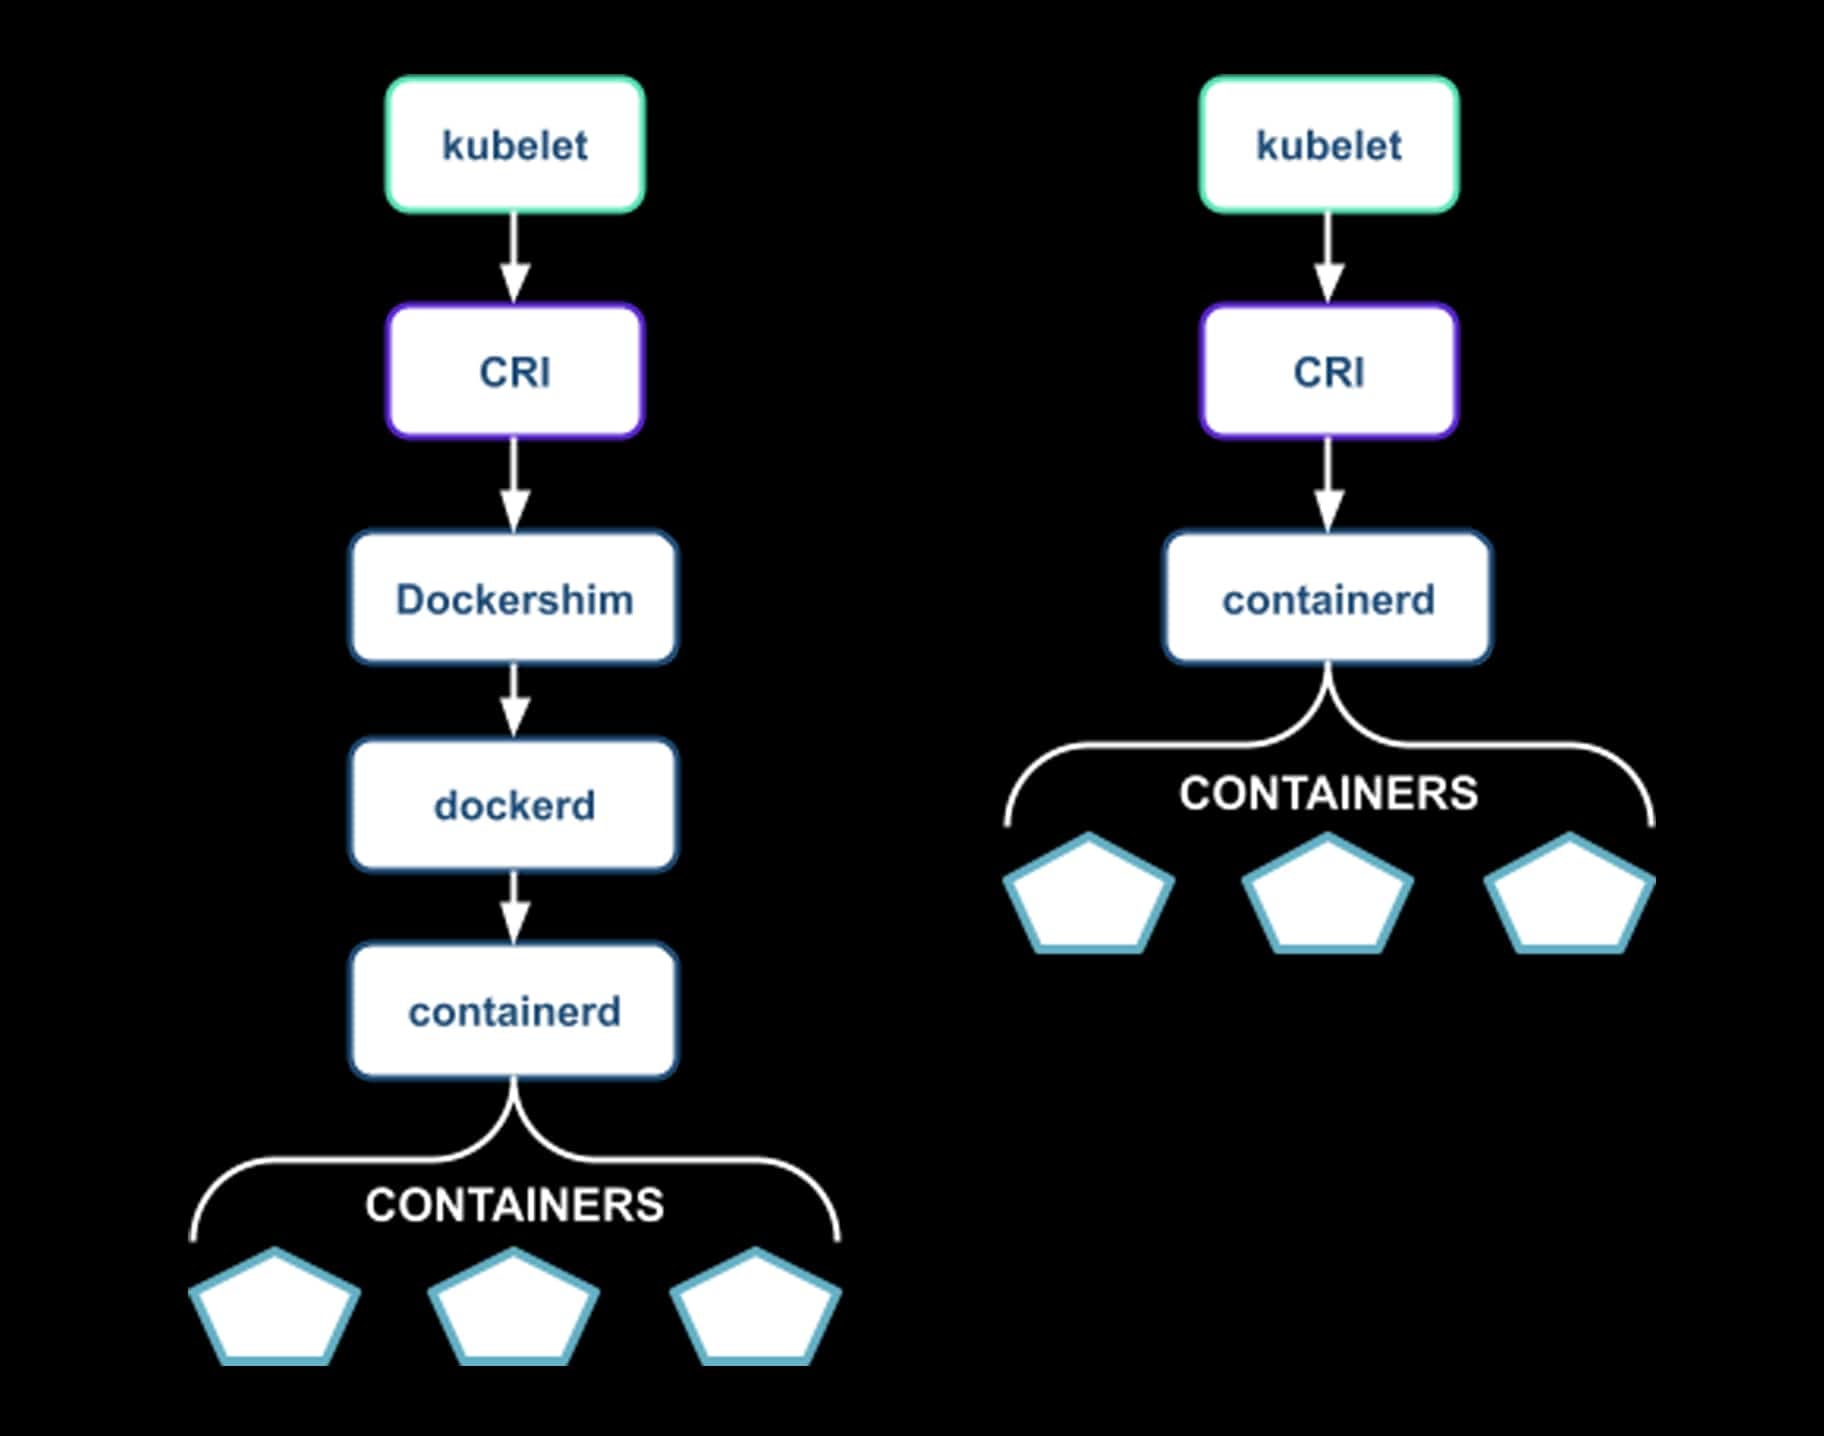
Docker is older than Kubernetes and didn’t implement CRI, sowhy does it work? The Dockershim component has been created to allow you to interact with the CRI. But today, there are alternatives to Docker and it no longer makes sense for Kubernetes to maintain this additional level of complexity.
Taking up the architecture explained above, Docker isn’t a container runtime and, as we have already said above, it is a series of tools to interact with containerd and only a middle-man.
Should I stop using Kubernetes with Docker?
If you have a cluster already provisioned by major cloud providers like GKE, EKS, or AKS (which defaults to containerd) or if you are just a Kubernetes user, this has no impact on you.
Docker has played, and will play, a fundamental role within the Kubernetes ecosystem. The latter will continue to run our Docker containers and to pull images from the Docker registry as Docker produces OCI compliant images.
But let’s come to us! In this article, we’ll walk you through creating a Kubernetes cluster with containerd rather than Docker.
Cluster Set-up on Vagrant VMs
Below we’ve written a basic Vagrantfile and scripts configuration for anyone to understand. Follow the steps provided to create the Kubernetes cluster.
As prerequisites you need Virtualbox and Vagrant installed and configured.
Step 1: Before starting the cluster, first create a Vagrantfile file inside a folder of your choice.
Vagrantfile
# -*- mode: ruby -*-
# vi: set ft=ruby :

ENV['VAGRANT_NO_PARALLEL'] = 'yes'

Vagrant.configure(2) do |config|

  # Kubernetes Master Server
  config.vm.define "master" do |node|

    node.vm.box               = "generic/ubuntu2004"
    node.vm.box_check_update  = false
    node.vm.box_version       = "3.2.18"
    node.vm.hostname          = "master"

    node.vm.network "private_network", ip: "172.0.0.100"

    node.vm.provider :virtualbox do |v|
      v.name    = "master"
      v.memory  = 2048
      v.cpus    =  2
    end

    node.vm.provider :libvirt do |v|
      v.memory  = 2048
      v.nested  = true
      v.cpus    = 2
    end


  end

  # Kubernetes Worker Node

    config.vm.define "worker0" do |node|

      node.vm.box               = "generic/ubuntu2004"
      node.vm.box_check_update  = false
      node.vm.box_version       = "3.2.18"
      node.vm.hostname          = "worker0"

      node.vm.network "private_network", ip: "172.0.1.101"

      node.vm.provider :virtualbox do |v|
        v.name    = "worker0"
        v.memory  = 1024
        v.cpus    = 1
      end

      node.vm.provider :libvirt do |v|
        v.memory  = 1024
        v.nested  = true
        v.cpus    = 1
      end

    end

end
Step 2: Execute the vagrant command. It will spin up two nodes, one master node and one worker node.
vagrant upStep 3: Login to the master node and worker node to install cluster init configurations script.
vagrant ssh mastervagrant ssh worker0main.sh
#!/bin/bash

echo "[TASK 1] Disable and turn off SWAP"
sed -i '/swap/d' /etc/fstab
swapoff -a

echo "[TASK 2] Stop and Disable firewall"
systemctl disable --now ufw >/dev/null 2>&1

echo "[TASK 3] Enable and Load Kernel modules"
cat >>/etc/modules-load.d/containerd.conf<<EOF
overlay
br_netfilter
EOF
modprobe overlay
modprobe br_netfilter

echo "[TASK 4] Add Kernel settings"
cat >>/etc/sysctl.d/kubernetes.conf<<EOF
net.bridge.bridge-nf-call-ip6tables = 1
net.bridge.bridge-nf-call-iptables  = 1
net.ipv4.ip_forward                 = 1
EOF
sysctl --system >/dev/null 2>&1

echo "[TASK 5] Install containerd runtime"
apt update -qq >/dev/null 2>&1
apt install -qq -y containerd apt-transport-https >/dev/null 2>&1
mkdir /etc/containerd
containerd config default > /etc/containerd/config.toml
systemctl restart containerd
systemctl enable containerd >/dev/null 2>&1

echo "[TASK 6] Add apt repo for kubernetes"
curl -s https://packages.cloud.google.com/apt/doc/apt-key.gpg | apt-key add - >/dev/null 2>&1
apt-add-repository "deb http://apt.kubernetes.io/ kubernetes-xenial main" >/dev/null 2>&1

echo "[TASK 7] Install Kubernetes components (kubeadm, kubelet and kubectl)"
apt install -qq -y kubeadm=1.21.0-00 kubelet=1.21.0-00 kubectl=1.21.0-00 >/dev/null 2>&1
Master node
vagrant@master:~$ vim main.sh
vagrant@master:~$ sudo bash main.sh
[TASK 1] Disable and turn off SWAP
[TASK 2] Stop and Disable firewall
[TASK 3] Enable and Load Kernel modules
[TASK 4] Add Kernel settings
[TASK 5] Install containerd runtime
[TASK 6] Add apt repo for kubernetes
[TASK 7] Install Kubernetes components (kubeadm, kubelet and kubectl)
Worker node
vagrant@worker0:~$ vim main.sh
vagrant@worker0:~$ sudo bash main.sh
[TASK 1] Disable and turn off SWAP
[TASK 2] Stop and Disable firewall
[TASK 3] Enable and Load Kernel modules
[TASK 4] Add Kernel settings
[TASK 5] Install containerd runtime
[TASK 6] Add apt repo for kubernetes
[TASK 7] Install Kubernetes components (kubeadm, kubelet and kubectl)
Step 4: I install the script below on just the master node, and copy the kubeadm join command at the end.
master.sh
#!/bin/bash

echo "[TASK 1] Pull required containers"
kubeadm config images pull >/dev/null 2>&1

echo "[TASK 2] Initialize Kubernetes Cluster"
kubeadm init --apiserver-advertise-address=172.0.0.100 --pod-network-cidr=192.168.0.0/16 >> /root/kubeinit.log 2>/dev/null

echo "[TASK 3] Deploy Calico network"
kubectl --kubeconfig=/etc/kubernetes/admin.conf create -f https://docs.projectcalico.org/v3.18/manifests/calico.yaml >/dev/null 2>&1
mkdir /home/vagrant/.kube
cp /etc/kubernetes/admin.conf /home/vagrant/.kube/config
chown -R vagrant:vagrant /home/vagrant/.kube

echo "[TASK 4] Generate and save cluster join command"
kubeadm token create --print-join-command
vagrant@master:~$ vim master.sh
vagrant@master:~$ sudo bash master.sh

[TASK 1] Pull required containers
[TASK 2] Initialize Kubernetes Cluster
[TASK 3] Deploy Calico network
[TASK 4] Generate and save cluster join command

kubeadm join 172.0.0.100:6443 --token 5d6fgz.0lll5srvyxa9wfcm --discovery-token-ca-cert-hash sha256:0828fbc966896ac32550a7641d54593ef98738d2878ed80c1966431888cc1324
Step 5: Copy and run the join command in worker node as sudo user
vagrant@worker0:~$ sudo kubeadm join 172.0.0.100:6443 --token 5d6fgz.0lll5srvyxa9wfcm --discovery-token-ca-cert-hash sha256:0828fbc966896ac32550a7641d54593ef98738d2878ed80c1966431888cc1324
[preflight] Running pre-flight checks
[preflight] Reading configuration from the cluster...
[preflight] FYI: You can look at this config file with 'kubectl -n kube-system get cm kubeadm-config -o yaml'
[kubelet-start] Writing kubelet configuration to file "/var/lib/kubelet/config.yaml"
[kubelet-start] Writing kubelet environment file with flags to file "/var/lib/kubelet/kubeadm-flags.env"
[kubelet-start] Starting the kubelet
[kubelet-start] Waiting for the kubelet to perform the TLS Bootstrap...

This node has joined the cluster:
* Certificate signing request was sent to apiserver and a response was received.
* The Kubelet was informed of the new secure connection details.

Run 'kubectl get nodes' on the control-plane to see this node join the cluster
Step 6: On the master node, list all the cluster nodes to ensure the worker nodes are connected to the master and are in a ready state.
kubectl get nodes -o wideYou can see runtime with containerd instead of Docker 😃
vagrant@master:~$ kubectl get nodes -o wide
NAME      STATUS   ROLES                  AGE     VERSION   INTERNAL-IP   EXTERNAL-IP   OS-IMAGE             KERNEL-VERSION     CONTAINER-RUNTIME
master    Ready    control-plane,master   2m41s   v1.21.0   10.0.2.15     <none>        Ubuntu 20.04.2 LTS   5.4.0-72-generic   containerd://1.5.2
worker0   Ready    <none>                 98s     v1.21.0   10.0.2.15     <none>        Ubuntu 20.04.2 LTS   5.4.0-72-generic   containerd://1.5.2
Conclusions
We’ve addressed why Kubernetes doesn’t need Docker to work, and we’ve seen the importance of Docker in workflow and how simple it is to install Kubernetes without the Docker runtime.
In version 1.20, you’ll get a deprecation warning for Docker. Version 1.23 will definitely have this feature removed and it will be sure to cause some problems at first. But it will not be catastrophic and, as the technology moves forward, the benefits will be seen.
Kubernetes is growing, but change doesn’t necessarily have to be a traumatic experience.
Most users won’t need to take any action. For those who do, there is still time to test and plan.