Guest post by Stanislas Girard, Site Reliability Engineering at Padok
Running an elastic search cluster in production is not an easy task. You are probably working with gigabits of data coming in all the time and need to make it easily accessible and resilient. If you are reading these lines, you are probably facing issues with your current elastic Search in production.
You can quickly spawn an elastic search cluster in production on AWS or GCP and start using it almost immediately. However, the optimization of your cluster is crucial if you want to improve speed and sustainability.
Many things can go wrong with your elastic search cluster. You can either run out of memory, have too many shards, bad rolling sharding policies, no index lifecycle management, and other issues that are not explicit at first.
Disclaimer: This isn’t a guide on making an elastic search production-grade cluster for every use case. It is more of an explanation of how you should set up your cluster and where to find the information if needed. There is not a single answer to this problem!
We are all facing different needs, different usage, and creating a single method that works with all of these parameters is not feasible. This is probably why you can’t find an in-depth explanation on how to get your elastic search cluster production-ready. When I’ve been using ElasticSearch, I’ve had many issues, and I’ve looked almost anywhere I could to find an answer. This article explains some of the basics things you can do and how to implement them on your production cluster to have a smooth experience with ElasticSearch.
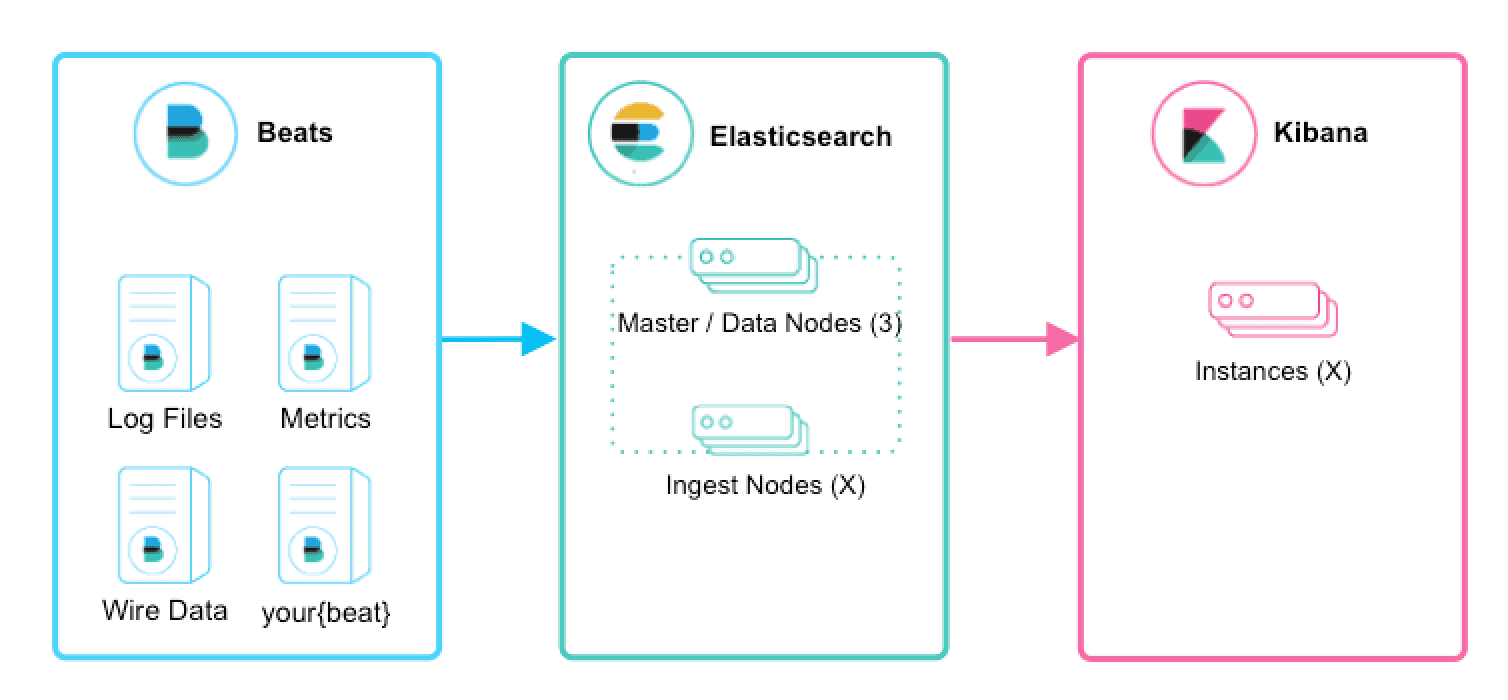
Let’s get started; first of all, let’s understand what an elastic search cluster is made of. We’ll first talk about nodes; this could be helpful when you configure your elastic nodes.
Types of Nodes:
A node that has the master role (default), makes it eligible to be elected as the master node, which controls the cluster. This is the most critical type of node in your cluster. You can’t have an elastic search cluster without having master nodes. We’ll go in more depth on how many you need. But know that specific rules apply to these nodes to keep the organization of your cluster smooth.
A data node is a node that has the data role (default). Data nodes hold data and perform data-related operations such as CRUD, search, and aggregations. A node with the data role can fill any of the specialized data node roles. These nodes hold all of your documents, they are essential, and your cluster can’t properly function without them. Data nodes are the default settings of any new node in your elastic search cluster. Data nodes can be specialized for specific use cases, which will cover in more detail below.
A node that has the ingest role (default). Ingest nodes can apply an ingest pipeline to a document to transform and enrich the document before indexing. If you have a heavy ingesting load, it is recommended to use a dedicated ingest node. To do so, you need to specify that your data and master nodes aren’t ingest nodes and declare those new nodes as ingest nodes.
A node with the remote_cluster_client role, which is activated by default, makes it eligible to act as a remote client. By default, any node in the cluster can act as a cross-cluster client and connect to remote clusters. This is particularly useful in some use cases when your production cluster needs access to remote clusters.
A node with xpack.ml.enabled and the ml role is the default behavior in the Elasticsearch default distribution. This role is activated by default on all of your nodes; if you have intensive machine learning features on your cluster, you should have at least one node with this role. For more information about machine learning features, see Machine learning in the Elastic Stack.
A node that has the transform role. If you want to use transforms, there be at least one transform node in your cluster. This is not a default role and needs to be added onto a node to activate this functionality in your cluster. I strongly advise you to read Transforms settings and Transforming data to better understand what a transforming node is.
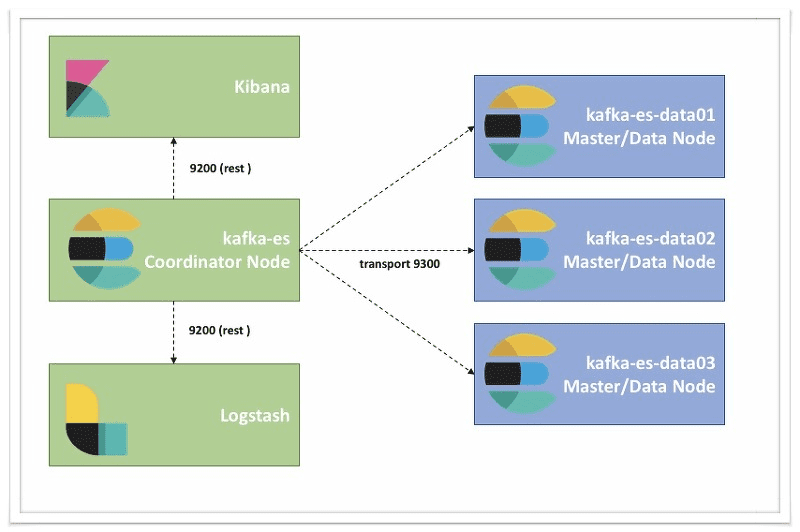
Coordinator Node
A node that has no attribute is a coordinator node and helps with the queries. Especially useful if you have a lot of queries coming in. Let’s say that you have multiple Kibana instances running or that you are querying your nodes heavily; you definitely need to spawn coordinator roles to ease the load on your master and data nodes.
That sums up pretty much all the most critical nodes that you can have. Each node has its specific use. Most roles are activated by default. But for better performances, it is recommended to have specialized nodes.
Summary:
Master Nodes
Control of the cluster requires a minimum of 3 with one active at any given time.
Data Nodes
Holds indexed data and performs data related operations Differentiated Hot and Warm Data nodes can be used -> More below.
Ingest Nodes
Use ingest pipelines to transform and enrich data before indexing.
Coordinating Nodes
Route requests, handle Search reduce phase, distribute bulk indexing. All nodes function as coordinating nodes by default.
Machine Learning Nodes
Run machine learning jobs
Transform node
Enables you to convert existing Elasticsearch indices into summarised indices.
Minimum of Master Nodes:
Master nodes are the most critical nodes in your cluster. In order to calculate how many master nodes you need in your production cluster, here is a simple formula:
N / 2 + 1
Where N is the total number of “master-eligible” nodes in your cluster, you need to round that number down to the nearest integer. There is a particular case; however, if your usage is shallow and only requires one node, then the query is 1. However, for any other use, you need at least a minimum of 3 master nodes in order to avoid any split-brain situation. This is a terrible situation to be in; it can result in an unhealthy cluster with many issues.
This setting should always be configured to a quorum (majority) of your master-eligible nodes. A quorum is (number of master-eligible nodes / 2) + 1. Here are some examples:
- If you have ten regular nodes ( ones that can either hold data and become master), the quorum is 6
- If you have three dedicated master nodes and a hundred data nodes, the quorum is 2.
- If you have two regular nodes, you are in a conundrum. A quorum would be 2, but this means a loss of one node will make your cluster inoperable. A setting of 1 will allow your cluster to function but doesn’t protect against the split-brain. It is best to have a minimum of three nodes.
Now that we’ve taken a look at the different types of nodes and how to make sure how to avoid bad situations such as the split-brain let’s take a look at the various aspects of the nodes such as memory, CPU, and disk. Those are also important factors. Unfortunately, there isn’t a single solution for all clusters, but some standard rules will significantly help you with your quest for a production-grade elastic search cluster.
Hardware
Heap: Sizing and Swapping
The default ElasticSearch node is configured to use 1Gb of heap memory. However, for just about every deployment, this quantity is too small. As ElasticSearch so graciously says: If you are using the default heap values, your cluster is probably misconfigured.
Sizing your nodes is a tricky task. Depending on your needs, you can go from 2Gb nodes 64Gb nodes. Having many small nodes is counterproductive for indexing and search performances. You’ll probably end up with your indices separated on many nodes, and your request time will be significantly high. You’ll probably move toward more significant nodes. However, you might end up in a situation with too few nodes and a small resiliency potential. If you only have one considerable node, losing it can mean the end of your cluster.
Making the right choice isn’t an easy task. You should always scale according to your requirements and your budget. One way to do it is by trial and error. Scale up or down your nodes and their number depending on the usage that you are seeing. After a few runs, you should end up with a configuration that utilizes just enough resources with good indexing and searching performances.
When you attribute 8Gb to an elastic search node, the standard recommendation is to give 50% of the available memory to ElasticSearch heap while leaving the other 50% free. Why can’t you allocate more? Well, there is something called Lucene that runs with ElasticSearch that requires memory too and is used for the most critical task. Don’t worry, and your memory won’t go unused; Lucene will happily gobble up whatever is leftover.
One last thing to know, there is a reason why you can’t have enormous nodes with elastic. ElasticSearch uses the JVM and requires a trio to compress object pointers when heaps are less than around 32Gb. So whatever happens, don’t allocate more than 32Gb (64Gb total) to your nodes.
Disks
Disks are probably the most essential aspect of a cluster and especially so for indexing-heavy clusters such as those that ingest log data.
Disks are by far the slowest subsystem in a server. This means that if you have write-heavy loads such as logs retention, you are doing a lot of writing, and the disks can quickly become saturated, which in turn becomes the bottleneck of the cluster.
I highly recommend, if you can afford, to use SSDs. Their far superior writing and reading speed significantly increase your overall performance. SSD-backed nodes see an increase in bot query and indexing performance.
So next time you spin up a new elastic search node, make sure that it is running with an SSD. The extra cost is worth it.
CPU
Let’s talk about the last aspect of hardware performance. CPUs are not so crucial with elastic Search as deployments tend to be relatively light on CPU requirements.
The recommended option is to use a modern processor with multiple cores. Common production-grade ElasticSearch clusters tend to utilize between two to eight-core machines.
If you need to choose between faster CPUs or more cores, choose more cores. The extra concurrency that multiple cores offer will far outweigh a slightly faster clock speed.
Kibana
Most clusters use Kibana to visualize data. This section will be pretty small. If you have heavy Kibana usage, I recommend that you use coordinator nodes. This will unload the query stress from your master nodes and improve the overall performance of your cluster.
Sharding Impact on Performance
In ElasticSearch, your data is organized in indices, and those are each made of shards that are distributed across multiple nodes. Shards are created when a new document needs to be indexed, then a unique id is being generated, and the destination of the shard is calculated based on this id. Once the shard has been delegated to a specific node, each write is sent to the node. This method allows a reasonably smooth distribution of documents across all of your shards. Thanks to this method, you can easily and quickly query thousands of documents in the blink of an eye.
Your data is organized in indices, each made of shards and distributed across multiple nodes. If a new document needs to be indexed, a unique id is being generated, and the destination shard is being calculated based on this id. After that, the writer is delegated to the node, which is holding the calculated destination shard. This will distribute your documents pretty well across all of your shards.
What is a shard? Each shard is a separate Lucene index, made of little segments of files located on your disk. Whenever you write, a new segment will be created. When a certain amount of segments is reached, they are all merged. This has some drawbacks; however, whenever you need to query your data, each segment is searched, meaning a higher I/O and memory consumption for your single node, whenever you need to search data against multiple shards meaning that the more shards you have, the more CPU work you need to do.
For example, if you have a write-heavy indexing case with just one node, the optimal number of indices and shards is 1. However, for search cases, you should set the number of shards to the number of CPUs available. In this way, searching can be multithreaded, resulting in better search performance.
But what are the benefits of sharding?
- Availability: Replication of the shards to other nodes ensures that you always have the data even if you lose some nodes.
- Performance: Distribution of your primary shards to other nodes implies that all shards can share the workload. They are improving the overall performance.
So if your scenario is write-heavy, keep the number of shards per index low. If you need better search performance, increase the number of shards, but keep the “physics” in mind. If you need reliability, take the number of nodes/replicas into account.
Building an elastic search cluster ready for production is not an easy task. You need to understand what your requirements are and what you want. If you wish to increase your search speed instead of resilience, take that into consideration before building your cluster. You are not bound to a specific implementation; however, if you create your cluster knowing what you’ll have in a couple of weeks, months you won’t encounter a lot of issues. ElasticSearch is tricky because it just works even if you have a lousy configuration; however, the more data you ingest, the more errors you can encounter. I encourage you to take time while building your cluster.
Don’t hesitate to ask me questions in the comments if you need help or contact Padok, the company I work for, if you need expertise.
Hit me up on Twitter @_StanGirard or Telegram @StanGirard!