

Guest post originally published on Rookout’s blog by Josh Hendrick, Senior Solutions Engineer at Rookout
As organizations place focus on innovation and digital transformation across enterprise IT, we continue to see increased adoption of containers and microservice application development patterns. Containers have brought developers new levels of flexibility and portability, but oftentimes still leave developers with questions about the best way to configure and build those containers. One interesting area that comes up is around how developers can most easily embed source code version information into their images. Most development teams need a simple and easy way to do this so that they can understand exactly which source code repository and code revision were used to build the container image as it’s important for auditing and debugging purposes.
It’s not uncommon to run into developers who are slowed down in their debugging process because they are not sure which version of their code is running, or even worse (!) end up trying to debug the wrong version of their application based on the code they have loaded in their local IDE. Worry not, for we know just the way to avoid this fate. In this guide, we’ll talk briefly about the potential approaches to embedding source code version information into Docker images and then dive into detail on how embedding that information into your container will allow for quick and easy setup for on the fly debugging with Rookout.
Embedding Version Information
Having source code version information available to your application can be beneficial. It allows for traceability back to the code repository and specific commit that your running application is using. This could be useful when debugging or even for use directly by your application during runtime for the purposes of displaying version information to your users.
One possible approach to embedding source code version information with Git based repositories is to include the .git folder along with your sources when building your image. This folder is typically a hidden folder at the root of your cloned Git repository and is used to store information about the current branch, commits, and other Git related configuration information. In a standard CI/CD workflow, the CI tool will clone the entire repository and then build an image based on the contents of the Dockerbuild or Docker compose files. When the image is built, typically the .git folder is excluded due to the fact that it can be quite large and including it could potentially slow down the build process and create issues with Docker layer caching. One nice solution is to just include a subset of the .git files that contain the most relevant information. This can be accomplished nicely by using the .dockerignore file.
Using the .dockerignore File
The .dockerignore file allows for inclusion or exclusion of specific files in the built Docker image. When the Docker image is built, files and folders that need to be used are compressed and sent to the Docker daemon from the Docker CLI. You may have specific large files or folders that you would like to exclude from this build context. In this case, the .dockerignore file comes in handy.
The .dockerignore file goes at the root of your build directory and for our purposes could look something like this:
# Files and Folders to ignore
.git
# Allow files for specific files with an !
!.git/HEAD
!.git/config
!.git/refs
In the above example, we’re first excluding the entire .git directory. Then we’re utilizing the include capability (with an exclamation point) to include just the specific files that can give relevant version information without all of the overhead of the entire .git folder.
The HEAD file is a pointer to the current branch reference and looks something like this:
ref: refs/heads/master
The .git config is a file which contains Git configuration information as well as the Git origin and may look something like this:
[core]
repositoryformatversion = 0
filemode = true
bare = false
logallrefupdates = true
ignorecase = true
precomposeunicode = true

[remote "origin"]
url = https://github.com/Rookout/tutorial-python
fetch = +refs/heads/*:refs/remotes/origin/*

[branch "master"]
remote = origin
merge = refs/heads/master
And finally the refs folder contains references to commit objects. Now that these files have been added, there is a direct path to retrieving a reference to the current revision. The config file links us directly to the remote origin url ‘https://github.com/Rookout/tutorial-python’ as shown above and the HEAD file gives us a pointer to ‘refs/heads/master’. By following the pointer to the ‘refs/heads/master’ file, we will be able to find the commit hash, which should look similar to the following:
18e2f68a753a1cab28327f1e8d3ac21912e3bd88
So now, rather than including the entire .git folder and potentially slowing the build down, we can include just a few relevant files that get us the information we need.
Using Version Information in Rookout
If you are using Rookout for on the fly debugging of your applications, you will need to understand which version of your code is deployed in your test or dev environment and then use that same code version from Rookout when you want to debug your running application. This is logical in that the source code commit you’re using from within Rookout should match the commit of code running in your test or production environment so that you can be sure you’re debugging the same codebase. In order to make this process as easy as possible, Rookout has the ability to read source code version information directly from the .git folder where your application is running.
By embedding the relevant files from your .git directory as discussed previously, Rookout can read the version information and automatically fetch your source code repository with the correct commit on the fly. By having Rookout automatically fetch your source code repository when you are ready to start debugging, much of the manual, error prone effort in ensuring that the code you’re using locally matches exactly what is deployed in your application is eliminated.
Setting Up Auto Source Fetching in Rookout
One additional option to allow Rookout to automatically fetch your source code repository is to set environment variables that Rookout can read, namely ROOKOUT_COMMIT and ROOKOUT_SOURCE_ORIGIN which you can read more about here. The main challenge with that approach is that it can be time consuming to figure out how to extract and set those arguments as part of a CI process. To improve on that approach, we can simply include the files from the .git directory as discussed above and let Rookout work its magic.
Here is an example Docker file that could use this approach:
FROM python:3.8-slim
WORKDIR /app
ADD requirements.txt .
RUN pip install -r requirements.txt
# move relevant files
ADD app.py .
ADD todos_store.py .
COPY utils/ ./utils
ADD static/ ./static
# COPY Git files for auto source fetching
COPY .git ./.git
#ENV FLASK_APP "app.py"
CMD ["python", "app.py"]
Notice from the above example, that it’s required to first COPY the .git folder to the Docker build context as seen in this line:
# COPY Git files for auto source fetching
COPY .git ./.git
This makes sure the .git folder is available to be packaged and when used in conjunction with the .dockerignore file, allows us to properly exclude the files and folders from .git that we don’t care about.
Tying It All Together
Now, when your Docker image is built, in addition to copying your source files, the relevant .git files and folders will be included. Rookout will then read these files and make an API call to automatically detect and fetch the correct code commit running in your environment.
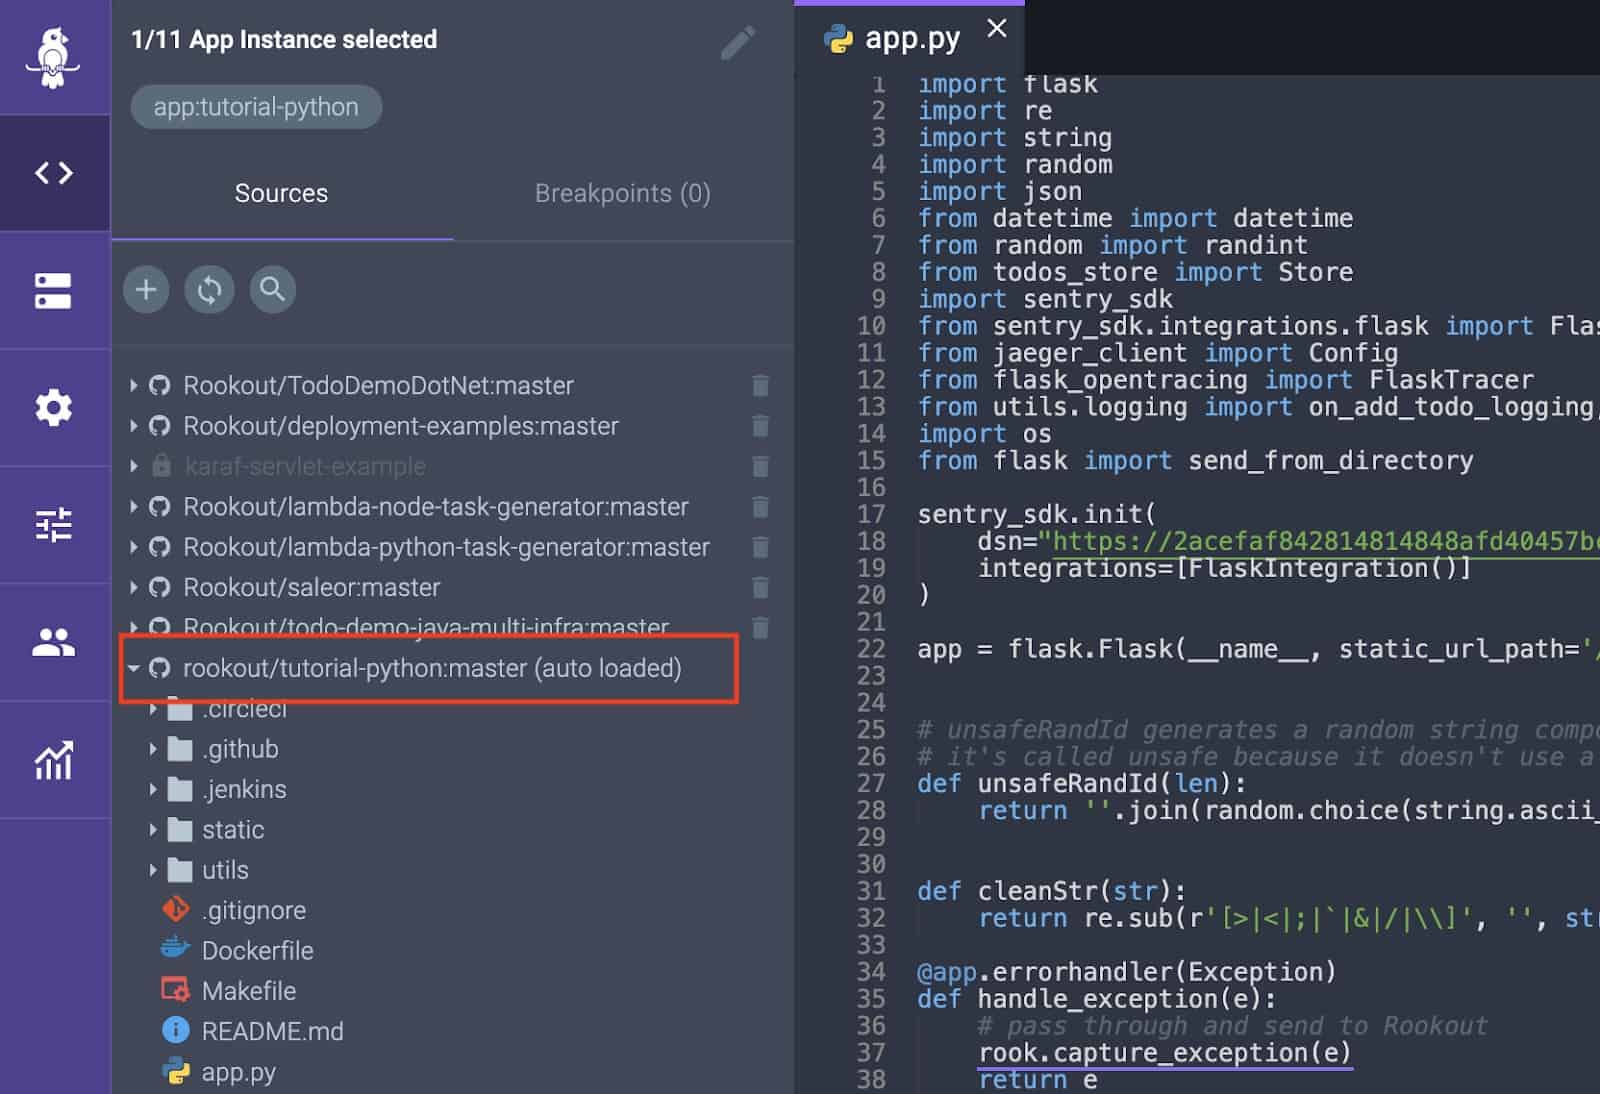
When viewing the Application Instances screen from Rookout, you should now see the Source origin and Revision commit hash automatically populated.

When in the debugger view, your source code should have the words auto loaded in parenthesis to signify that Rookout automatically fetched the sources based on the information in the .git folder.
By utilizing the above approach when using Rookout, it gives a seamless and simple approach to debugging your applications on the fly, without having to manage or worry about which code commit is deployed into your environment. We know it seems too good to be true, but give it a try. It’s worth it.