


Guest post originally published on Cloudreach’s blog by Brad Campbell, Chief Technologist, Platform Development at Cloudreach

Following up on his first blog focusing on Kubernetes as a cloud services provisioner, Brad Campbell explains how to deploy a simple to-do app with Custom Resource Definitions.
In the previous post, we scratched the surface of what Custom Resource Definitions are and the purpose they serve in the Kubernetes ecosystem. In this post, we will use Crossplane’s Custom Resource Definitions for AWS resources to deploy a simple to-do app with its cloud resources directly through Kubernetes.
Deploying an App with Custom Resource Definitions
Background
The app itself is a take on Docker’s “Docker 101 Tutorial” app. It’s a small to-do list SPA using React. In fact, it’s essentially the same application, with a twist: in my version of the app, I have introduced the use of AWS SNS to publish state changes of the individual to-do items to one (or many) topics. While the integration possibilities are plentiful using this sort of architecture (i.e. you could send the event to a Lambda function for some additional processing), I simply subscribed my mobile to the topic and receive a text message on every state change of an item (e.g. item added, item marked complete, item marked incomplete, item deleted).
Though serving as nothing more than an example of an app integrated with a cloud provider’s managed service for the purpose of demonstrating a CRD, I’m contemplating having my oldest son (schooling at home this year for obvious reasons) use this to-do app with the SNS integration so that I get real time notifications when he’s completed his assignments.
Containerized
In my repo, I have created a Makefile specifically for managing the lifecycle of a container image – feel free to have a look at it. However, I’ve done the heavy lifting here already: the app with all my modifications is already packaged and pushed to Dockerhub, which will make consuming it in our cluster quite easy.
Orchestration
Before Kubernetes and powerful concepts like Custom Resource Definitions (perhaps in a self-hosted Docker scenario, or with a service like ECS), the paradigm would have been to provision any cloud services through Terraform (or similar) and then get the ARN of the SNS topic to the container, perhaps by setting it as an environment variable on a task definition. In this case, however, we are going to let Kubernetes orchestrate this for us through the Crossplane AWS CRD for SNS Topics. Be aware, though, that this approach does come with tradeoffs. While completely subjective, I am categorizing each as a pro or con of the approach.
Pros
- No separate tooling is needed to orchestrate third-party services. That is to say, in a purely self-service model, a developer is writing a bit of extra YAML with their service definition to procure whatever cloud services they need, instead of YAML to define the (application) service, Terraform to procure (platform) services, sometimes code to get ARNs or other service identifiers back to the cluster, and so on.
- The lifecycle of application-specific platform services is more tightly coupled with the applications and environments to which they are bound.
- As a result of the last point, application deployments become less bound to environmental contexts and more portable between those contexts.
Cons
- Kubernetes clusters need a wider berth from an IAM perspective to allow them to manage provider-based services. Since the cluster itself creates the resources, the cluster needs the appropriate permissions to do so.
- Cost optimization becomes a much more difficult exercise as this deployment model will likely lead to less shared services being used across a cloud estate
Deploying the App
Now that you understand the potential upside of using CRDs to manage cloud resources, let’s have a go at deploying our app. I have included a series of scripts in the application repository to assist us in deploying the app. Once again, I’ll be using minikube for the duration of this post. All scripts are located in the k8s_deploy/sns folder. With a minikube start gets everything running locally, let’s work through the deployment.
Create the Namespace
The namespace is an organizational construct that allows us to keep our resources together. To create it:
$ ./01_namespace.sh
namespace/101-todo created
Create a Persistent Volume (PV)
By default, the todo app uses SQLite to store its data (it offers MySQL as well, but we stick with SQLite here). Let’s create a PersistentVolume resource to save the database in:
$ kubectl apply -f 02_pv.yml
persistentvolume/todos-db created
Create a Persistent Volume Claim (PVC)
In order to use the PV created in the pervious step, we need to create a claim:
$ kubectl apply -f 03_pvc.yml
persistentvolumeclaim/todos-db-pvc created
Install Crossplane
Crossplane has both some in-cluster components, as well as some out-of-cluster components (such as a kubectl plugin) that need to be installed. The installation of Crossplane also requires AWS credentials. These credentials are stored as a Kubernetes Secret in the cluster. The credentials provided in this step need to have the ability to create, update, and delete any AWS resources you might want to manage with Crossplane. In this case, the credentials I am supplying are stored in my local credentials file under the brad-pers-infrabook entry:
$ ./04_install_crossplane.sh brad-pers-infrabook
+ kubectl create ns crossplane-system
namespace/crossplane-system created
... [additional output] ...
This installs all Crossplane components and configures Crossplane with the needed credentials to provision resources in the associated account.
Configure App Credentials Secret
Our app publishes messages to an SNS topic. Once again, we rely on IAM credentials to accomplish this. First, copy the example file to a new file:
$ cp 05_secret.example.yml 05_secret.yml
Gather up an appropriate set of credentials and place them into the 05_secret.yml file, then apply the configuration:
$ kubectl apply -f 05_secret.yml
secret/aws-creds created
Create the SNS Topic
Now comes the cool part. Using kubectl and a configuration file, we create the SNS topic that our app uses as a message bus:
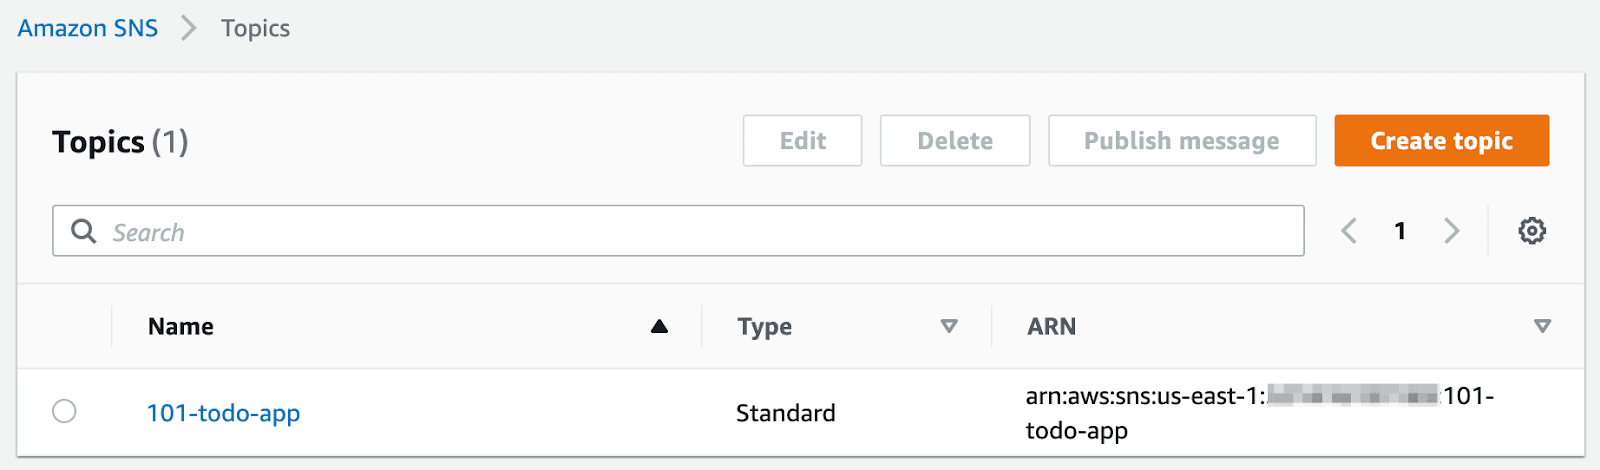
$ kubectl apply -f 06_sns.yml
snstopic.notification.aws.crossplane.io/101-todo-app created
In my account, I now see the topic:
Deploy the App
The topic ARN is available as an annotation on the resource. The 07_deployment_subst.sh script grabs this annotation by describing the resource with kubectl then injects it into the deployment’s template file (08_deployment.tpl.yml) to create the configuration file for the deployment that gets applied (08_deployment.yml). This whole process is as simple as running the 07 file:
$ ./07_deployment_subst.sh
deployment.apps/101-todo-deployment created
Lastly, let’s create the Service for the Deployment:
$ kubectl apply -f 09_service.yml
service/todo-svc created
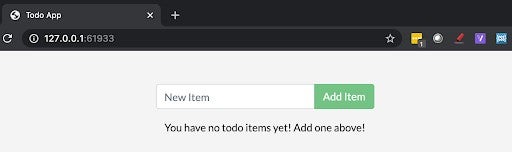
Access the App
Now that the service is created, let’s access it. The last thing we need to do is run the 10_access_service.sh script, which creates a tunnel to the VM that runs the minikube node that’s locally accessible:
$ ./10_access_service.sh
🏃  Starting tunnel for service todo-svc.
|-----------|----------|-------------|------------------------|
| NAMESPACE |   NAME   | TARGET PORT |          URL           |
|-----------|----------|-------------|------------------------|
| 101-todo  | todo-svc |             | http://127.0.0.1:61933 |
|-----------|----------|-------------|------------------------|
http://127.0.0.1:61933
❗ Because you are using a Docker driver on darwin, the terminal needs to be open to run it.
And, here’s the app!
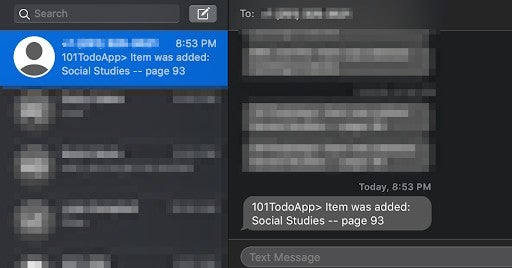
In the meantime, I’ve subscribed my mobile number to the SNS topic, so I’ll get notifications on new events.
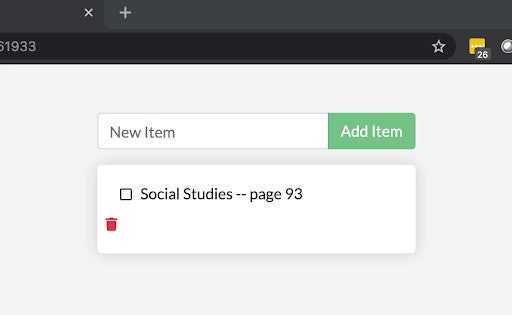
Adding an Item
Adding a message, I see it show up in the UI:
And here’s the message!
The app also has code to send notifications on items marked complete, marked incomplete, and deleted. In the configuration outlined here, I’m relying on functionality that relies on a default topic for notifications for multiple functions. However, if you want, you can configure separate topics for add, delete, and update functions: have a look at the files in the app/src/routes directory for the environment variables you’ll need to set if you want to give this a try (note: you’ll also need to modify the pod spec in the deployment template to accommodate the new variables, as well as accounting for the new topics in the 06 and 07 files).
Wrapping Up
To wrap it up, we installed Crossplane, configured it for use in our AWS account, and then deployed an app and its AWS dependencies using standard Kubernetes deployment processes. While the use-case for the SNS topic in app was a bit of an (illustrative) stretch, I hope it illuminated you to the possibilities of bundling cloud-based dependencies for apps running on Kubernetes alongside your deployment tools.
It’s also worth mentioning that AWS is coming up with their own set of CRDs for managing resources, but as of the time of this writing, they’re still in developer preview.
While my hodge-podge of shell scripts and YAML files isn’t the most elegant thing, I’m hoping it helped clarify the process a bit. If you’re looking for something a bit more elegant, I’d recommend you give Helm a try.
And speaking of Helm, stay tuned – we’ll take a look at creating Helm charts here soon!