
KubeCon + CloudNativeCon NA Virtual sponsor guest post from Joel Baxter, Kartik Mathur, and Don Wake of HPE.
Imagine that you’re a data scientist who’s been asked to create an application or service that can predict travel time for a proposed taxi ride. The application needs to have the ability to update the service with new data as it becomes available, so its predictions take recent patterns into account. In this tutorial, we’ll show you how to set up a Machine Learning (ML) pipeline using KubeDirector to train, register, and query your model.
KubeDirector was introduced to the open source community to address stateful application deployment in standard Kubernetes clusters. In the latest release (version 0.5), KubeDirector now allows multiple clusters to share data very easily using a new feature called Connections. The new feature helps users create large-scale dynamic, stateful containerized applications such as are found in Machine Learning (ML) pipelines and allow them to constantly evolve as models are improved and the data changes.
A basic ML pipeline consists of three stages:
- Training, where the input datasets are processed to create ML models
- Model registration, where the models to be used are identified and characterized
- Inferencing, where selected models are made available for answering queries
After a brief description of the KubeDirector architecture used for this solution, we’ll show you how to train, register, and finally query your model for answers. The sample dataset used, and available here under trip data, contains taxi ride data that will be used to infer total time per ride for given taxi pickup and drop-off locations. And yes, this is pre-2020 data. Things look much different now due to the pandemic. That’s why it’s important that your ML model is flexible and can take real-time data into account.
Our solution uses three KubeDirector Applications (kdapps): a training deployment kdapp named training-engine, a Jupyter Notebook kdapp named jupyter-notebook, and an inferencing deployment kdapp named deployment-engine.
A kdapp is a custom resource (CR) that can be created in any Kubernetes cluster. The kdapp instructs KubeDirector on how a particular kind of virtual application cluster should be deployed and managed. The three kdapps used in this solution are examples that can be found online in the KubeDirector github example catalog.
Register Your KubeDirector Applications with Kubernetes
Assuming that KubeDirector is already deployed and running in the Kubernetes cluster, these kdapp CRs can be created to register apps with KubeDirector, e.g. by using kubectl:
kubectl create –f cr-app-training-engine.json
kubectl create –f cr-app-jupyter-notebook.json
kubectl create –f cr-app-deployment-engine.json
This is a one-time step that builds a catalog of applications that data scientists can now instantiate as needed.
Once a kdapp is created, an instance of that app can be deployed by creating a KubeDirector virtual cluster (kdcluster) CR. A kdcluster identifies the desired kdapp and specifies runtime configuration parameters, such as the size and resource requirements of the virtual cluster.
KDApp Connections
For the purposes of this discussion, one of the most interesting parts of the kdcluster spec is the Connections stanza, which identifies other resources of interest to that kdcluster. This is detailed in the GitHub readme link here.
The KubeDirector GitHub repo includes examples of kdcluster CRs that instantiate these kdapps. This tutorial will show you how to create kdclusters much like those examples, except that yours will add information about the connections that each kdcluster will use.
The input data and trained ML models for this example pipeline will live in a project repository of shared persistent storage. The kdapps used will expect to be able to access that repository through directories mounted within the app containers and this implies the need for a persistent storage. The final piece of the puzzle will be the use of ConfigMap resources to describe and locate the ML models used for drawing inferences.
These components come together to build the pipeline like so:
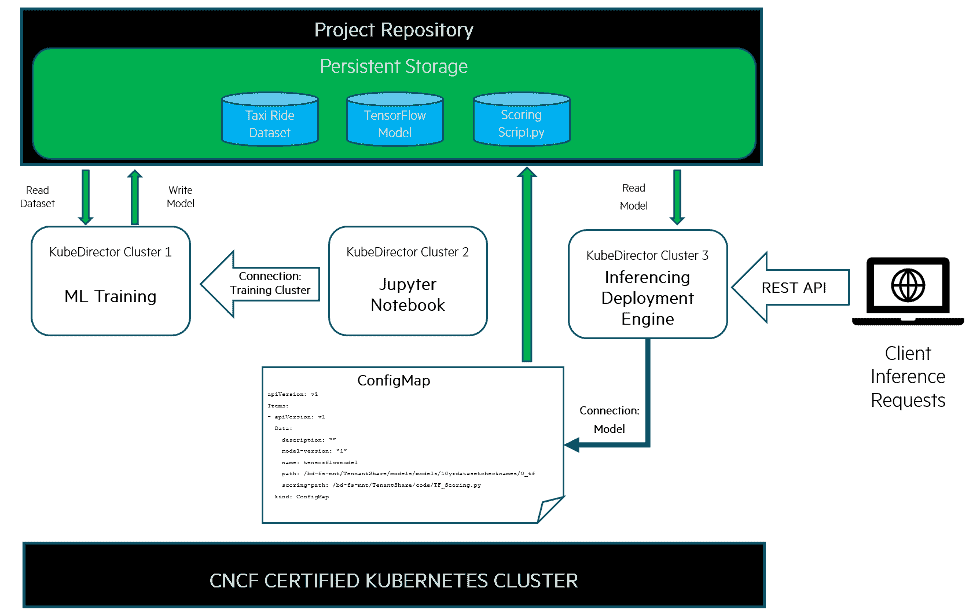
A project repository is used to store the key data components needed in any ML pipeline, such as source data, the model itself and the scoring script.
Training
Once you have registered the ML training kdapp and the Jupyter Notebook kdapp for Model Building, you’ll need to launch instances of those applications as KubeDirector clusters (kdclusters) to put the ML pipeline to work. First, launch an instance of the ML training kdapp:
kubectl create –f cr-cluster-training-engine.yaml
KubeDirector connection creation: Jupyter Notebook kdcluster –> Training engine kdcluster
Next, you’ll need to launch an instance of your Jupyter Notebook kdcluster. Before you do that, you need to modify the example kdcluster yaml file and include a new Connection stanza into the top level “spec” section. This modification would look similar to the following code:
spec:
app: “jupyter-notebook”
appCatalog: “local”
connections:
clusters:
- “training-engine-instance”
Now, use the modified yaml file to launch an instance of your Jupyter Notebook kdcluster:
kubectl create –f cr-cluster-jupyter-notebook.yaml
The runtime configuration of the connected training-engine kdcluster, including its service endpoints, is therefore injected by KubeDirector into the jupyter-notebook app. This info is used by the notebook app when KubeDirector triggers configuration scripts to run within the app containers.
Note that these Connections can also be edited in the kdcluster spec later, for example if the notebook should be redirected to work with a different training engine.
Training the model
Now that the notebook kdcluster is running, a user accesses the Jupyter Notebook web UI via the network service port. Then, the usual process of directing the connected training deployment to generate models from the input data can be performed.
Using a little training Magic
Those familiar with Jupyter Notebooks know that they include support for predefined magic functions that can be called within a notebook using a command line style syntax. These magic functions expand the capabilities of the notebook adding support for things like: %history, %edit, %rerun, %recall, %macro, %save, and %pastebin.
Jupyter Notebook also includes hooks that allow defining custom magics. The kdapps in our solution utilize these custom commands (magics) to seamlessly integrate with KubeDirector Connections. This includes custom magics to handle remotely submitting training code and retrieving results and logs. These magic functions make REST API calls to the API server that runs as part of a training environment.
For example the following magic functions are included:
%attachments: Returns a list of connected training environments%logs --url: URL of the training server load balancer%%<<training_cluster_name>>: Submits training code to the training environment
The below screenshot from the GitHub site shows you an example of how a Jupyter Notebook can use these Magic commands:
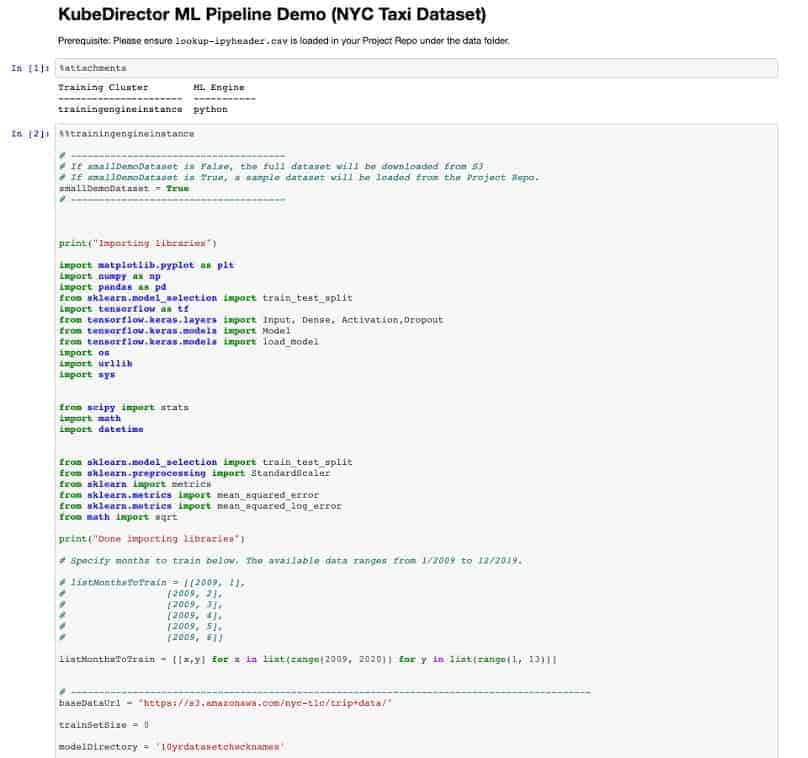
Note at the top of this screenshot of the Jupyter Notebook that the %attachments magic command is used to retrieve the Training Cluster name – traningengineinstance. Then that name is used in the following magic command – %%trainingengineinstance. This single command then submits training code to the training environment – truly magic!
As the training engine generates models, it will store the model data into the project repository. From the training engine’s point of view, it is simply writing to a designated subdirectory of its filesystem.
Model registration
Next, you’ll need to create a ConfigMap resource to store metadata about the model to be used in deployments. Here’s an example ConfigMap for the model data generated above:
apiVersion: v1
kind: ConfigMap
metadata:
name: tensorflowmodel
data:
name: tensorflowmodel
description: "example model"
model-version: "1"
path: /bd-fs-mnt/TenantShare/models/10yrdatasetchecknames/0_tf
scoring-path: /bd-fs-mnt/TenantShare/code/TF_Scoring.py
The two crucial parameters that will be used by the deployment-engine kdcluster are the path and the scoring-path, each of which identifies a location within the project repository as seen within an app container. The path is the location of the serialized model data. This path can be retrieved from the job log from when the model was trained. The scoring-path locates a script that will be used by the deployment engine to deserialize and process the model.
Create Inference Deployment
This is what you’ve been waiting for! How long will my taxi ride take? You’ve trained a model from a data set, and now it’s time to extract value from your model. To do this we need to create a deployment-engine.
A deployment-engine kdcluster is used to stand up services that will allow clients to draw ride-time inferences from the models you have created and registered.
A deployment engine will serve inferences for one or more models. To specify models to a deployment-engine kdcluster, the Connections feature once again comes in handy. Instead of naming other kdclusters of interest, this time it will be used to name ConfigMap resources, one for each model that the deployment should use. In this case, just use the one example model that was given.
KubeDirector Connection creation: Inference server kdcluster –> Model ConfigMap
For this deployment, the example cr-cluster-endpoint-wrapper.yaml file can be used. Similar to how the Jupyter Notebook kdcluster yaml file was modified, this kdcluster yaml file will be edited to include the Connection stanza. A new property in the top-level spec section is added, similar to the following:
spec:
app: deployment-engine
appCatalog: “local”
connections:
configmaps:
- “tensorflowmodel”
When these ConfigMap Connections are named in a kdcluster spec, KubeDirector will inject the contents of those ConfigMaps into a JSON file within the kdcluster’s app containers where they can be used by the deployment app. If the contents of the ConfigMaps change, KubeDirector will immediately update this file. The deployment app can therefore reference this file to find the models it should use, which it can then load from the FS Mount directories exposed within its containers.
This key use of KubeDirector Applications, Clusters and Connections is what makes an ML pipeline created with KubeDirector very dynamic – it’s able to easily accept constantly updating and changing data sets and models of that data. The taxi ride data for New York City in 2020 will likely look very different than the sample pre-pandemic dataset. ML pipelines need to be constantly monitored and often retrained to accommodate this model drift, as the ML model lifecycle is a highly iterative and dynamic process.
A similar process could be implemented using ConfigMaps mounted into application pods using native Kubernetes mechanisms. An important benefit of the Connections feature, however, is that the connected set of ConfigMaps can grow, shrink, and change while the pod remains running. In terms of the use case here, that means you could add another model to be handled by the deployment engine without interrupting any current requests that the engine is processing.
Serving Queries
The “haproxy” service port on the inference deployment can now be used to service REST API queries, using the model created earlier to make inferences about how long a proposed taxi ride will take. An example script for making queries to this service can be found here.
Here’s that script in action, sending a query to the inferencing deployment we created:
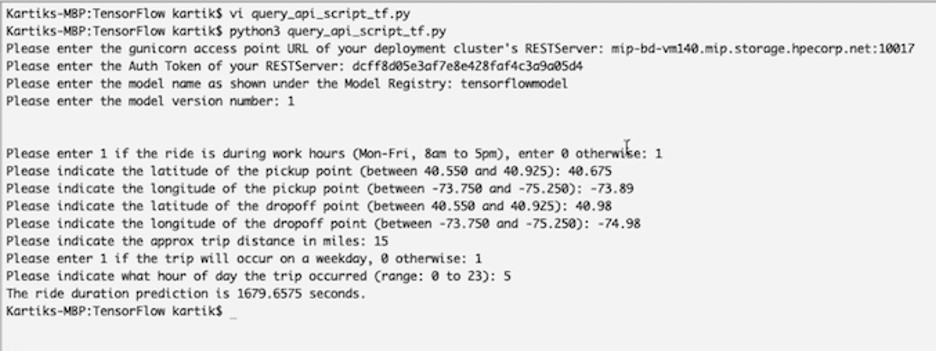
From this output, our example script queries our model via REST API calls, providing a few parameters, and the model returns a prediction.
Conclusion
While we’ve presented the steps from input dataset to query result sequentially here, in “steady state” operation all of these operations can be happening in different order and/or at the same time.
Building our pipeline using Kubernetes resources and the open-source KubeDirector project lets us deal flexibly with a wide range of configurations and changes, with minimal disruption. The possibilities include:
- Multiple notebooks per training deployment, with each notebook’s unique password given to a group or a single user for finer-grained access control.
- Multiple training deployments to implement different training methods or access different datasets.
- Changing existing notebooks to connect to different training deployments, without losing any of the working environment of the notebook.
- Multiple inferencing deployments, for access control or load-balancing.
- Multiple models served per inferencing deployment, at different service ports or different URLs.
- Changing the set of models served by an inferencing deployment, without interrupting its operation.
Find out more about KubeDirector applications and KubeDirector clusters at the GitHub site: GitHub. From there you can download open-source KubeDirector and use it in your own Kubernetes clusters! And to see how KubeDirector is used in the HPE Ezmeral Container Platform and check out our demos, go to the HPE DEV site here.
This article was co-authored by:
- Joel Baxter, Distinguished Technologist
- Kartik Mathur, Master Technologist
- Don Wake, Technical Marketing Engineer