
Guest post originally published on GitHub by Chanakya Ekbote, a Google Summer of Code Student Developer
Google Summer of Code (GSoC) is a global program focused on bringing more student developers into open source software development. Through the program, students get matched with open source, free software and technology-related organizations to write code and contribute to the open source community. The organizations provide mentors who act as guides through the entire process, from learning about the community to contributing code. The selected students work on a 3 month programming project during their break from school.
I was lucky and honoured to be selected to work on the project: Anomaly Detection of the CoreDNS Server through Machine Learning proposed by the maintainers of the CoreDNS Organisation, as a Google Summer of Code Student Developer. Through this post, I’d like to describe my journey and also showcase the work my mentors and I accomplished over the summer.
General Overview
The project is currently being used to integrate machine learning capabilities with CoreDNS, with the objective of protecting people against malicious websites and applications. It helps in identifying websites that could be potentially used by malicious hackers and cybercriminals and prevents the user from accessing such websites.
The project is also being used to provide machine learning capabilities to languages and platforms that generally have a dearth of such capabilities. One of the best features is that it is fully customisable and therefore can be tailored to fit the needs of any other project or organisation.
The project website can be found here: https://mlbridge.github.io/
Applying to the Google Summer of Code Program as a part of the CoreDNS Organisation
I have always loved to contribute to open source projects ever since the first year of my undergraduate journey. I had applied to GSoC last year too, but unfortunately, it just didn’t materialize. This year I started contributing to an open-source organisation since the month of November. I familiarised myself with the code base, made a few connections in the community and submitted a few PR’s too. A few months down the road, I was elated to hear that the organisation would be participating in GSoC’20. Since I knew what projects they were working on and what new additions the projects would require, I was confident of submitting a good proposal with the appropriate deliverables.
However, fate had something else in store for me. The organisation I was contributing to, did not get selected for the GSoC’20 program and I had to look for other opportunities. I was searching for another organisation to apply to, when one of my peers advised me to take a look at CoreDNS. I was a bit apprehensive at first but when I saw the projects that CoreDNS had listed, I was floored.
The CoreDNS organisation had a project that I was really passionate about. It basically combined machine learning with cybersecurity which seemed like a pretty interesting proposition. I got in touch with the mentors Paul and Yong and clarified any discrepancies that I had. With the inputs that I had from the mentors, I created a proposal and the rest is history.
The Community Bonding Period
Due to the onset of COVID-19, my term exams were postponed to bang in the middle of the Coding Period. Hence, in order to complete the goals of the project, my mentors and I decided to start working on the project from the start of the Community Bonding Period itself.
Initially, the main challenge we faced was integrating machine learning capabilities into the CoreDNS server as Go (the language CoreDNS has been built on) does not support the CUDA platform (that is essential for machine learning applications). At the same time, the Python ecosystem has tools like TensorFlow, PyTorch, MXNet and various others that not only interact with the CUDA platform but also allow for the easy prototyping and evaluation of deep learning models.
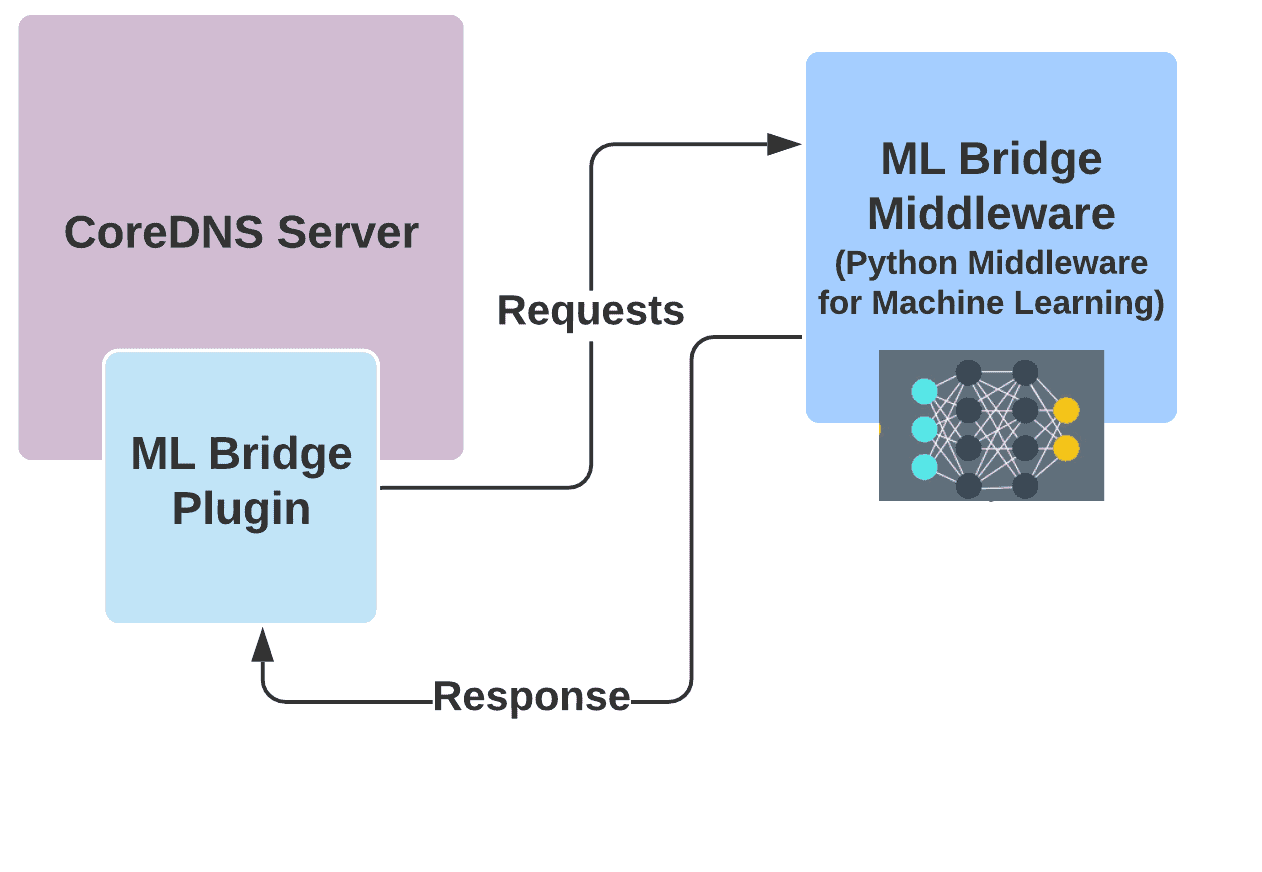
Upon ideating on the same, we decided not to reinvent the wheel but use the machine learning tools that Python has in tandem with CoreDNS by setting up a communication link between a CoreDNS plugin and a Python Flask server that contains the machine learning model. Hence the goal of the Community Bonding Period was to create a CoreDNS Plugin (ML Bridge Plugin) as well as a machine learning model that would be incorporated into the Flask server (ML Bridge Middleware.)
The CoreDNS Plugin and the Python Flask Server
During the first two weeks of the community bonding period, I had to create a CoreDNS plugin as well as the Python Flask Server. The plugin would basically communicate with the Python Flask Server to utilise the machine learning capabilities of the Python Ecosystem via HTTP POST requests.
I’ve had a decent amount of experience in Machine Learning however CoreDNS as well as Go was new to me. There was a pretty steep learning curve to climb and it was during this period that I thought that I’d probably not even pass the first GSoC evaluation. I thought I wasn’t good enough to complete GSoC. However, my mentors were very patient and used to take the time out to explain even the simplest concepts. Moreover, they provided ample reference materials to make sure I had a decent foothold on both Go as well as creating a CoreDNS plugin. They were very encouraging during this period and gave me a lot of confidence that I would be able to complete the project deliverables within the GSoC period.
The ML Bridge Plugin is a CoreDNS plugin that forwards requests to the ML Bridge Middleware via HTTP POST requests. Once the Middleware processes the request, it sends back the prediction, whether the domain name is malicious or benign, to the plugin. Depending on the nature of the domain name, the plugin can be configured to allow the request to fall through to the other plugins or send the request to Honeypot or Blackhole IP addresses. This would help in protecting users from accessing malicious websites.
The pseudo-code for the same is as follows:
def mlbridge(request):

result = forward(request) # Forwards the request to the ML Bridge Middleware

if   (result is malicious):

# Send back a Honeypot or Blackhole IP address.

else:

# Allow fallthrough to other plugins.
I was able to complete the CoreDNS plugin within a week and a half.
Due to the fact that I usually code in Python, creating the ML Bridge Middleware (the Flask Server) was pretty easy. It took around two days to create it and a day to test the communication link between the ML Bridge Plugin and the ML Bridge Middleware.
The only piece that was missing was the machine learning model that was to be included in the ML Bridge Middleware.
The Machine Learning Model
For any machine learning model, the main component is data. Paul was kind enough to provide the COVID-19 Cyber Threat Coalition Blacklist for malicious domains. For the benign domains, we found a dataset from DomCop.
Before moving on to the training model, we had to preprocess the data to a format that is suitable for by the machine learning model. The data was preprocessed as follows:
- Each domain name is converted to a unicode code point representation and then extended to a NumPy array of length 256.
- The dataset was created by combining the malicious domains as well as the non-malicious.
- The dataset was split as follows:
- Training Set: 80% of the dataset.
- Validation Set: 10 % of the dataset
- Test Set: 10% of the dataset
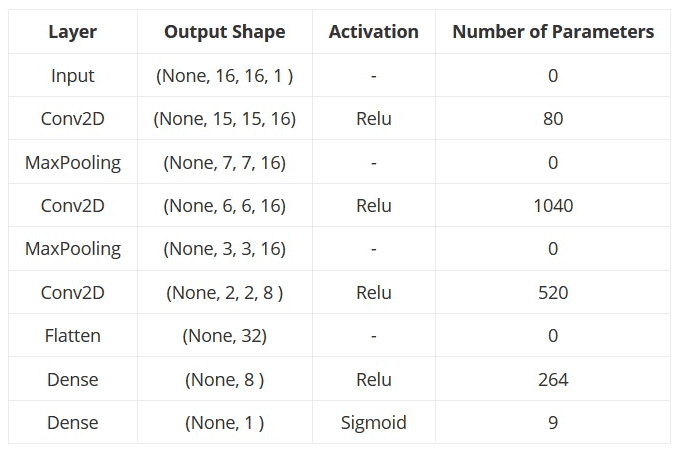
- Each NumPy Array is then converted to a (16, 16, 1) matrix.
The next decision was to create the appropriate machine learning model. We zeroed in on a convolutional neural network that outputs the probability whether a domain name is malicious or benign. The model’s input is a (16, 16, 1) shaped array and the output is a single value lying in between 0 and 1. If the output value is less than 0.5, the domain name is considered benign, else it is considered malicious. The details of the Convolutional Neural Net are as follows:
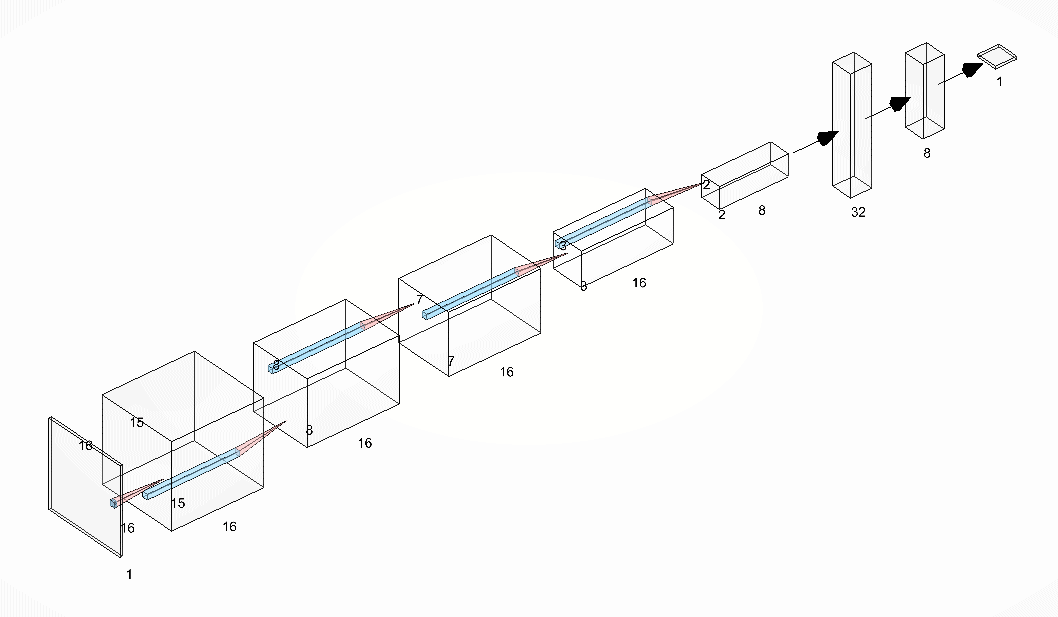
The model can be visualised as follows:
The efficacy of the model is as follows:

Combining the ML Bridge Middleware with the Machine Learning Model
Combining the Middleware with the machine learning model was fairly easy. All I had to do was save the trained model and then use the saved model in the Middleware for getting the predictions. These predictions were then communicated to the ML Bridge Plugin. The pseudocode for the same is as follows:
def mlbridge(request):

preprocessed_data = preprocess(data) # Preprocesses the data
prediction = saved_model(prerocessed_data) # Gets the prediction from the trained model
forward(prediction) # Forwards the prediction to the ML Bridge Plugin
Google Summer of Code: Phase – I
Once the machine learning model was created, we decided to take a step back and reformulated the goal of the project. Upon further discussion with my mentors I came to realise that normally, to prevent people from accessing certain malicious websites, vetted lists of malicious domains are used to check if the website requested by the user is malicious or benign. However, the problem with that was if the website requested by the user did not exist in the vetted list, it was assumed to be benign, which was not always the case. Therefore, we decided to use the machine learning model as a secondary check, i.e. if the domain name is not present in the vetted lists, we run it through the machine learning model and then send the status of the domain name back to the ML Bridge Plugin. In addition to that we decided to work on a User Interface (ML Bridge User Interface) which a system administrator could use to analyse the past historical trends to manually decide whether the domain queried was malicious or not.
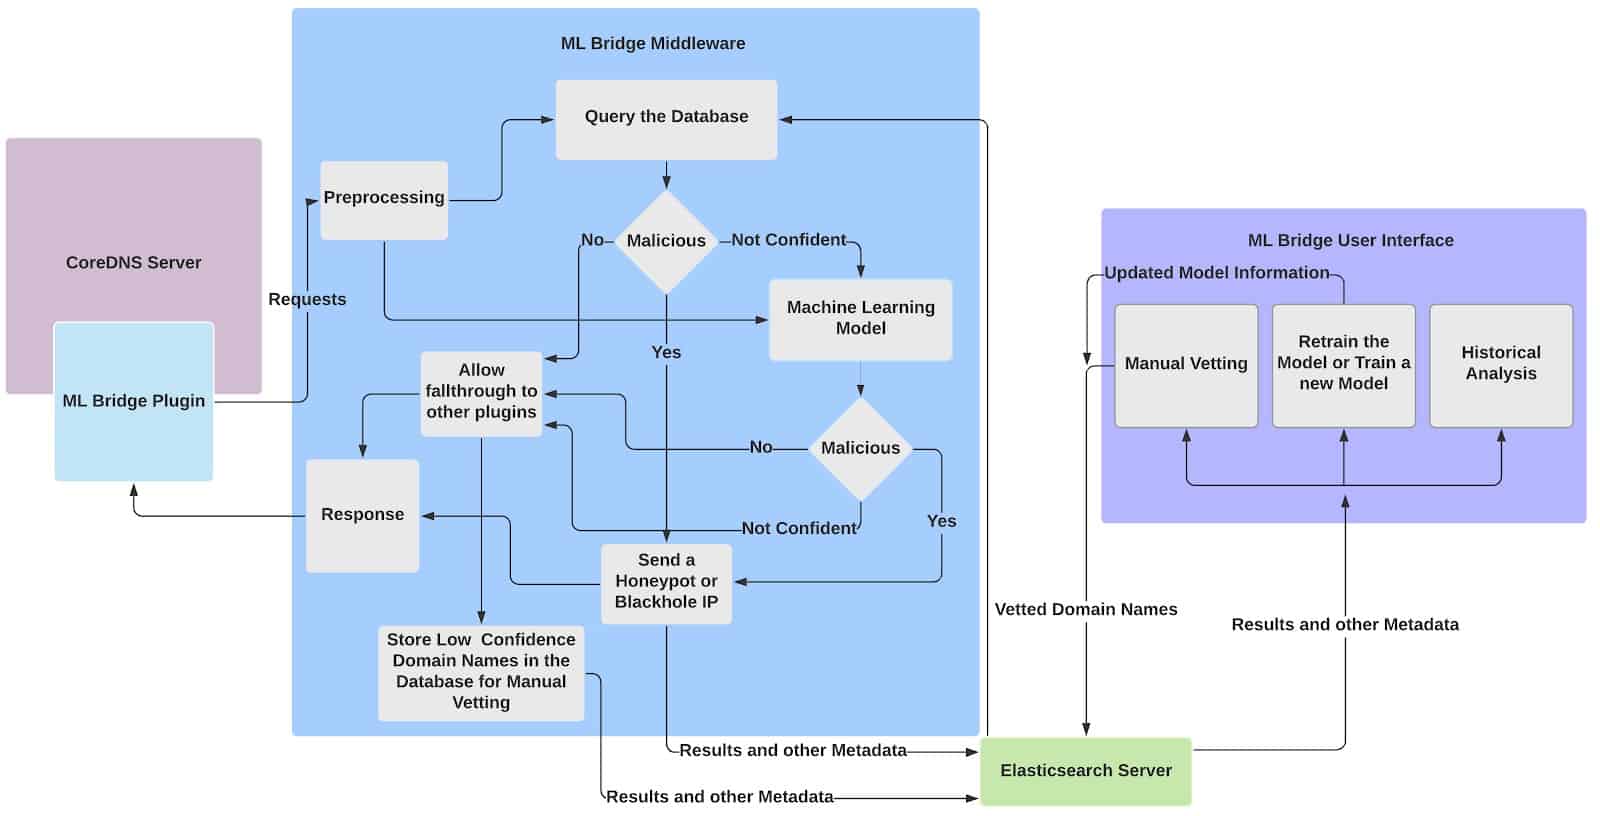
Hence the two main goals for Phase-I were to update the ML Bridge Middleware to use the machine learning model as a secondary check and finish the historical trend analysis in the ML Bridge User Interface.
However, before we started working on these goals we had to first solve the communication problem, i.e. how would the ML Bridge User Interface communicate with the Plugin and the Middleware?
Solving the Communication Problem
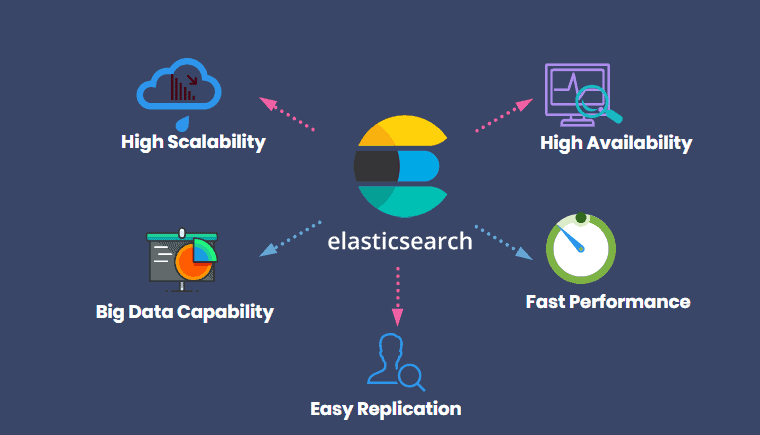
Initially, we thought about solving the communication problem via HTTP POST requests. However, we soon realized that it would be too slow. We then decided to use a fast caching database and zeroed in on the NoSQL database: Elasticsearch.
Elasticsearch is a NoSQL distributed database where the data is stored in a manner that data retrieval is quick. That makes it an ideal choice for communicating between different ML Bridge components running parallely.
Each component dumps data into the Elasticsearch Database, which then can be retrieved by other components. Depending on the data, different actions can be taken by each component. Hence, it acts as an ideal communication channel. Moreover, it also helps in storing data that can be retrieved at a later time or date.
Updating the Middleware
The ML Bridge Middleware was updated to include the following functionalities:
The Middleware first preprocesses the request forwarded from the Machine Learning Plugin. The preprocessed request is then cross-checked against manually vetted lists. If the request is of a benign domain, a response is sent back to the ML Bridge Plugin that allows the fallthrough to other plugins. If the request is of a malicious domain, a response is sent back to the ML Bridge Plugin that prevents the fallthrough to other plugins. Moreover, the ML Bridge Plugin sends back Honeypot or Blackhole IP addresses to the user querying the malicious domain. If the domain does not exist in the manually vetted list, the preprocessed request is then sent to the machine learning model where it infers whether it is benign or malicious.
If the machine learning model is highly confident that the request is of a benign domain, then a response is sent back to the ML Bridge Plugin that allows the fallthrough to other plugins. If the model is highly confident that the domain name is malicious, a response is sent back to the ML Bridge Plugin that prevents the fallthrough to other plugins. Moreover, the ML Bridge Plugin sends back Honeypot or Blackhole IP addresses to the user querying the malicious domain. If the model is not confident about its prediction, then a response is sent back to the ML Bridge Plugin that allows the fallthrough to other plugins. However, the domain name is stored in the database for manual vetting.
The classification result as well as other metadata such as the IP addresses, the date and time of the request, are stored in Elasticsearch.
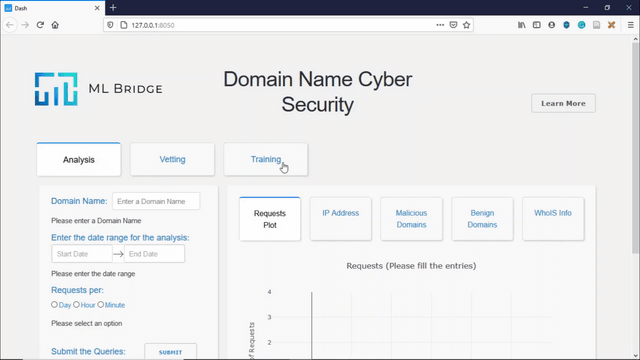
Creating the User Interface and the Historical Analysis Feature
There were many frameworks and alternatives that we could have used to create a user interface however, we decided to work with Dash as it would help in the easy prototyping and development of the user interface. Moreover, Dash had all the components that were needed for the project and hence it was an ideal choice.
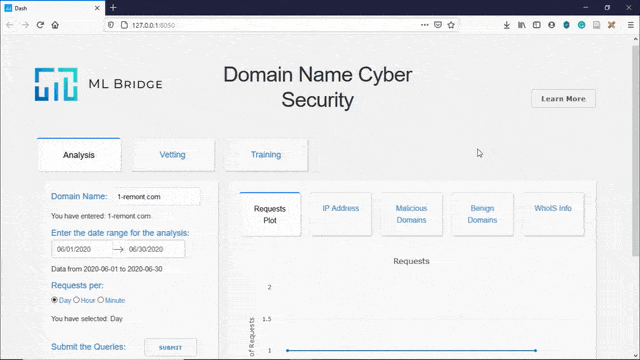
A demo of the Hisotorical Analysis Feature can be seen below:

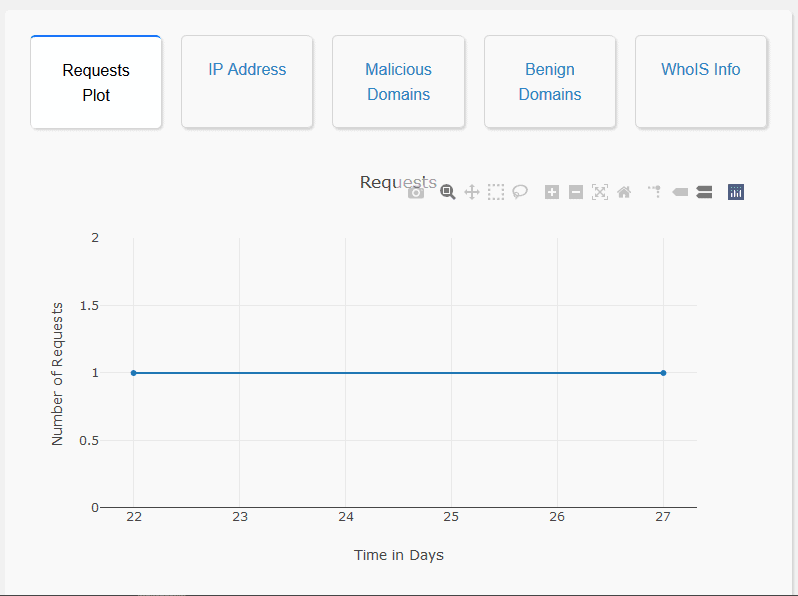
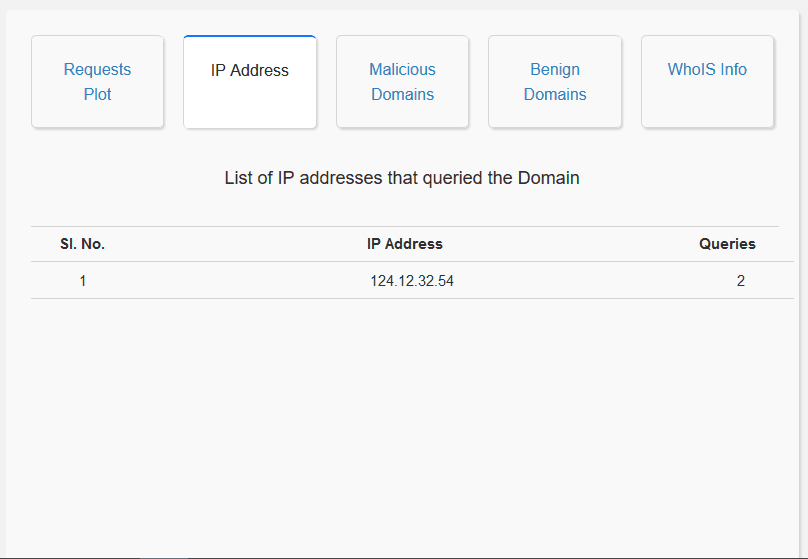
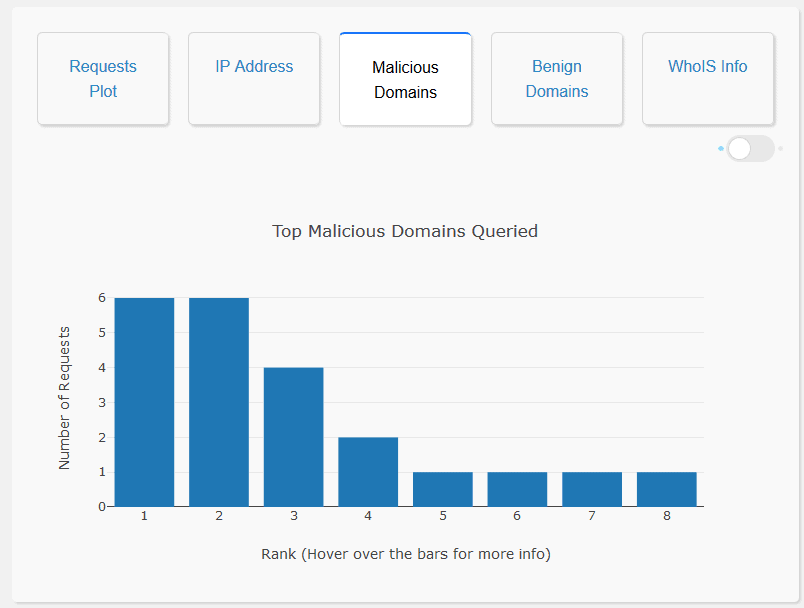
The Analysis tab contains the Historical Analysis feature.
The historical analysis feature allows the user to visualize the frequency at which domains have been queried and the IP addresses of the users querying those domains in the past. Moreover, it also helps in understanding the top queried domains by the users. In addition to that the feature also provides the information of the domains as stored in the WhoIS Database.
The historical analysis feature has the following use cases:
Domain Name Analysis: The user interface enables the user to search for a particular domain name along with a time range. The user interface then searches for that particular domain name in the Elasticsearch database. Once the domain name is found, the user interface will display the number of requests to that particular domain name in the user specified time range, the nature of the domain name (benign or malicious) and also the IP addresses that have queried that particular domain name. This allows for a domain-specific analysis.
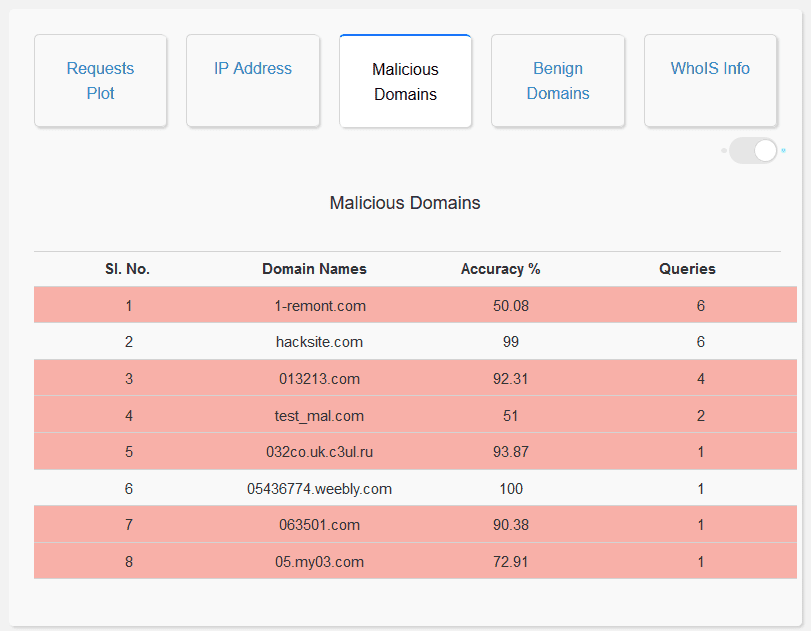
Analysis of Malicious Domain Names: The user interface enables the user to visualize the top 20 malicious domains queried, as a bar graph. It also displays a list of all the malicious domains queried which can be seen via a toggle switch at the top right in the same window. This allows the user to gain a general picture of all the malicious domain names queried and also helps in identifying model misclassification. Moreover, the domain names that the model is not confident about, are highlighted in red. On clicking the Malicious Domains Tab:
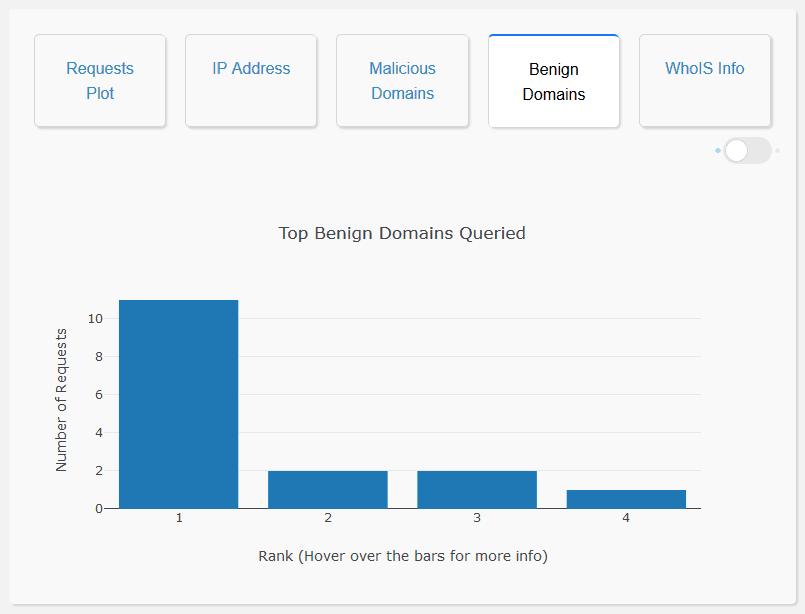
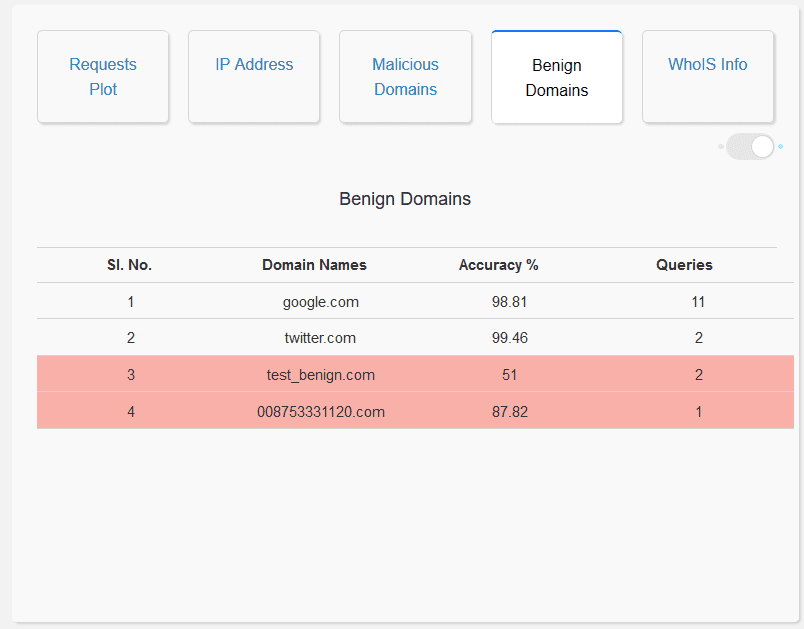
Analysis of Benign Domain Names: The user interface enables the user to visualize the top 20 benign domains queried, as a bar graph. It also displays a list of all the benign domains queried which can be seen via a toggle switch at the top right in the same window. This allows the user to gain a general picture of all the benign domain names queried and also helps in identifying model misclassification. Moreover, the domain names that the model is not confident about, are highlighted in red. On clicking the Benign Domains Tab:
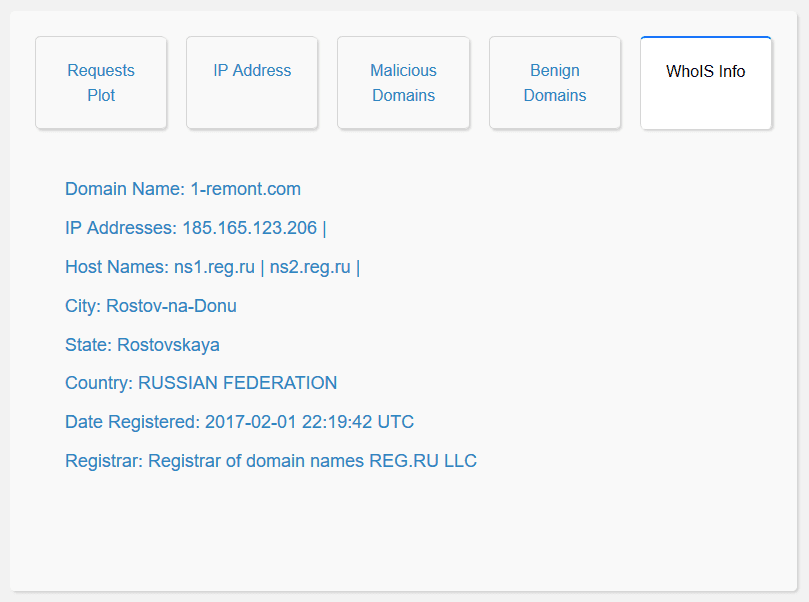
WhoIS Information: The user interface enables the user to access the WhoIS records of the domain name. This allows the user to understand more information regarding the request queried, thereby enabling the user to make a well-informed decision while vetting the domain names.
Google Summer of Code: Phase – II
After the historical analysis feature was completed, my mentors and I decided to add a new feature that would allow the user interface to be used to retrain older machine learning models as well as creating and training new machine learning models.
The main problem was that we had to find a way to dissociate the training from the User Interface as we did not want the User Interface to be unusable until the training was complete. Hence we decided to create an ML Bridge Machine Learning Module which would be another component that would communicate with the ML Bridge User Interface via Elasticsearch.
Moreover, we still had to create the manual vetting feature so that the user would be able to classify certain domains as malicious or benign. Hence the project goals for the phase were: developing the manual vetting feature, developing the ML Bridge Machine Learning Module as well as developing the frontend for the User Interface for the training feature.
Developing the Manual Vetting Tool
The manual vetting feature allows the user to manually vet domain names that the model has low confidence in, thereby creating a new dataset of malicious or benign domains. This dataset can be used for blocking or allowing domains and also for updating the dataset for retraining the model.
The demo of Manual Vetting can be seen below:
The user can decide whether to classify a non-vetted domain as a benign domain, or can be classified as a domain that is malicious or can be selected to send back Honeypot IP addresses to the malicious domain. To classify the domains into a different class, select all the domains whose class has to be changed by selecting them via the checkboxes on the left. Then select the class you want them to be identified as from the options on the right and then click submit.
The Machine Learning Module
The ML Bridge Machine Learning Module is a module developed to use the information provided by the user regarding training, via the User Interface, namely the number of epochs, the batch size as well as the sample size to train a new model or retrain the existing model. The module then communicates back to the User Interface the accuracy graph, the loss graph, the confusion matrices as well as confusion metrics via Elasticsearch.
However at that time, since the User Interface for the training feature had not been completed, we added dummy values to the Elasticsearch Database to test the efficacy of the Machine Learning Model and verify the responses.
Google Summer of Code: Phase – III
The final phase majorly consisted of creating unit tests for my code as well as creating documentation for all the work I had done. Moreover, due to the fact that my project involved a lot of components working together in tandem, my mentors advised me to create a website that would explain how all the components fit together. However, prior to that, I had to finish the training feature of the User Interface.
Incorporating the Training Feature into the ML Bridge User Interface
The ML Bridge User Interface can be used to train new machine learning models or retrain older machine learning models. Such a capability is extremely useful when the current model underperforms or there is new data to train the model on.
A demo of the Training can be seen below:
The user has the ability to enter the number of epochs, the batch size as well as the sample size for the model training. The loss as well as accuracy graphs of the training are updated in real time. Once the training is completed, the confusion matrices as well as confusion metrics can be observed to understand the efficacy of the model. The efficacy of older pre-trained models can also be observed by selecting the load model option and entering the name of a pre-trained model.
Unit Testing
I had little to no experience with Unit Testing. My mentors were kind enough to explain the process and also provided resources so that I’d fully understand the process. Once I had finished writing tests, I used the Travis CI and the Codecov tools to understand the potency of my test.
Creating The Code Documentation
I had already added docstrings to most of the code I had written. The Pdoc tool was to convert the docstrings into an HTML format that is easily understood by all.
Creating The Website
Due to the fact that we did not have a lot of time to create a website from scratch, my mentors and I decided to create a website via GitHub Pages. The Jekyll engine (the engine behind GitHub Pages) would convert the Readme file into a static website, with little to no modifications to the HTML and CSS files.
The website can be accessed at https://mlbridge.github.io.
The End of a Beautiful Journey…
At the end of my Google Summer of Code journey I had mixed feelings. On one hand I was delighted that I had learnt so much and grown a lot over the summer, on the other hand a part of me was sad that the journey had finally ended. It made me cherish the GSoC experience even more. What next you may ask. Well I’m not sure. I’d like to pick up a few new skills that I always wanted and explore some other interesting open-source projects. As Tolkien once said, All that is gold does not glitter, Not all those who wander are lost.
Acknowledgements
I would like to thank my mentors Paul Greenberg and Yong Tang for their continuous support and guidance throughout this amazing Google Summer of Code journey. They always ensured that all my doubts were cleared, helped me in identifying relevant issues and finding solutions for those problems, through extensive discussions. This journey would not have been possible without them. I would like to thank my friend Dheeraj who helped me design the ML Bridge logo. I would like to thank all the essential workers who are working tirelessly throughout this COVID-19 crisis. I would also like to thank Cloud Native Foundation (CNCF) as well as Google for providing me with this wonderful opportunity. I hope that both CNCF as well as Google through their respective student developer programs, continue to inspire many more developers for years to come and hope that their journey will be as memorable as mine 😄.