


Guest post originally published on the Kublr blog by Oleg Chunikhin
Leveraging Client Certificates and Bearer Tokens to Authenticate in Kubernetes
In part one of this series on Kubernetes RBAC, we introduced authentication and authorization methods. In this article, we’ll dive a little deeper into authentication — a prerequisite for RBAC.
As we saw, there are a few authentication methods including client certificates, bearer tokens, HTTP basic auth, auth proxy, and impersonation. Because HTTP basic auth and statically configured bearer tokens are considered insecure, we won’t cover them here. Instead, we’ll focus on the authentication mechanisms that are viable options for production deployments.
Client certificates
When authenticating through client certificates, the client must first obtain a valid x509 client certificate which the Kubernetes API server will accept as authentication. This usually means that the client certificate must be signed by the cluster CA certificate.
Externally Signed Certificates
The client certificate can be signed by the Kubernetes API server itself, or externally by an administrator or an enterprise PKI. Let’s first look how the certificate is signed externally, outside the Kubernetes API server.
- The client (user) generates a CSR (certificate signing request) using a personal private key
- The client (user) sends the CSR to the signing authority (an administrator or an enterprise PKI)
- The signing authority signs a client certificate based on the CSR and the Kubernetes API server CA private key
- The signing authority sends the signed certificate to the client
- The client can now use the client certificate with the private key to authenticate the API server requests
There is a drawback, however. The server CA private key will be exposed to an external system or administrator. While that may be acceptable with an enterprise PKI, it likely isn’t with manual certificate signatures.
Here is a sequence of signing certificate commands:
User: generate user private key (if not exist):
openssl genrsa -out user1.key 2048
User: generate user CSR:
openssl req -new -key user1.key -out user1.csr -subj "/CN=user1/O=group1/O=group2"
Admin: sign user client cert:
openssl x509 -req -in user1.csr -CA cluster-ca.crt -CAkey cluster-ca.key \
    -set_serial 101 -extensions client -days 365 -outform PEM -out user1.crt
User: use with kubectl via options or kubeconfig:
kubectl --client-key=user1.key --client-certificate=user1.crt get nodes

kubectl config set-credentials user1 --client-key user1.key --client-certificate user1.crt --embed-certs
kubectl config set-context user1 --cluster demo-rbac --user user1
kubectl --context=user1 get nodes

kubectl config use-context user1
kubectl config get-contexts
kubectl get nodes
Internally Signed Certificates
Alternatively, you can use client certificate authentication directly from the cluster. As a client, you can create certificate signature requests. In this case, the system administrator or external system does not sign it. Instead, it sends it to the Kubernetes cluster which will sign the certificate and return it to the administrator who can now extract the signed certificate from the Kubernetes API and send it back to the client. This is done with a special object in the Kubernetes API called CertificateSigningRequest.
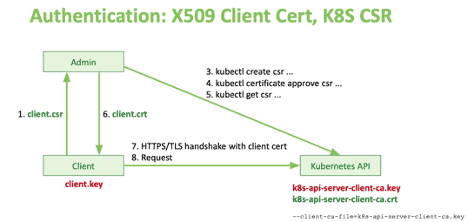
Authentication: X509 Client Cert, Kubernetes CSR
Here is a sequence of commands:
User: generate user privat key (if not exist):
openssl genrsa -out user2.key 2048
User: generate user CSR:
openssl req -new -key user2.key -out user2.csr -subj "/CN=user2/O=group1/O=group2"
Admin: use Kubernetes API server to sign the CSR:
kubectl apply -f - <<EOF
apiVersion: certificates.k8s.io/v1beta1
kind: CertificateSigningRequest
metadata:
  name: user2
spec:
  request: $(cat user2.csr | base64 | tr -d '\n')
  usages: ['digital signature', 'key encipherment',
    'client auth']
EOF
Admin (approver): approve or deny the CSR in the Kubernetes API:
kubectl certificate approve user2
kubectl certificate deny user2
Admin: extract the approved and signed certificate from the Kubernetes API:
kubectl get csr user2 -o jsonpath='{.status.certificate}' | \
base64 --decode > user2.crt
User: use with kubectl via options or kubeconfig:
kubectl --client-key=user2.key --client-certificate=user2.crt get nodes

kubectl config set-credentials user2 --client-key user2.key --client-certificate user2.crt --embed-certs
kubectl config set-context user2 --cluster demo-rbac --user user2
Bearer Tokens
Service Account
Instead of client certificates, you can also use bearer tokens to authenticate subjects in Kubernetes. The easiest way to get a token is by creating a service account in the Kubernetes API. The Kubernetes server will then automatically issue a token associated with the service account, and anyone using that token will be identified as using this service account to access the cluster.

Authentication: Service Account
Here is a sequence of commands you can use to create a service account, get a token from it and use that token to access Kubernetes API:
Create service account:
kubectl create serviceaccount sa1
Get service account token:
kubectl get -o yaml sa sa1
SA_SECRET="$(kubectl get sa sa1 -o jsonpath='{.secrets[0].name}')"

kubectl get -o yaml secret "${SA_SECRET}"
SA_TOKEN="$(kubectl get secret "${SA_SECRET}" -o jsonpath='{.data.token}' | base64 -d)"
Send request:
kubectl "--token=${SA_TOKEN}" get nodes

kubectl config set-credentials sa1 "--token=${SA_TOKEN}"
kubectl config set-context sa1 --cluster demo-rbac --user sa1
Side note:
Please note that generally, when working with kubectl, you won’t specify secrets and credentials via command line instead you will use a kubectl configuration file. You can modify that configuration file using kubectl commands. This allows you to add the token into your kube config file as an additional set of credentials and use it via a new context in the kubeconfig file. Learn more about using kubeconfig files to organize access to different clusters with multiple sets of credentials in the Kubernetes documentation on this subject.
Using a kubeconfig file allows you to run kubectl without specifying any sensitive information in the command line while relying on the current context set within that config file.
Note that you can always operate with your config file using various command-line options.
OIDC Token
Alternatively, you can leverage an external identity provider like OIDC to authenticate through a token. At Kublr, we use Keycloak. We love this identity provider as it’s a powerful, scalable open source tool, supporting all modern standards like SAML, OIDC, XACML, etc. It also integrates with most identity management systems. Kublr uses it by default as a user management system for Kublr and managed Kubernetes clusters, but it can also serve as an identity broker when integrated with enterprise identity management tools, or even used as an identity manager for user applications via its powerful “realms.” Realms are a completely separate domain for users, groups, authentication, federation, etc.
How does authentication with OIDC work?
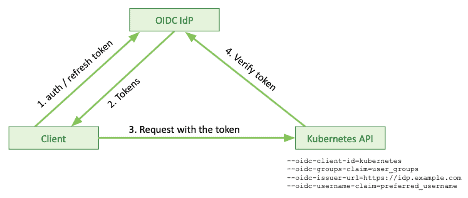
First, your Kubernetes API server must be configured to talk to an OIDC endpoint / OIDC provider. This is done via Kubernetes API server configuration parameters. The following snippet shows additions in the Kublr cluster specification necessary to setup the Kubernetes API server:
spec:
  master:
    kublrAgentConfig:
      kublr:
        kube_api_server_flag:
          oidc_client_id: '--oidc-client-id=kubernetes'
          oidc_groups_claim: '--oidc-groups-claim=user_groups'
          oidc_issuer_url: '--oidc-issuer-url=https://***'
          oidc_username_claim: '--oidc-username-claim=preferred_username'
When a client connects to a Kubernetes API, it talks to an identity provider using one of the flows defined in OIDC protocol to get an authentication access and refresh token. The identity provider sends the tokens back for the client to authenticate with the Kubernetes API.
The Kubernetes API server talks directly with the OIDC identity provider via OIDC API to verify if the client provided token is valid. The token provides all information needed for the Kubernetes API server to identify the client. The client, on the other hand, can also refresh that token using a “refresh token.”

Authentication: OIDC
Let’s see how this looks in a command-line world. We will use cURL to talk to the identity provider and kubectl to talk to the Kubernetes server. Although in real-life scenarios in most cases this will be hidden under the hood of the framework or client library of your choice.
Login request from the client with visualization of the response:
curl \
  -d "grant_type=password" \
  -d "scope=openid" \
  -d "client_id=kubernetes" \
  -d "client_secret=${CLIENT_SECRET}" \
  -d "username=da-admin" \
  -d "password=${USER_PASSWORD}" \
  https://kcp.kublr-demo.com/auth/realms/demo-app/protocol/openid-connect/token | jq .
Login – the same request but with response tokens saved in environment variables for use in the followup commands:
eval "$(curl -d "grant_type=refresh_token" -d "client_id=kubernetes" \
  -d "client_secret=${CLIENT_SECRET}" -d "refresh_token=${REFRESH_TOKEN}" \
  https://kcp.kublr-demo.com/auth/realms/demo-app/protocol/openid-connect/token | \
  jq -r '"REFRESH_TOKEN="+.refresh_token,"TOKEN="+.access_token,"ID_TOKEN="+.id_token')" ; \
  echo ; echo "TOKEN=${TOKEN}" ; echo ; echo "ID_TOKEN=${ID_TOKEN}" ; echo ; \
  echo "REFRESH_TOKEN=${REFRESH_TOKEN}"
Refresh token request with visualized response:
curl \
  -d "grant_type=refresh_token" \
  -d "client_id=kubernetes" \
  -d "client_secret=${CLIENT_SECRET}" \
  -d "refresh_token=${REFRESH_TOKEN}" \
  https://kcp.kublr-demo.com/auth/realms/demo-app/protocol/openid-connect/token | jq -r .
Refresh – the same request with response tokens saved in the environment variables:
eval "$(curl -d "grant_type=refresh_token" -d "client_id=kubernetes" \
-d "client_secret=${CLIENT_SECRET}" -d "refresh_token=${REFRESH_TOKEN}" \
https://kcp.kublr-demo.com/auth/realms/demo-app/protocol/openid-connect/token | \
jq -r '"REFRESH_TOKEN="+.refresh_token,"TOKEN="+.access_token,"ID_TOKEN="+.id_token')" ; \
echo ; echo "TOKEN=${TOKEN}" ; echo ; echo "ID_TOKEN=${ID_TOKEN}" ; echo ; \
echo "REFRESH_TOKEN=${REFRESH_TOKEN}"
Token introspection request:
curl \
  --user "kubernetes:${CLIENT_SECRET}" \
  -d "token=${TOKEN}" \
  https://kcp.kublr-demo.com/auth/realms/demo-app/protocol/openid-connect/token/introspect | jq .
kubectl kubeconfig configuration and request:
kubectl config set-credentials da-admin \
   "--auth-provider=oidc" \
   "--auth-provider-arg=idp-issuer-url=https://kcp.kublr-demo.com/auth/realms/demo-app" \
   "--auth-provider-arg=client-id=kubernetes" \
   "--auth-provider-arg=client-secret=${CLIENT_SECRET}" \
   "--auth-provider-arg=refresh-token=${REFRESH_TOKEN}" \
   "--auth-provider-arg=id-token=${ID_TOKEN}"

kubectl config set-context da-admin --cluster=demo-rbac --user=da-admin

kubectl --context=da-admin get nodes
Access tokens are usually short-lived, while the refresh tokens have a longer shelf life. You can refresh tokens through the command line sending the ID and refresh token to the identity provider, providing you a set of refreshed tokens.
You can also introspect the token with an identity provider endpoint. That’s essentially an API the Kubernetes API server can use to check who is sending a specific request.
As mentioned above, there are two more ways to provide access to a Kubernetes cluster. One is using an auth proxy, mainly used by vendors to set up different Kubernetes architectures. It assumes that you start a proxy server, which is responsible for authenticating user requests and forwarding them to the Kubernetes API. That proxy can authenticate users and clients anyway it likes and will add user identifications into the request headers for requests that are sent to the Kubernetes API.

Authentication: Authenticating Proxy
This allows the Kubernetes API to know who they work with. Kublr, for example, uses this authentication method to proxy dashboard requests, web console requests, and provide a proxy Kubernetes API endpoint.
Lastly, there is authentication through impersonation. If you already have certain credentials providing access to the Kubernetes API, those credentials can be used to “impersonate” users through authorization rules. This will allow the user to send impersonation headers so the Kubernetes API will switch your authentication context to that impersonated user.
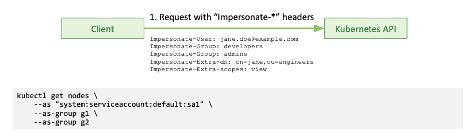
Authentication: Impersonation
For regular clients and for production purposes, you only really have two options: client certificates or bearer tokens.
Roll up your sleeves
If you want to get your hands dirty, there are some tools you can use to analyze and debug apps connected to a Kubernetes API. cURL is great for experiments with REST APIs. Then, of course, there is kubectl — the Kubernetes CLI. jq command-line JSON processor helps visualize and process JSON data. JSON and YAML, as you may know, are commonly used file formats for Kubernetes and the Kubernetes API.
cURL
Here is an example of using cURL in linux to call Kubernetes API:
curl -k -v -XGET -H 'Authorization: Bearer ***' \
  'https://52.44.121.181:443/api/v1/nodes?limit=50' | jq -C . | less -R
- “-k” switch disables checking the server certificate
- “-v” enables verbose output
- “-H ‘Authorization: …’ ” adds a token authorization header
- Sending curl output through “jq -C” command formats and colorizes server JSON output
- “less -R” allows you to scroll up and down the output
kubectl
Examples of using kubectl:
kubectl --kubeconfig=kc.yaml get nodes

export KUBECONFIG="$(pwd)/config.yaml"
kubectl get nodes

kubectl get nodes --v=9
- “
--kubeconfig” option allows you to specify the location of the kubeconfig file containing information and credentials necessary to locate and authenticate with a Kubernetes API server. - “KUBECONFIG” environment variable can be used to specify a default kubeconfig file location
- If neither “
--kubeconfig” option nor “KUBECONFIG” environment variable are specified, kubectl will look for a kubeconfig file at a default location “$HOME/.kube/config”
Example of a kubeconfig file:
apiVersion: v1
kind: Config
clusters:
- name: demo-rbac
  cluster:
    certificate-authority-data: ***
    server: https://52.44.121.181:443
users:
- name: demo-rbac-admin-token
  user:
    token: ***
contexts:
- name: demo-rbac
  context:
    cluster: demo-rbac
    user: demo-rbac-admin-token
current-context: demo-rbac
Conclusion
Authentication in Kubernetes can be handled in different ways. For production-grade deployments you have some options. You can use client certificates that can be either signed externally or by Kubernetes through the Kubernetes API. Alternatively, you can use a bearer token in Kubernetes by creating a service account or leverage an external identity provider like OIDC. These are all valid approaches. Which route you’ll go will be ultimately determined by your system and application architecture and requirements.
If you’d like to experiment with RBAC, download Kublr and play around with its RBAC feature. The intuitive UI helps speed up the steep learning curve when dealing with complexities of Kubernetes deployment and RBAC YAML files.