
Originally published on Magalix Blog by Mohamed Ahmed
What is Kubernetes Scheduling?
If you’ve read any Kubernetes documentation, books, or articles you’ve undoubtedly seen the word “schedule” in phrases like “the Pod gets scheduled to the next available node” for example. Kubernetes Scheduling involves mush more than just placing a pod on a node. In this article, we discuss the different mechanisms that Kubernetes follows when it needs to deal with a new pod, and the components entailed in the process.
What happens when you create a Pod on a Kubernetes Cluster?
In a matter of seconds, the Pod is up and running on one of the cluster nodes. However, a lot has happened within those seconds. Let’s see:
- While scanning the API server (which it is continuously doing), the Kubernetes Scheduler detects that there is a new Pod without a nodeName parameter. The nodeName is what shows which node should be owning this Pod.
- The Scheduler selects a suitable node for this Pod and updates the Pod definition with the node name (though the nodeName parameter).
- The kubelet on the chosen node is notified that there is a pod that is pending execution.
- The kubelet executes the Pod, and the latter starts running on the node.
How Kubernetes selects the right node?
Perhaps the hardest part of the above steps is when the Scheduler decides which node it should select for running the pod. Indeed, this part takes the most work as there are several algorithms that the Scheduler must use to make this decision. Some of those algorithms depend on user-supplied options, while Kubernetes itself calculates others. They can be explained like a set of questions that the Scheduler asks the node to decide it.
Do you have what it takes to run this pod (predicate)?
A node may be overloaded with so many busy pods consuming most of its CPU and memory. So, when the scheduler has a Pod to deploy, it determines whether or not the node has the necessary resources. If a Pod was deployed to a node that does not have enough memory (for example) that the Pod is requesting, the hosted application might behave unexpectedly or even crash.
Sometimes, the user needs to make this decision on behalf of Kubernetes. Let’s say that you’ve recently purchased a couple of machines equipped with SSD disks, and you want to use them explicitly for the MongoDB part of the application. To do this, you select the nodes through the node labels in the pod definition. When a node does not match the provided label, it is not chosen for deploying the Pod.
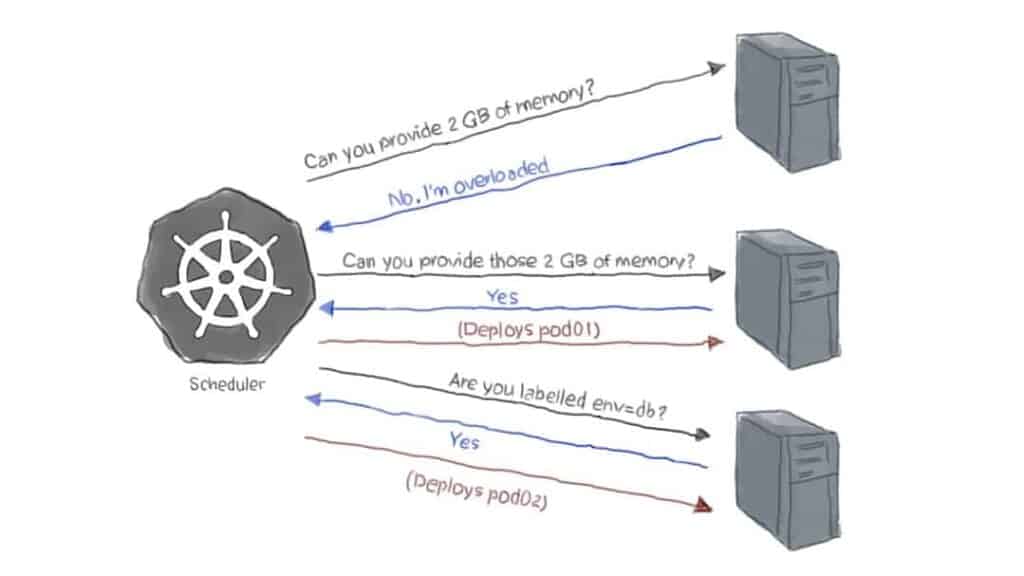
As demonstrated in the above graph, the predicate decision resolves to either True (yes, deploy the pod on that node) or False (no, don’t deploy on that one).
Are you a better candidate for having this pod (priorities)?
In addition to true/false decisions a.k.a predicates, the scheduler executes some calculations (or functions) to determine which node is more suited to be hosting the pod in question.
For example, a node where the pod image is already present (like it’s been pulled before in a previous deployment) has a better chance of having the pod scheduled to it because no time will be wasted downloading the image again.
Another example is when the scheduler favors a node that does not include other pods of the same Service. This algorithm helps spread the Service pods on multiple nodes as much as possible so that one node failure does not cause the entire Service to go down. Such a decision-making method is called the spreading function.
Several decisions, like the above examples, are grouped, and weight is calculated for each node based on the final decision. The node with the highest priority wins the pod deployment.
The final decision
You may be asking, if there are so many factors that the Kubernetes Scheduler must consider before selecting a node for deploying the pod, how does it get to choose the right one?
- Well, the decision process is done as follows:
- The scheduler determines all the nodes that it knows they exist and are healthy.
- The scheduler runs the predicate tests to filter out nodes that are not suitable. The rest of the nodes form a group of possible nodes.
- The scheduler runs priority tests against the possible nodes. Candidates are ordered by their score with the highest ones on the top. At this point, the highest-scoring possible node gets chosen. But sometimes there may be more than one node with the same score.
- If nodes have the same score, they are moved to the final list. The Kubernetes Scheduler selects the winning node in a round-robin fashion to ensure that it equally spreads the load among the machines.
What if that was not the best decision?
In busy Kubernetes Clusters, the time between the Scheduler choosing the right node and the kubelet on that node executing the pod may be sufficient for changes to occur on the nodes. Even if that time is no more than a few milliseconds, a pod may get terminated on one of the nodes that were filtered out due to insufficient memory. That node could’ve had a higher score on the priority test only if it wasn’t overloaded back then. But now, perhaps a less-suitable node was selected for the pod.
Some projects aim at addressing this situation like the Kubernetes Descheduler Project. In this application, the pod is automatically evicted from the node if another node proved to be a better choice for pod-scheduling. The pod is returned to the schedule to deploy it again to the right node.
Perhaps a more difficult situation could occur when the opposite scenario happens. Let’s say that a node was tested against whether or not it could provide 2 GB of memory. At the time the Scheduler was doing the predicate check, the node did have some spare RAM. However, while kubelet is executing the pod against the node, a DaemonSet was deployed to the same node. This DaemonSet entailed some resource-heavy operation that consumed the remaining 2 GB. Now, when the pod tries to run, and since it is missing the amount of memory it requires to function correctly, it fails. If this pod was deployed using just a pod definition, then the application that it runs on would fail to start, and Kubernetes could do nothing about it. However, if this pod was part of a pod controller like a Deployment or a ReplicaSet, then once it fails, the controller will detect that there is a smaller number of replicas than it should be handling. Accordingly, the controller will request another pod to be scheduled. The Scheduler will run all the checks again and schedules the pod to a different node. This is one of the reasons why it is always advised to use a higher-level object like Deployments when creating pods.
User-defined decision-making
Earlier in this article, we mentioned that a user could simply choose to run a pod on a specific node using the.spec.nodeSelector parameter in the Pod definition or template. The
nodeSelector selects nodes that have specific one or more labels. However, sometimes, user
requirements get more complicated. A nodeSelector, for example, selects nodes that have all the labels defined in the parameter. What if you want to make a more flexible selection?
Node Affinity
Let’s consider our earlier example when we wanted to schedule our pod to run on the machines with the SSD disks. Let’s say that we want them also to use the eight-cored hosts. Node affinity allows for flexible decisions like this. The following pod template chooses nodes that have labels of feature=ssd or feature=eight-cores:
apiVersion: v1
kind: Pod
metadata:
 name: mongo
spec:
 affinity:
   nodeAffinity:
     requiredDuringSchedulingIgnoredDuringExecution:
       nodeSelectorTerms:
       - matchExpressions:
         - key: feature
           operator: In
           values:
           - ssd
           - eight-cores
 containers:
 - name: mongodb
   image: mogo
The requiredDuringSchedulingIgnoredDuringExecution option
There’s a new option here: requiredDuringSchedulingIgnoredDuringExecution. It’s is easier than it looks. It means that we need to run those pods only on nodes labeled feature=ssd or feature=eight-cores. We don’t want the scheduler to make decisions outside of this set of nodes. This is the same behavior as the nodeSelector but with a more expressive syntax.
The preferredDuringSchedulingIgnoredDuringExecution option
Let’s say that we’re interested in running the pod on our selected nodes. But, since launching the pod is of an absolute priority, we demand to run it even if the selected nodes are not available. In this case, we can use the preferredDuringSchedulingIgnoredDuringExecution option. This option will try to run the pod on the nodes specified by the selector. But if those nodes are not available (failed the tests), the Scheduler will try to run the pod on the next best node.
The Node Anti-Affinity
Some scenarios require that you don’t use one or more nodes except for particular pods. Think of the nodes that host your monitoring application. Those nodes shouldn’t have many resources due to the nature of their role. Thus, if other pods than those which have the monitoring app are scheduled to those nodes, they hurt monitoring and also degrades the application they are hosting. In such a case, you need to use node anti-affinity to keep pods away from a set of nodes. The following is the previous pod definition with anti-affinity added:
apiVersion: v1
kind: Pod
metadata:
 name: mongo
spec:
 affinity:
   nodeAffinity:
     requiredDuringSchedulingIgnoredDuringExecution:
       nodeSelectorTerms:
       - matchExpressions:
         - key: feature
           operator: In
           values:
           - ssd
           - eight-cores
         - key: role
           operator: NotIn
           values:
           - monitoring

 containers:
 - name: mongodb
   image: mogo
Adding another key to the matchExpressions with the operator NotIn will avoid scheduling the mongo pods on any node labelled role=monitoring.
Learn how to continuously optimize your k8s cluster
Nodes taints and tolerations
While nodes anti-affinity patterns allow you to prevent pods from running on specific nodes, they suffer from a drawback: the pod definition must explicitly declare that it shouldn’t run on those nodes. So, what if a new member joins the development team, writes a Deployment for her application, but forgets to exclude the monitoring nodes from the target nodes? Kubernetes administrators need a way to repel pods from nodes without having to modify every pod definition. That’s the role of taints and tolerations.
When you taint a node, it is automatically excluded from pod scheduling. When the schedule runs the predicate tests on a tainted node, they’ll fail unless the pod has toleration for that node. For example, let’s taint the monitoring node, mon01:
kubectl taint nodes mon01 role=monitoring:NoScheduleNow, for a pod to run on this node, it must have a toleration for it. For example, the following .spec.toleration:
tolerations:
- key: "role"
  operator: "Equal"
  value: "monitoring"
  effect: "NoSchedule"
matches the key, value, and effect of the taint on mon01. This means that mon01 will pass the predicate test when the Scheduler decides whether or not it can use it for deploying this pod.
An important thing to notice, though, is that tolerations may enable a tainted node to accept a pod but it does not guarantee that this pod runs on that specific node. In other words, the tainted node mon01 will be considered as one of the candidates for running our pod. However, if another node has a higher priority score, it will be chosen instead. For situations like this, you need to combine the toleration with nodeSelector or node affinity parameters.
TL;DR
- The Kubernetes Scheduler is the component in charge of determining which node is most suitable for running pods.
- It does that using two main decision-making processes:
- Predicates: which are a set of tests, each of them qualifies to true or false. A node that fails the predicate is excluded from the process.
- Priorities: where each node is tested against some functions that give it a score. The node with the highest score is chosen for pod deployment.
- The Kubernetes Scheduler also honors user-defined factors that affect its decision:
- Node Selector: the .spec.nodeSelector parameter in the pod definition narrows down node selection to those having the labels defined in the nodeSelector.
- Node affinity and anti-affinity: those are used for greater flexibility in node selection as they allow for more expressive selection criteria. Node affinity can be used to guarantee that only the matching nodes are used or only to set a preference.
- Taints and tolerations work in the same manner as node affinity. However, their default action is to repel pods from the tainted nodes unless the pods have the necessary tolerations (which are just a key, a value, and an effect). Tolerations are often combined with node affinity or node selector parameters to guarantee that only the matched nodes are used for pod scheduling.