
By Connor Gilbert, product manager at StackRox
Last month, the Kubernetes ecosystem was shaken by the discovery of the first major security flaw in Kubernetes, the world’s most popular container orchestrator. The vulnerability – CVE-2018-1002105 – enables attackers to compromise clusters via the Kubernetes API server, allowing them run code to perform malicious activity such as installing malware, etc.
Earlier this year, Tesla suffered a complex cryptocurrency mining malware infection caused by a misconfiguration in the Kubernetes console. The attackers exploited the fact that the particular Kubernetes console wasn’t password protected, allowing them to access one of the pods that included access credentials for Tesla’s larger AWS environment.
As organizations accelerate their adoption of containers and container orchestrators, they will need to take necessary steps to protect such a critical part of their compute infrastructure. To help in this endeavor, check out these nine Kubernetes security best practices, based on customer input, you should follow to help protect your infrastructure.
- Upgrade to the latest version
New security features — and not just bug fixes — are added in every quarterly update, and to take advantage of them, we recommend you run the latest stable version. The very best thing to do is to run the latest release with its most recent patches, especially in light of the discovery of CVE-2018-1002105. Upgrades and support can become more difficult the farther behind you fall, so plan to upgrade at least once per quarter. Using a managed Kubernetes provider can make upgrades very easy.
- Enable Role-Based Access Control (RBAC)
Control who can access the Kubernetes API and what permissions they have with Role- Based Access Control (RBAC). RBAC is usually enabled by default in Kubernetes 1.6 and beyond (later for some managed providers), but if you have upgraded since then and haven’t changed your configuration, you’ll want to double-check your settings. Because of the way Kubernetes authorization controllers are combined, you must both enable RBAC and disable legacy Attribute-Based Access Control (ABAC).
Once RBAC is being enforced, you still need to use it effectively. Cluster-wide permissions should generally be avoided in favor of namespace-specific permissions. Avoid giving anyone cluster admin privileges, even for debugging — it is much more secure to grant access only as needed on a case-by-case basis.
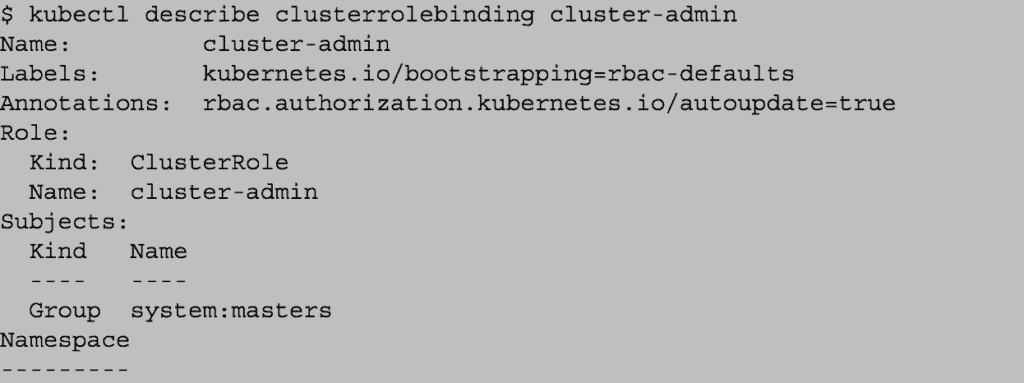
You can explore the cluster roles and roles using `kubectl get clusterrolebinding` or `kubectl get rolebinding –all-namespaces`. Quickly check who is granted the special “cluster-admin” role; in this example, it’s just the “masters” group:
If your application needs access to the Kubernetes API, create service accounts individually and give them the smallest set of permissions needed at each use site. This is better than granting overly broad permissions to the default account for a namespace.
Most applications don’t need to access the API at all; `automountServiceAccountToken` can be set to “false” for these.
- Use namespaces to establish security boundaries
Creating separate namespaces is an important first level of isolation between components. We find it’s much easier to apply security controls such as Network Policies when different types of workloads are deployed in separate namespaces.
Is your team using namespaces effectively? Find out now by checking for any non-default namespaces:

- Separate sensitive workloads
To limit the potential impact of a compromise, it’s best to run sensitive workloads on a dedicated set of machines. This approach reduces the risk of a sensitive application being accessed through a less-secure application that shares a container runtime or host. For example, a compromised node’s kubelet credentials can usually access the contents of secrets only if they are mounted into pods scheduled on that node — if important secrets are scheduled onto many nodes throughout the cluster, an adversary will have more opportunities to steal them.
You can achieve this separation using node pools (in the cloud or on-premises) and Kubernetes namespaces, taints, tolerations, and other controls.

- Secure cloud metadata access
Sensitive metadata, such as kubelet admin credentials, can sometimes be stolen or misused to escalate privileges in a cluster. For example, a recent Shopify bug bounty disclosure detailed how a user was able to escalate privileges by confusing a microservice into leaking information from the cloud provider’s metadata service. GKE’s metadata concealment feature changes the cluster deployment mechanism to avoid this exposure, and we recommend using it until it is replaced with a permanent solution. Similar countermeasures may be needed in other environments.
- Create and define cluster network policies
Network Policies allow you to control network access into and out of your containerized applications. To use them, you‘ll need to make sure that you have a networking provider that supports this resource; with some managed Kubernetes providers such as Google Kubernetes Engine (GKE), you‘ll need to opt in. (Enabling network policies in GKE will require a brief rolling upgrade if your cluster already exists.) Once that’s in place, start with some basic default network policies, such as blocking traffic from other namespaces by default.
If you are running in Google Container Engine, you can check whether your clusters are running with policy support enabled:

- Run a cluster-wide Pod Security Policy
A Pod Security Policy sets defaults for how workloads are allowed to run in your cluster. Consider defining a policy and enabling the Pod Security Policy admission controller — instructions vary depending on your cloud provider or deployment model. As a start, you could require that deployments drop the NET_RAW capability to defeat certain classes of network spoofing attacks.
- Harden node security
You can follow these three steps to improve the security posture on your nodes:
- Ensure the host is secure and configured correctly. One way to do so is to check your configuration against CIS Benchmarks; many products feature an autochecker that will assess conformance with these standards automatically.
- Control network access to sensitive ports. Make sure that your network blocks access to ports used by kubelet, including 10250 and 10255. Consider limiting access to the Kubernetes API server except from trusted networks. Malicious users have abused access to these ports to run cryptocurrency miners in clusters that are not configured to require authentication and authorization on the kubelet API server.
- Minimize administrative access to Kubernetes nodes. Access to the nodes in your cluster should generally be restricted — debugging and other tasks can usually be handled without direct access to the node.
- Turn on audit logging
Make sure you have audit logs enabled and are monitoring them for anomalous or unwanted API calls, especially any authorization failures — these log entries will have a status message “Forbidden.” Authorization failures could mean that an attacker is trying to abuse stolen credentials. Managed Kubernetes providers, including GKE, provide access to this data in their cloud console and may allow you to set up alerts on authorization failures.
Looking ahead
Follow these recommendations for a more secure Kubernetes cluster. Remember, even after you follow these tips to configure your Kubernetes cluster securely, you will still need to build security into other aspects of your container configurations and their runtime operations. As you improve the security of your tech stack, look for tools that provide a central point of governance for your container deployments and deliver continuous monitoring and protection for your containers and cloud-native applications.
To learn more about how Kubernetes changes the application security paradigm and how to leverage some of the most important built-in Kubernetes security capabilities, check out my colleague’s blog post Kubernetes security 101 here.