Project post originally published on the Flux Blog by Priyanka Ravi and Daniel Holbach
This is the first blog post in a series where we want to shine a light on projects in the Flux Ecosystem. This time it’s going to be the Terraform Controller.
If you use Terraform, you might think of it as “Infrastructure as Code” and to be separate from the concept of GitOps. Quite often we have seen debates about “Infrastructure as Code vs. GitOps”. The Terraform Controller reconciles these two worlds and lets you take advantage of the benefits of GitOps for existing Terraform resources: one source of truth, one single pane of glass and drift detection among them.
You might have resorted to using pipelines or manual deployments up until now. In this blog post we are going to show how to have your Terraform resources managed the GitOps way. Without having to convert your code at all!
What is the Terraform Controller?
The Terraform Controller is a Flux controller that can manage your Terraform resources. Although Flux runs on Kubernetes, whatever you are using Terraform for, the Flux controller can manage it. It has several features including the ability to do manual approvals or auto-approve Terraform plans, and the Terraform outputs can be set as a Kubernetes secret. It is also integrated with Terraform Cloud and Terraform Enterprise.
The benefits of using the Terraform Controller is that you are able to take advantage of GitOps for existing Terraform resources. There is drift detection of Terraform resources and it can be used as a glue for Terraform resources and Kubernetes workloads.
Terraform Controller is very versatile because it offers different modes of operation and many features which give you the integration points and control you need. Primarily it supports these use-cases:
- GitOps Automation Model: Here you GitOps your Terraform resources from the provision steps to the enforcement steps, like for example a whole EKS cluster.
- Hybrid GitOps Automation Model: Here you GitOps parts of your existing infrastructure resources. For example, you have an existing EKS cluster. You can choose to GitOps only its nodegroup, or its security group.
Building on this, you can make use of these features if you have a TFSTATE file:
- State Enforcement: Use GitOps to enforce it, without changing anything else.
- Drift Detection: Use GitOps just for drift detection, so you can decide to do things later when a drift occurs.
And there’s more: Multi-Tenancy, Plan and Manual Approve and more features on the roadmap.
Now let’s move on to how to integrate it practically!
GitOpsing your Terraform
Prerequisites
Obviously you will need a Kubernetes cluster and Flux installed. Terraform Controller will require at least Flux 0.32, which in turn needs at least Kubernetes version 1.20.6. Either use flux install or flux bootstrap as explained in the Flux documentation.
Installation
Now you need to install Terraform Controller. There are many ways to do it, check out the installation docs for more information.
One very easy way to do it is to add this HelmRelease to your bootstrap repository.
Tying in your Terraform resources
And here is where all the beauty of Terraform Controller comes in – it does all the hard work for you. All you will need to do to is
- Define the source of your Terraform resources
- Enable GitOps Automation
Define source
So let’s go ahead, here we define a Source controller’s source (you can pick any of GitRepository, Bucket, OCIRepository). A GitRepository entry could look like this:
apiVersion: source.toolkit.fluxcd.io/v1beta1
kind: GitRepository
metadata:
  name: helloworld
  namespace: flux-system
spec:
  interval: 30s
  url: https://github.com/tf-controller/helloworld
  ref:
    branch: main
The GitOps Automation mode
The GitOps automation mode could be enabled by setting .spec.approvePlan=auto. In this mode, Terraform resources will be planned, and automatically applied for you. Here is a simple example you can just copy and paste.
apiVersion: infra.contrib.fluxcd.io/v1alpha1
kind: Terraform
metadata:
  name: helloworld
  namespace: flux-system
spec:
  interval: 1m
  approvePlan: "auto"
  path: ./
  sourceRef:
    kind: GitRepository
    name: helloworld
    namespace: flux-system
Note: If you have a kustomization.yaml file (which is the case in the basic flux bootstrap use-case), make sure you add the file(s) the above manifest portions are in into the resources list.
Once you commit this to Git, you should see Terraform Controller pick this up quickly. One way to confirm is:
kubectl -n flux-system get terraforms.infra.contrib.fluxcd.io

NAME READY STATUS AGE

helloworld True No drift:
main/d9c5cc348e555526ea563fb82fc901e37de4d732 1m
Simple, wasn’t it?
What else is there?
The Terraform Controller team has been hard at work and made sure that many of the common use-cases are supported. Above we covered the automation mode, some teams might want more control, so there’s a “plan and manual apply” mode as well. You can configure it as well to just do “drift detection only”.
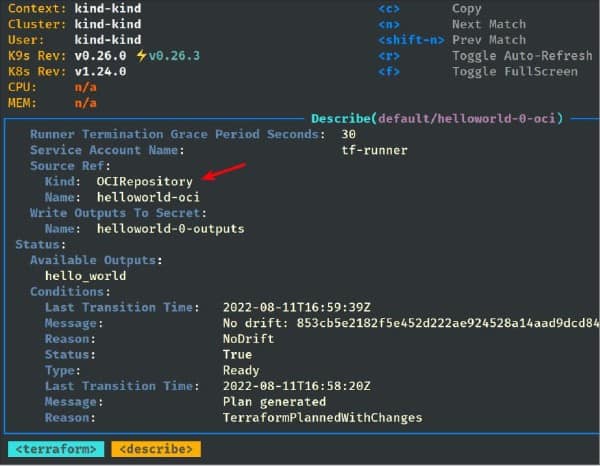
And there’s more, you can disable drift detection, use it with AWS EKS IRSA, interact with Terraform (set variables, manage terraform state), there’s health checks and lots of other flexibility. OCI fans will love to hear that it supports OCI Artifacts as Source as well.
It is also integrated with Terraform Cloud and Terraform Enterprise.
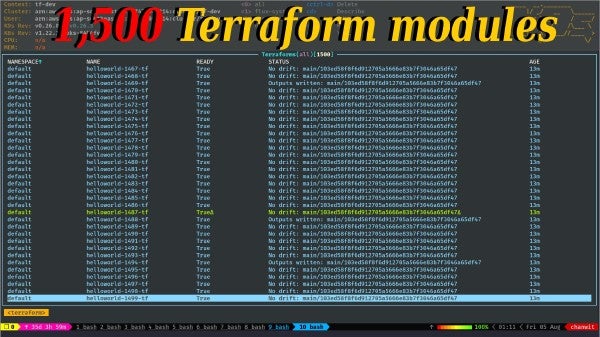
In past weeks the performance of the Terraform Controller has been improved significantly as well. Now the controller is greatly scalable to reconcile and provision a high volume of Terraform modules concurrently. The team has recently tested the controller with 1,500 Terraform modules.
In the most recent release (v0.12.0) new features are: custom backend support, interoperability with Flux’s Notification Controller, and supporting human-readable plan output in ConfigMap.
And there’s more to come, check out the team’s roadmap. While you are checking it out, please give feedback as well. If you are missing something, if you like it, if you want to contribute – the team is eager to hear from you.
Want to learn more?
Priyanka “Pinky” Ravi, Developer Experience Engineer at Weaveworks gave a great introduction to the Terraform Controller a couple of weeks ago. Take a look to dive into some of the finer details of this!
You are lucky, there is more to come! Pinky gave an on-demand webinar as part of the CNCF series. You can sign up for it here.
Title: How to GitOps your Terraform!
Presenter: Priyanka “Pinky” Ravi
Link: Registration here.