Guest post by Michał Różycki, Software Engineer and Kubernetes Advocate at Grape Up
With this article, the audience gets to know effective ways to ensure Kubernetes security, using must-have solutions, proven practices, and the best tools empowering building and maintaining a secure environment on the platform. From the basic rules for creating and managing containers to the guidelines for securing access to the cluster, the article explains similarities to a simple HTTP server, TLS communication, authentication, and authorization methods. Summing up such an important thread, the article provides an introduction to security policies with examples of PodSecurityPolicy and NetworkPolicy in Kubernetes.
Security in Kubernetes and cloud-native needs to be analyzed at every level that impacts the way applications work:
- Cloud security is related to a cloud provider and infrastructure like public vs. private network.
- Cluster security covers authentication, internal communication, or different types of policies.
- Container – all the security measures and methods during build and maintenance steps.
- Code which should be the developers’ concern how to write a secure application.
All these layers affect the overall security of the Kubernetes stack, and it’s crucial to ensure high-quality solutions at every stage as poor security standards at a lower level cannot be fixed with the development of a higher layer.
Ensuring container security
Container security is widely explained in numerous articles, but all these insights can be summarized by three fundamental rules. The first one comes to using a minimal base image for a container. When aiming to start fast, we set some base images with plenty of built-in features. But in the end, we may see that’s not a good idea. The larger the base is, the more issues may occur. The scan below shows the top 10 most downloaded images from dockerhub.
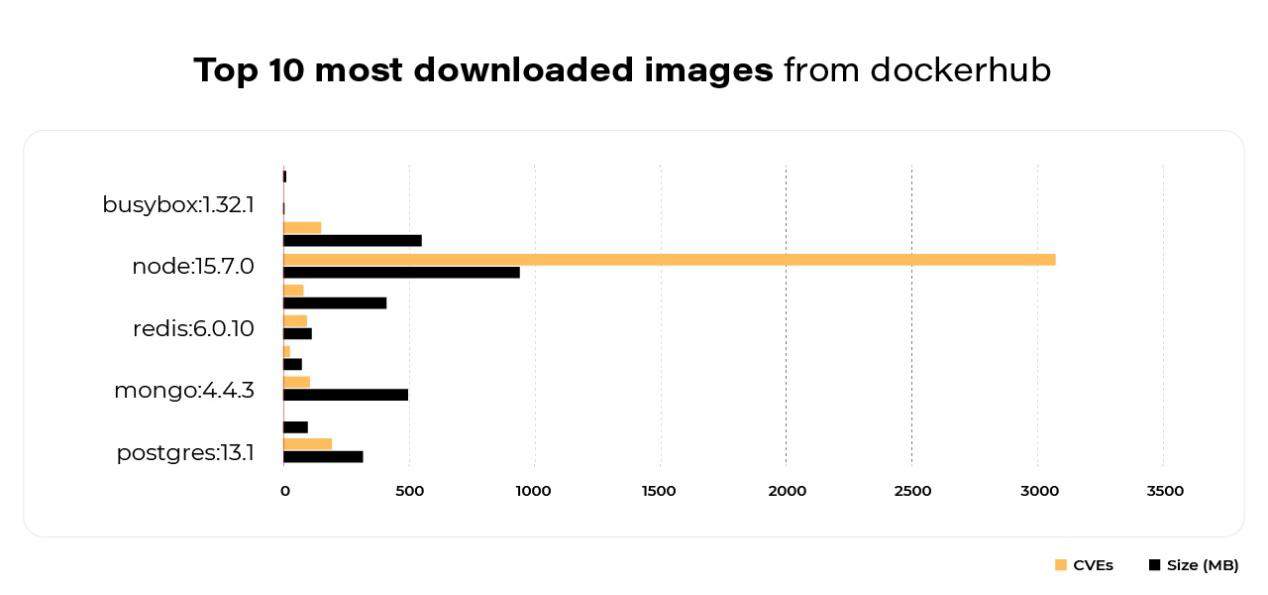
Here occurs a simple dependency. The bigger and more robust the images are, the more issues (CVEs) appear there. To avoid unnecessary problems in the future, it’s better to use bare minimum features.
The second rule focuses on specifying a user instead of a root. If a user is not specified in a Dockerfile, then the root is used by default. It may be risky, so it’s better to use a different user instead. Many times, a base image already provides a custom user. For example, there is a Postgres user in the Postgres image or mysql in the mariadb image. The recommended solution here is to use it with a USER directive in a Dockerfile.
The third rule prioritizes using a specific tag for a base. Assuming that the newest version of a base image will be the most secured one, developers often use the latest tag. In general, that is true, but it may bring some new security issues and unexpected changes. So obviously, it’s better to use a specific version tag. Worth keeping in mind, in that case, is the fact that while not specify a version then Docker uses the latest one by default.
Those 3 basic rules work well for building own Docker image. What with pulling already created containers? Usually, there is no time to manually inspect images and check whether they are safe or not. Especially when willing to check for some well-known threats and vulnerabilities. In that case, an image can be scanned for Common Vulnerabilities and Exposures (CVEs). There are plenty of tools to do that. For example, Clair or Trivy. They work pretty similarly – they scan images using external databases with known vulnerabilities. Those external DBs are often provided by OS vendors. To scan an image, we can simply run the command and after few seconds the answer comes.
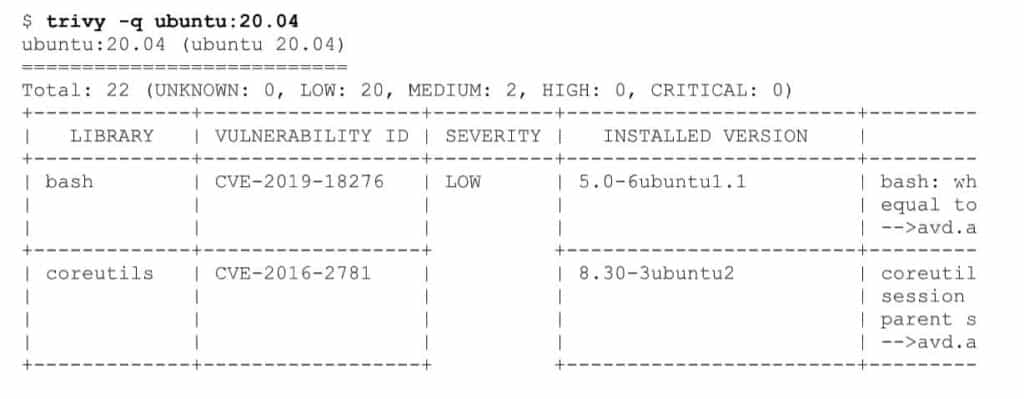
Worth mentioning is that those tools sometimes use different databases, so there might be a different result if we use Clair. But mainly those differences are in the LOW and MEDIUM severity.
When following these rules, the container becomes secure, but there are still some things to keep in mind. What if someone injected there some malicious code? In order to defend against such an attack, we have to somehow securely and confidently identify the image. There has to be some tool that guarantees such confidence, and there is one. It’s called Notary and is used by Docker Content Trust. In simple words, it creates a few metadata files/signatures signed with different keys that allow verifying the integrity and freshness of the image. From the developer’s perspective, everything works pretty much the same. For Docker, we just have to set the environment variable:
export DOCKER_CONTENT_TRUST=1
With such a solution, the Docker engine verifies image signatures before we pull them and push the signatures with the image. The only problem with DCT is that Kubernetes does not support it, and you need to work around that with additional tools.
So, we have our image scanned and signed, and now we should store it securely. We can use dockerhub, but it is safer to run our own docker registry internally. Of course, we have to maintain that, but it provides valuable benefits:
- We have full control over the images that are used. We can even enforce using our local registry only.
- Besides, most of the private docker registries support image scanning. Which is not provided by Docker.
- The last thing is that Docker helps itself to move to a private registry because of recent rate limits (409 Too many requests).
Now we see another three golden rules – scan, sign, and store. It’s not all we can do to make containers secure, but it is already more than enough.
Providing cluster security
Once the security of a container is provided, we can focus on cluster security. The crucial part here is understanding how Kubernetes works. We send a request, it is processed, saved in the etcd, and we get a response. Sounds like a fancy HTTP server with an etcd in the back. Then we can start from security rules that apply to a simple HTTP server in order to secure access to the cluster.
The first rule comes to TLS. We should enable the TLS for all API traffic and in-cluster components communications. Furthermore, it’s recommended to stop using insecure-skip-tls-verify in a kubeconfig. When it is already configured, we can specify how to control access to the API server. It is a three-step process.
The first step is authentication. Let’s think again about the apiserver as a simple HTTP server, then what are the HTTP auth methods? Kubernetes supports most of them, so there are:
- basic authentication, which in fact is already deprecated in K8S, it was just a file with static user: passwords
- bearer tokens – in K8S it can be a static token from a file that contains user and group info as well. It should be in the format of the:
token, user, uid, “group1,group2,group3” - Another token that can be used to authenticate is the ServiceAccount token. For each service account created there is a secret generated that contains the token (it is done with ServiceAccount admission controller) with name and namespace information. By default, ServiceAccount tokens are signed with a Kubernetes TLS certificate but this can be easily changed.
- Another method is to use client certificates. To enable that, we have to provide a CA file to the apiserver that will be used to validate certificates provided by users. This CA file can be the same one that was used to create TLS certificates.
- The next option is to use the OpenID Connect token that can be obtained from any IdentityProvider and sent with your request. In order to do that with kubectl, we can simply use –token flag or put your token into kubeconfig. Then signature and expiry date are validated by apiserver. We just need to configure the apiserver to let it know about our IdentityProvider and all the validation is done automatically. The only problem here is that we have to somehow obtain the token – Kubernetes does not provide the login page.
- The last methods are webhook or proxy auth. We have put them together because they are just a delegation of the logic used to validate the user. In the case of webhook – Kubernetes apiserver simply forward the token to the logic that has to respond in a proper format. So, based on that logic user will be authenticated or not.
And in the case of proxy auth, it is the proxy server’s responsibility to authenticate the user and then put additional headers with user and group information into the request.
In order to use any of those methods, we need to properly configure the apiserver. The documentation recommends using at least ServiceAccount tokens and some other method. We encourage everyone to use OpenID Connect or Webhook/Proxy auth as those methods are very flexible ways of authentication and secure if configured properly.
Now when our user is authenticated, we need to check if they are allowed to make requested operation. So, the next step is an authorization. The request already includes the username of the requester, the requested action, and the object affected by the action. Usually, it also provides group membership information and some additional details. Based on all that information apiserver decides whether the user is authorized for the requested action. The most common methods are RBAC and Webhook (which work pretty similar as for authentication). There are two more methods, but I would like to focus on RBAC only. The main concept is that the administrator defines different roles or cluster roles with specific:
- allowed action verbs (e.g., create, get, update, patch, delete)
- allowed resource, specified by API group and resource type. If needed resource names can be added as well to narrow the target resource to specific ones.
Example of such a role:
 apiVersion: rbac.authorization.k8s.io/v1
 kind: Role
 metadata:
   name: cm-reader
 rules:
 - apiGroups: [""]  # "" indicates the core API group
   resources: ["configmaps"]
   resourceNames: ["my-configmap"]
   verbs: ["get", "watch", "list"]
Then, to make it work, we have to assign that role to the subject using binding. There can be single or multiple subjects with different types, like service account, user, or group in a single binding resource, for example:
 apiVersion: rbac.authorization.k8s.io/v1
 kind: RoleBinding
 metadata:
   name: read-cms
 subjects:
 - kind: User
   name: jane       # "name" is case sensitive
   apiGroup: rbac.authorization.k8s.io
 roleRef:
   kind: Role       # this must be Role or ClusterRole
   name: cm-reader  # name of used Role or ClusterRole
   apiGroup: rbac.authorization.k8s.io
The whole mechanism is pretty simple – specify what can be done with a particular role, then bind that role to your subject (user, service account, or group). But sometimes, it may be demanding to create some more complicated Roles. For example, RBAC works only in a whitelisting manner. It does not support ‘deny’ rules, so we have to whitelist all the resources except a particular one you would like to deny. But then, there is a helpful command that can be used to check whether our subject is properly allowed/blocked from certain actions:
kubectl auth can-i list secrets --namespace dev --as daveSo we have our requester authenticated and authorized to make an action. But it’s not enough. We can control it even more with the last step – Admission control. This is a place where admission controllers live. We have “mutating” controllers that modify the request, or we have “validating” controllers that may reject.
They are executed only if the request is going to create, modify, delete, or connect to (proxy) an object. If one of them rejects, then already the whole request is rejected. They can modify the request and, for example, set some default values. There are plenty of those admission controllers, like:
- PodSecurityPolicy that will be described later,
- DefaultStorageClass that can set default storage class if there is none specified
- There are as well Webhook admission controllers. One of the example admission controllers that use webhook is Connaisseur (https://github.com/sse-secure-systems/connaisseur). Apiserver executes Webhook external logic that verifies if the image from the request is properly signed. It simply adds support similar to DockerContentTrust to Kubernetes.
- There are also plenty more, and you can find them here: https://kubernetes.io/docs/reference/access-authn-authz/admission-controllers/
To sum up. We have fully set up access control to our cluster. The request has to go through Authentication -> Authorization -> AdmissionControl:
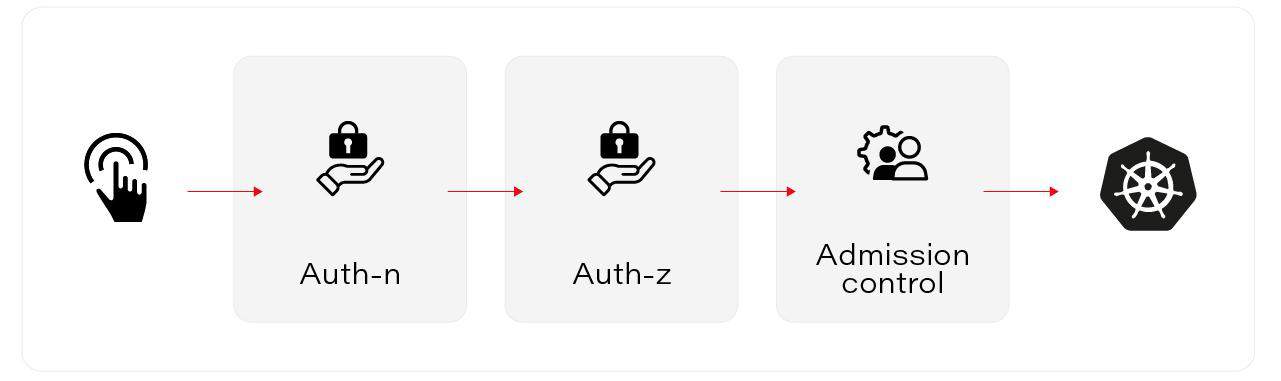
Then it ends in apiserver and is processed. So now we can use those admission controllers and other Kubernetes resources to control how Pods are running.
Policies
First, we can limit the CPU and RAM usage of our Pods. In order to do that, we have two different resources:
- ResourceQuota, which limits the whole usage of all pods in a namespace,
- LimitRange does the same, but it affects each pod in a namespace.
- See below examples:
| apiVersion: v1kind: ResourceQuotametadata: name: mem-cpu-demo namespace: demospec: hard: requests.cpu: “1” requests.memory: 1Gi limits.cpu: “2” limits.memory: 2Gi | apiVersion: v1kind: LimitRangemetadata: name: cpu-min-max namespace: demospec: limits: – default: cpu: “800m” defaultRequest: cpu: “500” max: cpu: “800m” min: cpu: “200m” type: Container |
PodSecurityPolicy
Here come PodSecurityPolicy and NetworkPolicy. The first is responsible for setting-up Pod/Container security context, and the second one is for the in-cluster firewall. Before we explain more about PodSecurityPolicy, let’s check out Pod security in the first place. How is it done?
It is called SecurityContext. You can set up this on your Pod or Container level, and it gives you the ability to configure some security parameters there. Like privileged containers, running as concrete users, Linux Capabilities or SELinux, AppArmor, or Seccomp options. See below example of how it can be used:
 apiVersion: v1
 kind: Pod
 metadata:
   name: security-context-demo
   namespace: demo
 spec:
   securityContext:
     runAsUser: 1000
     runAsGroup: 3000
     fsGroup: 2000
   volumes:
   - name: sec-ctx-vol
     emptyDir: {}
   containers:
   - name: sec-ctx-demo
     image: busybox
     command: ["sh", "-c", "sleep 1h"]
     volumeMounts:
     - name: sec-ctx-vol
       mountPath: /data/demo
     securityContext:
       allowPrivilegeEscalation: false
As an administrator, we can set or enforce those parameters for users. This is where PodSecurityPolicy (PSP) is used. It can modify the user’s request with some default params. Besides, it may prevent Pods from starting if they do not match the conditions you have specified. PSP is a cluster-level resource. It allows you to control the securityContext plus additional parameters like volume types or hostNetwork usage (more details can be found here: https://kubernetes.io/docs/concepts/policy/pod-security-policy/):
 apiVersion: policy/v1beta1
 kind: PodSecurityPolicy
 metadata:
   name: restricted
 spec:
   privileged: false
   allowPrivilegeEscalation: false
   volumes: # Allow core volume types.
     - 'configMap'
     - 'emptyDir'
     - 'projected'
     - 'secret'
     - 'downwardAPI'
     - 'persistentVolumeClaim'
   hostNetwork: false
   hostPID: false
   runAsUser:
     rule: 'MustRunAsNonRoot’
   fsGroup:
     rule: 'MustRunAs'
     ranges: # Forbid the root group.
       - min: 1
         max: 65535
   readOnlyRootFilesystem: false
One important thing is that it is not enough to enable PSP as an optional admission controller on apiserver. We have to authorize the user or ServiceAccount to use that PSP. In order to do that, we have to set up a proper Role or CluserRole which grants access to “use” the desired policy. Then, simply bind that role to our subject and now it does all the magic.
| apiVersion: rbac.authorization.k8s.io/v1kind: ClusterRolemetadata: name: psp:restrictedrules:- apiGroups: [‘policy’] resources: [‘podsecuritypolicies‘] verbs: [‘use‘] resourceNames: – ‘restricted’ | apiVersion: rbac.authorization.k8s.io/v1kind: RoleBindingmetadata: name: sa:psp:restricted namespace: demoroleRef: kind: ClusterRole name: psp:restricted apiGroup: rbac.authorization.k8s.iosubjects:- kind: ServiceAccount name: default namespace: test- kind: User apiGroup: rbac.authorization.k8s.io name: jane |
Another important note – even if we bind the user to use the policy and you create the Deployment. In the end, it is the service account that creates a pod. Yes, you have to set up service accounts as well.
NetworkPolicy
As we already mentioned, using NetworkPolicies allows us to build an in-cluster firewall. It works in whitelisting manner, which means once it’s set up, it usually blocks all the network connections, and you have to whitelist desired ones. Please note it is a namespaced resource, but it may affect other pods as well, eg. if we block ingress connections, then pods from other namespaces cannot connect to ours.
There are few typical fields in the configuration.
- PodSelector – this matches the pods that are blocked. If we put an empty object here, then all pods in a namespace are affected.
- PolicyType – this can be Ingress, Egress, or both. Simply this defines which type of network traffic is affected (blocked).
- Ingress where we can define all the rules. It whitelists all the “from” sources to defined port.
- Egress whitelists outcoming traffic “to” listed targets on the selected port.
 apiVersion: networking.k8s.io/v1
 kind: NetworkPolicy
 metadata:
   name: test-network-policy
   namespace: default
 spec:
   podSelector:
     matchLabels:
       role: db
   policyTypes:
   - Ingress
   - Egress
   ingress:
   - from:
     - ipBlock:
         cidr: 172.17.0.0/16
         except: [ 172.17.1.0/24 ]
     - namespaceSelector:
         matchLabels:
           project: myproject
     ports:
     - protocol: TCP
       port: 6379
   egress:
   - to:
     - ipBlock:
         cidr: 10.0.0.0/24
     - podSelector:
         matchLabels:
           role: frontend
     ports:
     - protocol: TCP
       port: 5978
For example, to allow all egress (outgoing) connections, you can setup below policy:
 apiVersion: networking.k8s.io/v1
 kind: NetworkPolicy
 metadata:
   name: allow-all-egress
   namespace: demo
 spec:
   podSelector: {}
   egress:
   - {}
   policyTypes:
   - Egress
On the other hand, if you want to block all incoming connections:
 apiVersion: networking.k8s.io/v1
 kind: NetworkPolicy
 metadata:
   name: default-deny-ingress
   namespace: demo
 spec:
   podSelector: {}
   policyTypes:
   - Ingress
Provided practices and suggestions work well for many cases and empower enterprises to secure their Kubernetes stack. But as the adoption of Kubernetes increases and many companies build their customized solutions, it’s necessary to take these rules as an introduction and best practice that often requires additional, personalized methods and tools.
While securing a cluster, we need to balance between ease of use and safety. We can create very restrictive rules that will make our cluster very hard to use for non-cluster-admin users. We do not want to end up with a lock that requires ten different keys to be opened, and for sure, we do not want a lock that can be opened without a key at all. In the end, security is important but the main goal is to run your app and provide it to your customers.
Author
Michał Różycki is a Software Engineer and Kubernetes Advocate at Grape Up. Michał develops and manages Cloudboostr – multi-cloud enterprise Kubernetes. He collaborates with numerous enterprises on adopting Kubernetes.